Labels
- Alikas Scraps
- All Dolled Up Store
- Amy Marie
- Annaica
- Arthur Crowe
- Babycakes Scraps
- Barbara Jensen
- Bibi's Collections
- Black Widow Creationz
- Blu Moon
- Bonnies Creations
- Bookwork Dezines
- Broken Sky Dezine
- Carita Creationz
- Carpe Diem Designs
- CDO
- Celinart Pinup
- Celine
- Chacha Creationz
- Charmed Designs
- Cherry Blossom Designs
- Chili Designz
- Cluster Frame
- Creative Misfits
- Creative Scraps by Crys
- Curious Creative Dreams
- Danny Lee
- Derzi
- Designs by Ali
- Designs by Joan
- Designs by Ketura
- Designs By Norella
- Designs by Vi
- Diana Gali
- Diry Art Designs
- Disturbed Scraps
- Dreaming With Bella
- Eclipse Creations
- Elegancefly
- Extras
- Fabulous Designz
- Forum Set
- Foxy's Designz
- Freek's Creation
- FTU
- FwTags
- Goldwasser
- Gothic Inspirations
- Gothic Raven Designs
- Graphfreaks
- Hania's Designs
- Happy Pumpkin Studios
- Horseplay's Pasture Designs
- indie-Zine
- Irish Princess Designs
- Ishika Chowdhury
- Kaci McVay
- Kajenna
- katharine
- Katherine
- Khloe Zoey
- Killer Kitty
- Kissing Kate
- KiwiFirestorm
- Kiya Designs
- Kizzed by Kelz
- KZ Designz
- Lady Mishka
- Lil Mz Brainstorm
- Maiden of Darkness
- Mariel Designs
- MellieBeans
- Michelle's Myths
- Midnight Shadow
- Misticheskya
- MistyLynn's Creations
- MMeliCrea Designz
- Moon Vixen Designs
- NaSionainne
- Ninaste
- Niqui Designs
- Pandora
- Picsfordesign
- Pink Paradox Productions
- Radyga Designs
- Redefined Designs
- Rissa's Designs
- Schnegge
- ScottishButterfly Creations
- Scrappin Krazy Designs
- Scrappin With Lil Ol Me
- Scraps and the City
- Scraps Dimensions
- Scraps From The Heart
- Scraps N Company
- Scraps with Attitude
- Shining Star Art
- Skyscraps
- Sleek N Sassy Designs
- Sophisticat Simone
- Souldesigner
- Soxsational Scraps
- Spazz
- Starlite and Soul
- Stella Felice
- Tammy Welt
- Tasha's Playground
- The PSP Project
- Thrifty Scraps by Gina
- Tiny Turtle Designs
- Upyourart
- Verymany
- Wendy Gerber
- Whisper In the Wind
- Wick3d Creationz
- Wicked Diabla
- Yude's Kreationz
Blog Archive
Thursday, May 30, 2013
SPICY HOT BABE
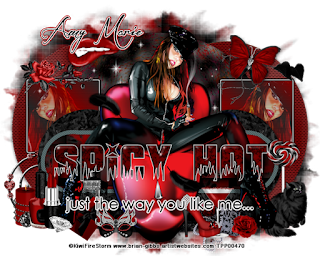
Supplies needed:
I am using the amazing art from KiwiFireStorm for this tutorial, which you can find here
Scrapkit: I am using an awesome kit from Amy Marie called "Red Hot" which you can get by going here
Template 35 from Millie which can be found here
Mask 302 from Weescotslass here
Plugins used: Cybia - Screenworks, Penta - Jeans, Eyecandy 4000 - Marble, Eyecandy 4000 - Glass, Xero-Radiance, Xero-Bad Dream, Lokas 3D Shadow
----------------------------
This tutorial is written for those who have working knowledge of PSPX2 (any version will do).
This tutorial was written by me on May 30, 2013. Please do not copy or paste on any other forum, website or blog provide link back to tut only. Please do not claim as your own. This tutorial is copyrighted to me. Any resemblance to any other tutorial is purely coincidental.
Ok - let's start and remember to save often.
Open the template and using your shortcut keys on your keyboard (SHIFT+D) duplicate the template as a new image. Close the original and delete the copywrite layer.
Adjust Canvas size to 750 x 600 (you can resize/crop later)
Select "Spicy Hot" Wordart 11 layer
Select all, float, defloat
Selections, Modify, Contract by 3
Add new raster layer and flood-fill with gradient color of choice
Select none
Apply Eyecandy Marble with the following settings:
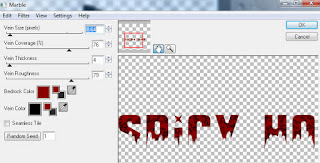
Apply Eyecandy Glass on default settings
Merge down to original wordart layer
Select Oval frame 10 layer
Select all, float, defloat
Add new raster layer and flood-fill color of choice
Select none
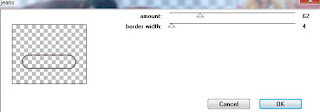
Apply Penta - Jeans with the following settings:
Delete/Hide original oval layer
Select Oval 9 layer
Select all, float, defloat
Paste paper 17
Select invert, delete, select none
Delete/Hide original oval layer
Select Circle 7 layer
Select all, float, defloat
Paste paper 20
Select invert, delete, select none
Delete/Hide original circle layer
Select Circle 8 layer and repeat above steps
Select Square 6 layer
Select all, float, defloat
Add new raster layer and flood-fill with gradient of choice(Linear style, Angle 45, Repeat 2)
Paste close-up tube of choice on top of gradient and delete
Change closeup to Screen
Apply Xero Bad Dream at default settings or random setting of choice
Drop opacity on close-up down to 65%
Apply dropshadow and merge down on top of gradient layer
Effects, Texture Effects, Blinds (Width 2, Opactity 20, Horizontal and Light from left/top checked)
Apply Eyecandy Gradient Glow on fat default settings (Glow Width 5)
Delete/Hide original square layer
Select Square 5 layer and repeat above steps
Select Oval 4 layer
Select all, float, defloat
Paste paper 21
Select invert, delete, select none
Delete/Hide original oval layer
Select Shape 3 layer
Select all, float, defloat
Paste paper 3
Select invert, delete, select none
Delete/Hide original shape layer
Select Circle 1 layer
Select all, float, defloat
Paste paper 9
Select invert, delete, select none
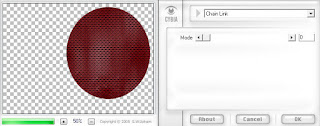
Apply Cybia Screenworks (Chain Link) on default settings
Delete/Hide original circle layer
Select Circle 2 layer and repeat above steps
Copy and paste tube of choice and position where desired
Apply Xero Radiance at setting of choice
Apply Lokas 3D Shadow at default settings
Select Element 36 - resize by 55%
Paste and position on bottom left side
Select Element 38 - resize by 25%
Paste and position on bottom left
Select Element 29 - resize by 40%
Paste and position on bottom left
Select Element 30 - resize by 40%
Paste and position on bottom left
Select Element 54 - resize by 40%
Paste and position on bottom right side
Select Element 46 - resize by 35%
Paste and position on bottom
Select Element 8 - resize by 25%
Paste and position on bottom
Select Element 75 - resize by 30%
Paste and position on bottom
Paste paper 17
Move layer to the bottom of the template
Apply Mask 302
Merge group and move to the bottom
Add any additional elements you like.
Add any dropshadows you like
Crop and resize as desired
Add copyright info, license number and name
You're done! Thanks for trying my tutorial!
Labels:Amy Marie | 0
comments
Tuesday, May 28, 2013
ROCKIN MINX
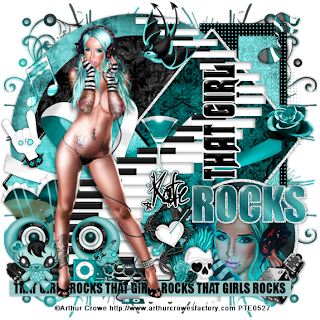
Supplies needed:
I am using the amazing art from Arthur Crowe for this tutorial, which you can find here
Scrapkit: I am using an awesome kit from Irish Princess Designs called "Rockin Minx" which you can get by going here
Template 106 from Tami which can be found here
Mask 89 from Trese here
Plugins used: Xero-Radiance, Xero-Bad Dream, Lokas 3D Shadow
----------------------------
This tutorial is written for those who have working knowledge of PSPX2 (any version will do).
This tutorial was written by me on May 28, 2013. Please do not copy or paste on any other forum, website or blog provide link back to tut only. Please do not claim as your own. This tutorial is copyrighted to me. Any resemblance to any other tutorial is purely coincidental.
Ok - let's start and remember to save often.
Open the template and using your shortcut keys on your keyboard (SHIFT+D) duplicate the template as a new image. Close the original and delete the copywrite layer.
Select Wordart Raster 8 layer
Select all, float, defloat
Add new raster layer and flood-fill with gradient or color of choice
Select none
Apply Eyecandy Glass with default settings of choice
Delete/Hide original wordart layer
Select Wordart Raster 6 layer and apply same glass settings
Select Strip Raster 10 layer
Select all, float, defloat
Add new raster layer and flood-fill with color of choice
Select none
Effect, Texture Effects, Blinds (Width 2, Opactity 20, Horizontal and Light from left/top checked)
Delete/Hide original strip layer
Select Circle Frame Raster 12
Adjust, Add/Remove Noise, Add Noise (Uniform checked, Noise 100%, Monochrome checked)
Select Circle Raster 4 layer
Select all, float, defloat
Add new raster layer and flood-fill with gradient of choice(Linear style, Angle 45, Repeat 2)
Paste close-up tube of choice on top of gradient and delete
Change closeups to Hard Light
Apply Xero Bad Dream at default settings or random setting of choice
Drop opacity on close-ups down to 65%
Apply dropshadow and merge down on top of gradient layer
Effects, Texture Effects, Blinds (Width 2, Opactity 20, Horizontal and Light from left/top checked)
Delete/Hide original circle layer
Select Diamond Frame Raster 13
Select all, float, defloat
Add new raster layer and flood-fill with color of choice
Select none
Apply Eyecandy Glass at default settings
Delete/Hide original frame layer
Select Diamond Copy of Raster 2 layer
Select all, float, defloat
Paste paper 7
Select invert, delete, select none
Delete/Hide original diamond layer
Select Diamond Frame Raster 14 layer
Adjust, Add/Remove Noise, Add Noise (Uniform checked, Noise 100%, Monochrome checked)
Select Diamond Raster 2 layer
Select all, float, defloat
Paste paper 2
Select invert, delete, select none
Delete/hide original diamond layer
Select Circle Raster 16 layer
Select all, float, defloat
Paste paper 9
Select invert, delete, select none
Delete/Hide original circle layer
Select Circle Raster 3 layer
Select all, float, defloat
Paste paper 6
Select invert, delete, select none
Delete/Hide original circle layer
Select Rectangle Raster 11 layer
Select all, float, defloat
Paste paper 1
Select invert, delete, select none
Delete/Hide original rectangle layer
Select Rectangle Raster 5 layer
Apply Effects, Texture effects, weave (Gap size 2, Width 5, Opacity 5, Fill gaps checked, Change Gap Color to color of choice)
Copy and paste tube of choice and position where desired
Apply Xero Radiance at setting of choice
Apply Lokas 3D Shadow at default settings
Select PianoStairs Element and paste on top right behind tube layer
Select Corset Element - resize by 35%
Image Free Rotate Left by 15% and paste on bottom left
Select Speakers Element - resize by 40%
Paste and position on bottom left side below strip/wordart layer
Select Bear Element - resize by 20%
Paste and position on bottom left side
Select Cross Element - resize by 30%
Paste and position on bottom right side below tube layer
Select PunkSkull Element - resize by 20%
Paste and position on bottom right side
Select Flower Element - resize by 25%
Paste and position on right side
Select New raster layer and flood fill with color or gradient of choice
Move layer to the bottom of the template
Apply Mask 89
Merge group and move to the bottom
Add any additional elements you like.
Add any dropshadows you like
Crop and resize as desired
Add copyright info, license number and name
You're done! Thanks for trying my tutorial!
Labels:Irish Princess Designs | 0
comments
BLOODY NURSE
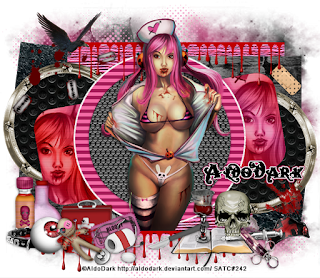
Supplies needed:
I am using the amazing art from Aldodark for this tutorial, which you can find here
Scrapkit: I am using an awesome kit from Hania's Designs called "Bloody Nurse" which you can get by going here
Template 200 from Kristen which can be found here
Mask 22 from Gina Gems here
Plugins used: VM Extravaganza - Transmission, Xero-Radiance, Xero-Bad Dream, Lokas 3D Shadow
----------------------------
This tutorial is written for those who have working knowledge of PSPX2 (any version will do).
This tutorial was written by me on May 28, 2013. Please do not copy or paste on any other forum, website or blog provide link back to tut only. Please do not claim as your own. This tutorial is copyrighted to me. Any resemblance to any other tutorial is purely coincidental.
Ok - let's start and remember to save often.
Open the template and using your shortcut keys on your keyboard (SHIFT+D) duplicate the template as a new image. Close the original and delete the copywrite layer.
Select Circle Copy of Raster 1
Select all, float, defloat
Paste paper 5
Select invert, delete, select none
Delete/Hide original circle layer
Select Circle Raster 5 layer
Select all, float, defloat
Add new raster layer and flood-fill with color of choice
Select none
Apply VM - Transmission with the following settings:
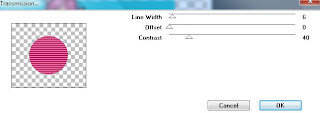
Delete/Hide original circle layer
Select Rectangle Raster 4 layer
Select all, float, defloat
Add new raster layer and flood-fill with gradient of choice(Linear style, Angle 45, Repeat 2)
Paste close-up tubes of choice on top of gradient and delete
Change closeups to Luminance (Legacy)
Apply Xero Bad Dream at default settings or random setting of choice
Drop opacity on close-ups down to 75%
Apply dropshadow and merge down on top of gradient layer
Effects, Texture Effects, Blinds (Width 2, Opactity 20, Horizontal and Light from left/top checked)
Delete/Hide original rectangle layer
Select Circle Raster 6 layer
Select all, float, defloat
Paste paper 4
Select invert, delete, select none
Delete/Hide original circle layer
Select Circle Copy of Raster 6 layer and repeat above steps
Select Frame Element 89 - resize by 50%
Paste and position on top of Circle 6
Duplicate, mirror and reposition over copy of circle 6
Select Rectangle Raster 7 layer
Select all, float, defloat
Paste paper 7
Select invert, delete, select none
Delete/hide original rectangle layer
Select Copy of Rectangle Raster 7 layer and repeat above steps
Select Rectangle Raster 8 layer
Select all, float, defloat
Add new raster layer and flood-fill with color of choice
Select none
Apply Effects, Texture Effect, Wood Grain Texture with the following settings:
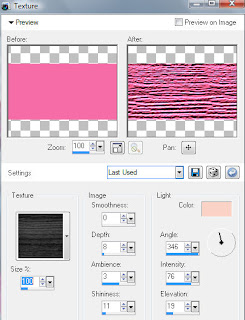
Delete/Hide original rectangle layer
Select Copy of Rectangle Raster 8 layer and repeat above steps
Select your pen tool
 (Line Style Solid, Width 5, Anti-alias checked, Foreground Material Color #c00000)
Draw a line the length of Rectangle Copy of Raster 8 and convert to raster
Apply Alien Skin Eyecandy Nature - Drip with the following settings:
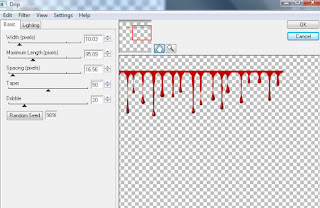
Select Rectangle Raster 8 and repeat above steps
Select Rectangle Raster 9 layer
Select all, float, defloat
Paste paper 2
Select invert, delete, select none
Delete/Hide original rectangle layer
Select Rectangle Copy of Raster 9 layer and repeat above steps
Copy and paste tube of choice and position where desired
Apply Xero Radiance at setting of choice
Apply Lokas 3D Shadow at default settings
Select Element 45 - resize by 50%
Paste and position on bottom right side
Select Element 33 - resize by 40%
Paste and position on bottom right
Select Element 51 - resize by 50%
Paste and position on bottom right
Select Element 40 - resize by 45%
Paste and postion on bottom right above book element
Select Element 84 - resize by 55%
Paste and position on bottom right above book element
Select Element 16 - resize by 25%
Paste and position on bottom right side
Select Element 55 - resize by 60%
Paste and position on bottom left
Select Element 56 - resize by 60%
Paste and position on bottom left
Select Element 70 - resize by 55%
Paste and position on the bottom left
Select Element 22 - resize by 30%
Paste and position on bottom left
Select Element 32 - resize by 45%
Paste and position on bottom left
Select Element 35 - resize by 50%
Paste and position on bottom left
Select New raster layer and flood fill with color or gradient of choice
Move layer to the bottom of the template
Apply Mask 22
Merge group and move to the bottom
Add any additional elements you like.
Add any dropshadows you like
Crop and resize as desired
Add copyright info, license number and name
You're done! Thanks for trying my tutorial!
Labels:Hania's Designs,Scraps and the City | 0
comments
Saturday, May 25, 2013
DEVILISH DEMI
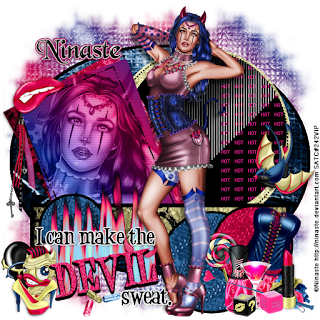
Supplies needed:
I am using the amazing art from Ninaste for this tutorial, which you can find here
Scrapkit: I am using a stunning kit from Amy Marie called "Devilish Demi" which you can get by going here
Devil Template from Deanna which can be found on the Misfits Blog here
Mask 14 from Artmama or mask of choice (She closed her blog so I am unable to provide a link)
Plugins used: Alien Skin Eyecandy 5 Nature - Fire, Tramages - Tow The Line, Xero-Radiance, Xero-Bad Dream, Lokas 3D Shadow
----------------------------
This tutorial is written for those who have working knowledge of PSPX2 (any version will do).
This tutorial was written by me on May 25, 2013. Please do not copy or paste on any other forum, website or blog provide link back to tut only. Please do not claim as your own. This tutorial is copyrighted to me. Any resemblance to any other tutorial is purely coincidental.
Ok - let's start and remember to save often.
Open the template and using your shortcut keys on your keyboard (SHIFT+D) duplicate the template as a new image. Close the original and delete the copywrite layer.
Adjust Canvas Size by 650 x 500 (you can resize later)
Select Devil Top Wordart layer
Select all, float, defloat
Add new raster layer and flood-fill with color of choice
Select none
Adjust, Add/Remove Noise, Add Noise (Uniform checked, Noise 100%, Monochrome checked)
Delete/Hide original wordart layer
Select Devil Bottom layer
Select all, float, defloat
Add new raster layer
Apply Alien Skin Eyecandy Nature - Fire with the following settings:
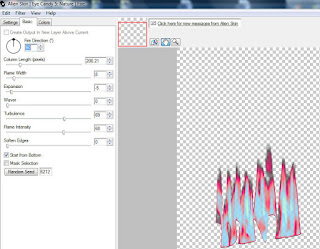
Select none
Move the fire layer below Devel Bottom layer
Select Left Pink Circle layer
Select all, float defloat
Paste paper 7
Select invert, delete, select none
Delete/Hide original circle layer
Select Black Circle layer and repeat above steps
Select Left White Circle layer
Select all, float, defloat
Add new raster layer and flood-fill with color of choice
Select none
Delete/Hide original circle layer
Select Right White Circle and Bottom White Circle layer and repeat above steps
Select Right Pink Circle layer
Select all, float, defloat
Paste paper 6
Select invert, delete, select none
Delete/Hide original circle layer
Select White Strip layer
Select all, float, defloat
Paste paper 10
Select invert, delete, select none
Delete/Hide original strip layer
Select Grey Square layer
Select all, float, defloat
Add new raster layer and flood-fill with gradient of choice(Linear style, Angle 45, Repeat 2)
Paste close-up tube of choice on top of gradient and delete
Change closeup to Luminance (Legacy)
Apply Xero Bad Dream at default settings or random setting of choice
Drop opacity on close-up down to 70%
Apply dropshadow and merge down on top of gradient layer
Effects, Texture Effects, Blinds (Width 2, Opactity 20, Horizontal and Light from left/top checked)
Delete/Hide original square layer
Select White Square layer
Select all, float, defloat
Paste paper 12
Select invert, delete, select none
Delete/Hide original square layer
Select Overlay layer
Add new raster layer and flood-fill with color of choice
Go back and reselect overlay
Select all, float, defloat
Select color layer you just fill, select invert, delete, select none
Delete/Hide original overlay layer
Select Black Circle layer
Apply Tramages - Tow the Line with the following settings:
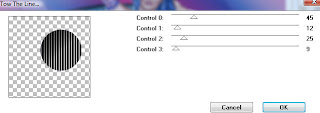
Select White Circle layer
Select all, float, defloat
Paste paper 2
Select invert, delete, select none
Delete/hide original circle layer
Select Pink Oval layer
Select all, float, defloat
Paste paper 15
Select invert, delete, select none
Delete/Hide original oval layer
Select White Oval layer
Select all, float, defloat
Add new raster layer and flood-fill with color of choice
Select none
Delete/Hide original oval layer
Copy and paste tube of choice and position where desired
Apply Xero Radiance at setting of choice
Apply Lokas 3D Shadow at default settings
Select Element 5 - resize by 35%
Paste and position on right side
Select Element 113 - resize by 50%
Image Free Rotate Right by 15% and paste on bottom right side
Select Element 12 - resize by 35%
Paste and position on bottom right
Select Element 116 - resize by 30%
Paste and position on bottom right
Select Element 99 - resize by 30%
Paste and position on bottom right
Select Element 75 - resize by 35%
Paste and position on bottom right
Select Element 102 - resize by 30%
Paste and position on bottom left side
Select Element 71 - resize by 35%
Paste and position on bottom left below duck element
Select Element 115 - resize by 30%
Paste and position on bottom left
Select New raster layer and flood fill with color or gradient of choice
Move layer to the bottom of the template
Apply Mask
Merge group and move to the bottom
Add any additional elements you like.
Add any dropshadows you like
Crop and resize as desired
Add copyright info, license number and name
You're done! Thanks for trying my tutorial!
Labels:Amy Marie,Ninaste,Scraps and the City | 0
comments
Friday, May 24, 2013
GOTHY SUZANNE
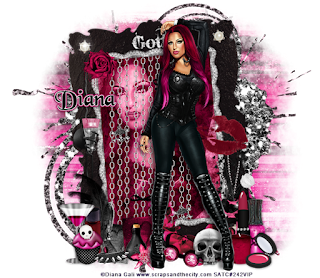
Supplies needed:
I am using the amazing art from Diana Gali for this tutorial, which you can find here
Scrapkit: I am a gorgeous kit from Disturbed Scraps called "Goth & Hot" which you can get by going here
Mask 110 from Designs by Vaybs which you can find here
Plugins used: Xero-Radiance, Xero-Bad Dream, Lokas 3D Shadow
----------------------------
This tutorial is written for those who have working knowledge of PSPX2 (any version will do).
This tutorial was written by me on May 24, 2013. Please do not copy or paste on any other forum, website or blog provide link back to tut only. Please do not claim as your own. This tutorial is copyrighted to me. Any resemblance to any other tutorial is purely coincidental.
Ok - let's start and remember to save often.
Open up a 750 x 650 blank canvas (we can resize it later)
Select Frame Element 49 and paste in the center of the canvas
Resize by 70%
Select your magic wand tool and click in the center of your frame (Add (Shift), RGB Value, Tolerance 25, Contiguous checked, Feather 0)
Selections, Modify, Expand by 5
Paste paper 12
Select invert, delete
Paste close-up tube on top of paper where desired and delete
Select none
Change close-up tube to Luminance (Legacy)
Drop opacity down to 75%
Apply Xero- Bad Dream at settings of choice
Apply dropshadow and merge down on top of paper layer
Move paper layer below frame
Select Element 4 - resize by 65%
Paste below frame layer where desired
Paste tube of choice where desired on top
Apply Xero Radiance at setting of choice
Apply Lokas 3D Shadow at default settings
Select Element 79 - resize by 40%
Paste and position on bottom left
Select Element 109 - resize by 25%
Paste and position on bottom left
Select Element 89 - resize by 25%
Paste and position on bottom left
Select Element 86 - resize by 40%
Image Free Rotate Left by 15% and paste on bottom left
Select Element 42 - resize by 25%
Paste and position on bottom left
Select Element 76 - resize by 40%
Paste and position on bottom right
Select Element 110 - resize by 40%
Paste and position on bottom right
Select Element 88 - resize by 25%
Paste and position on bottom right
Select Element 103 - resize by 25%
Image mirror and paste on bottom right
Select Element 80 - resize by 70%
Paste and position on bottom
Select Element 31
Paste in the center of canvas and move to the bottom layer
Paste paper 1
Move layer to the bottom of the template
Apply Mask 110
Merge group and move to the bottom
Add any additional elements you like.
Add any dropshadows you like
Crop and resize as desired
Add copyright info, license number and name
You're done! Thanks for trying my tutorial!
TEMPTING ROXANNE
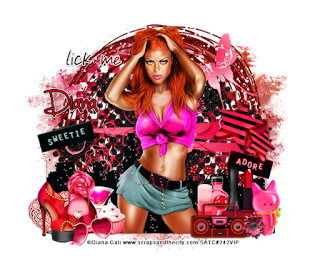
Supplies needed:
I am using the amazing art from Diana Gali for this tutorial, which you can find here
Scrapkit: I am a gorgeous kit from Disturbed Scraps called "Roxanne - Hot Summer" which you can get by going here
Mask 176 from Aqua which you can find on the Misfits Blog here
Plugins used: Alient Skin Xenofex 2 - Constellation, Xero-Radiance, Xero-Bad Dream, Lokas 3D Shadow
----------------------------
This tutorial is written for those who have working knowledge of PSPX2 (any version will do).
This tutorial was written by me on May 24, 2013. Please do not copy or paste on any other forum, website or blog provide link back to tut only. Please do not claim as your own. This tutorial is copyrighted to me. Any resemblance to any other tutorial is purely coincidental.
Ok - let's start and remember to save often.
Open up a 750 x 650 blank canvas (we can resize it later)
Select Element 59 and paste in the center of the canvase
Resize by 65%
Select Element 60 and paste in the center above element 59
Resize by 80%
Select Element 46 and paste where desired on top of element 59
Select Element 55 - resize by 45%
Paste and position on right side
Select Element 37 - resize by 70%
Paste and position on the bottom where desired
Apply Xenofex 2 - Constellation with the following settings:
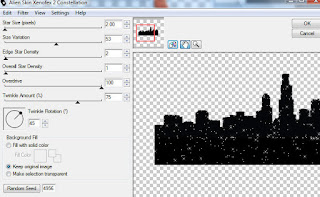
Paste tube of choice where desired on top
Apply Xero Radiance at setting of choice
Apply Lokas 3D Shadow at default settings
Select Element 1 - resize by 20%
Image Free Rotate Left 15% and paste on bottom left
Select Element 73 - resize by 30%
Paste and position on bottom left
Select Element 72 - resize by 35%
Paste and position on bottom left
Select Element 74 - resize by 35%
Image Free Rotate Left by 15% and paste on bottom left
Select Element 35 - resize by 40%
Paste and position on bottom left
Select Element 84 - resize by 75%
Paste and position on bottom right side
Select Element 78 - resize by 55%
Paste and position on bottom right
Select Element 85 - resize by 55%
Paste and position on bottom right side
Select Element 30 - resize by 55%
Paste and position on bottom right
Select Element 98 - resize by 40%
Paste and position on bottom right
Paste paper 1
Move layer to the bottom of the template
Apply Mask 176
Merge group and move to the bottom
Add any additional elements you like.
Add any dropshadows you like
Crop and resize as desired
Add copyright info, license number and name
You're done! Thanks for trying my tutorial!
Thursday, May 23, 2013
WAITING FOR BELL
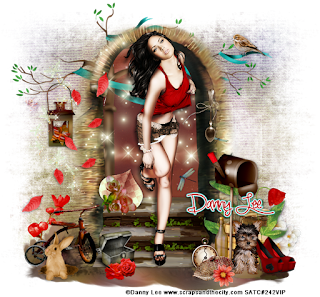
Supplies needed:
I am using the amazing art from Danny Lee for this tutorial, which you can find here
Scrapkit: I am a gorgeous kit from Bibi's Collection called "Bell" which you can get by going here
Mask 249 from Trese which you can find here
Plugins used: Xero-Radiance, Xero-Bad Dream, Lokas 3D Shadow
----------------------------
This tutorial is written for those who have working knowledge of PSPX2 (any version will do).
This tutorial was written by me on May 23, 2013. Please do not copy or paste on any other forum, website or blog provide link back to tut only. Please do not claim as your own. This tutorial is copyrighted to me. Any resemblance to any other tutorial is purely coincidental.
Ok - let's start and remember to save often.
Open up a 700 x 650 blank canvas (we can resize it later)
Select Element 40 and paste in the center of the canvas - resize by 75%
Select your Freehand Selections Tool and draw a selection around the center (door) area (Add (Shift), Feather 0, Smoothing 4, Anti-alias checked)
Paste paper 7
Select invert, delete, select none
Move paper below element layer
Drop opacity on paper down to 82%
Select Element 2 - resize by 65%
Paste and position on the bottom below element 40
Select Element 42 and paste on the bottom below element 40
Paste tube of choice where desired on top
Apply Xero Radiance at setting of choice
Apply Lokas 3D Shadow at default settings
Select Element 22 - resize by 55%
Paste and position where desired below element 40
Select Element 61 and paste on bottom right side
Select Element 52 - resize by 45%
Paste and position on bottom right side
Select Element 21 - resize by 45%
Paste and position on bottom right side
Select Element 51 - resize by 35%
Image mirror and paste on bottom right side
Select Element 56 - resize by 50%
Paste and position on bottom right side
Select Element 63 - resize by 50%
Image mirror and paste on bottom left side
Select Element 29 - resize by 40%
Paste and position it on the left side
Select Element 46 - resize by 60%
Paste and position on left side
Select Element 73 - resize by 40%
Paste and position on bottom left side
Select Element 23 - resize by 20%
Paste and position on bottom left side
Paste paper 1
Move paper layer to the bottom
Apply Mask 249
Merge group and move to the bottom
Add any additional elements you like.
Add any dropshadows you like
Crop and resize as desired
Add copyright info, license number and name
You're done! Thanks for trying my tutorial!
Monday, May 20, 2013
SEXY FIONA

Supplies needed:
I am using the amazing art from Diana Gali for this tutorial, which you can find here
Scrapkit: I am using a stunning kit from Bibi's Collections called "Fiona" which you can get by going here
Template 175 from Leah which can be found here
Summer Mask 4 from Jenny which you can find on the Misfits Blog here
Plugins used: Eyecandy 4000 - Glass, Xero-Radiance, Xero-Bad Dream, Lokas 3D Shadow
----------------------------
This tutorial is written for those who have working knowledge of PSPX2 (any version will do).
This tutorial was written by me on May 20, 2013. Please do not copy or paste on any other forum, website or blog provide link back to tut only. Please do not claim as your own. This tutorial is copyrighted to me. Any resemblance to any other tutorial is purely coincidental.
Ok - let's start and remember to save often.
Open the template and using your shortcut keys on your keyboard (SHIFT+D) duplicate the template as a new image. Close the original and delete the copywrite layer.
Adjust Canvas Size by 650 x 500 (you can resize later)
Select all Wordart layers and Group them together
Move layers to the top like I did if you desire
Select Words 1 layer
Select all, float, defloat
Add new raster layer and flood-fill with color of choice
Select none
Adjust, Add/Remove Noise, Add Noise (Uniform checked, Noise 60%, Monochrome checked)
Delete/Hide original wordart layer
Select Words 2 layer
Select all, float, defloat
Add new raster layer and flood-fill with gradient of choice
Select none
Apply Eyecandy Glass at default settings
Delete/Hide original wordart layer
Select Circle 1 layer
Select all, float, defloat
Paste paper 12
Select invert, delete, select none
Delete/Hide original circle layer
Select Element 72 - resize by 70%
Paste and position on top of circle 1 layer
Select Circle 2 layer
Select all, float defloat
Paste paper 8
Select invert, delete, select none
Delete/Hide original circle layer
Select Circle 3 layer
Select all, float, defloat
Add new raster layer and flood-fill with color of choice
Select none
Apply Effects, Texture Effects, weave (Gap size 3, Width 4, Opacity 5, Fill gaps checked, Change Gap Color to color of choice)
Delete/Hide original circle layer
Select Circle 5 layer and repeat above steps
Select Square 6 layer
Select all, float, defloat
Paste paper 17
Select invert, delete, select none
Delete/Hide original square layer
Select Circle 6 layer
Select all, float, defloat
Paste paper 18
Select invert, delete, select none
Delete/Hide original circle layer
Select Rectangle 7 layer
Select all, float, defloat
Paste paper 4
Select invert, delete, select none
Delete/Hide original rectangle layer
Copy and paste tube of choice and position where desired
Apply Xero Radiance at setting of choice
Apply Lokas 3D Shadow at default settings
Select Element 46 - resize by 65%
Paste and position on top left below tube layer
Select Element 11 - resize by 80%
Image flip and paste on bottom right side below tube layer
Select Element 69 - resize by 65%
Paste and position on right side below tube layer
Select Element 105 - resize by 45%
Image Free Rotate Right by 15%
Paste and position on bottom right side below element 69 layer
Select Element 25 - resize by 40%
Image mirror and paste on bottom right side
Select Element 75 - resize by 40%
Paste and position on bottom right side
Select Element 62 and paste on bottom left side below tube layer
Select Element 9 - resize by 65%
Paste and position on the bottom below tube layer
Image duplicate, mirror and flip and reposition on bottom where desired
Select New raster layer and flood fill with color or gradient of choice
Move layer to the bottom of the template
Apply Summer Mask
Merge group and move to the bottom
Add any additional elements you like.
Add any dropshadows you like
Crop and resize as desired
Add copyright info, license number and name
You're done! Thanks for trying my tutorial!
Sunday, May 19, 2013
HEATHER'S MASQUERADE
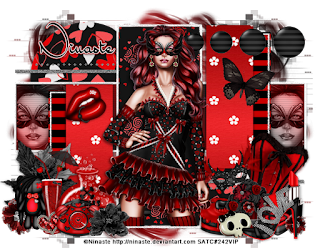
Supplies needed:
I am using the amazing art from Ninaste for this tutorial, which you can find here
Scrapkit: I am using a stunning kit from Tiny Turtle Designs called "Heather2" which you can get by going here
Template 44 from Twisted T's which can be found here
Mask 242 from Trese which you can find here
Plugins used: VM Extravaganza - Transmission, Eyecandy 4000 Glass, Xero-Radiance, Xero-Bad Dream, Lokas 3D Shadow
----------------------------
This tutorial is written for those who have working knowledge of PSPX2 (any version will do).
This tutorial was written by me on May 19, 2013. Please do not copy or paste on any other forum, website or blog provide link back to tut only. Please do not claim as your own. This tutorial is copyrighted to me. Any resemblance to any other tutorial is purely coincidental.
Ok - let's start and remember to save often.
Open the template and using your shortcut keys on your keyboard (SHIFT+D) duplicate the template as a new image. Close the original and delete the copywrite layer.
Adjust Canvas Size by 700 x 550 (you can resize later)
Select Circles Raster 5 layer
Select all, float, defloat
Add new raster layer and flood-fill with color of choice
Select none
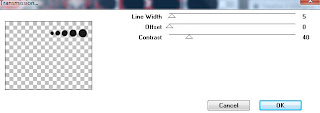
Apply VM Transmission with the following settings:
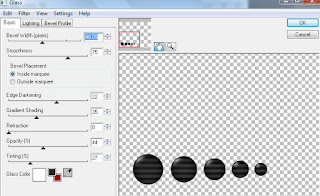
Apply Eyecandy Glass with the following settings:
Delete/Hide original circles layer
Select Circles Copy of Raster 5 layer and repeat above steps
Select Rectangles Raster 3 layer
Select all, float, defloat
Paste paper 38
Select invert, delete, select none
Delete/Hide original rectangles layer
Select Rectangle Raster 2 layer
Select all, float, defloat
Selections, Modify, Contract by 3
Paste paper 37
Select invert, delete, select none
Delete/Hide original rectangle layer
Select Rectangles Raster 3 layer
Select all, float, defloat
Paste paper 28
Select invert, delete, select none
Delete/Hide original rectangles layer
Select Rectangle Raster 7 layer
Select all, float, defloat
Add new raster layer and flood-fill with gradient colors of choice (Linear style, Angle 45, Repeat 3)
Paste close-up tubes of choice on top of gradient and delete
Change closeups to Luminance (Legacy)
Apply Xero Bad Dream at default settings or random setting of choice
Drop opacity on close-up down to 80%
Apply dropshadow and merge down on top of gradient layer
Effects, Texture Effects, Blinds (Width 2, Opactity 20, Horizontal and Light from left/top checked)
Delete/Hide original rectangle layer
Select Circles Raster 6 layer
Select all, float, defloat
Paste paper 36
Select invert, delete, select none
Delete/Hide original circles layer
Copy and paste tube of choice and position where desired
Apply Xero Radiance at setting of choice
Apply Lokas 3D Shadow at default settings
Select Element 91 - resize by 40%
Image, Free Rotate Right by 20%
Paste and position on bottom right side
Select Element 101 - resize by 25%
Paste and position on bottom right side
Select Element 62 - resize by 20%
Paste and position on bottom right side
Select Element 42 - resize by 25%
Paste and position on bottom right side
Select Element 77 - resize by 16%
Paste and position on bottom right side
Select Element 13 - resize by 30%
Paste and position on bottom left side
Select Element 48 - resize by 15%
Paste and position on bottom left side
Select Element 54 - resize by 20%
Paste and position on bottom left side
Select Element 12 - resize by 30%
Image Free Rotate Left by 15% and paste on bottom left side
Select Element 87 - resize by 20%
Paste and position on bottom left side
Select New raster layer and flood fill with color or gradient of choice
Move layer to the bottom of the template
Apply Mask 242
Merge group and move to the bottom
Add any additional elements you like.
Add any dropshadows you like
Crop and resize as desired
Add copyright info, license number and name
You're done! Thanks for trying my tutorial!
THE CATS MEOW
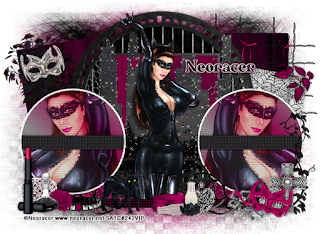
Supplies needed:
I am using the amazing art from Neoracer for this tutorial, which you can find here
Scrapkit: I am using an awesome kit from Hania's Designs called "RRRrrr" which you can get by going here
Template 416 from Missy which can be found here
Mask 5 from Zuzzanna which you can find here
Plugins used: Alien Skin Xenofex 2 - Constellation, Eyecandy 4000 - Glass, Xero-Radiance, Xero - Bad Dream, Lokas 3D Shadow
----------------------------
This tutorial is written for those who have working knowledge of PSPX2 (any version will do).
This tutorial was written by me on May 19, 2013. Please do not copy or paste on any other forum, website or blog provide link back to tut only. Please do not claim as your own. This tutorial is copyrighted to me. Any resemblance to any other tutorial is purely coincidental.
Ok - let's start and remember to save often.
Open the template and using your shortcut keys on your keyboard (SHIFT+D) duplicate the template as a new image. Close the original and delete the copywrite layer.
Adjust Canvas Size by 700 x 550 (you can resize later)
Select Thin Rectangle layer
Select all, float, defloat
Paste paper 6
Select invert, delete, select none
Delete/Hide original strip layer
Select Thin Rectangle 2 layer and repeat above steps
Select Star1 and Star2 layers and delete
Select Circle Left layer
Select all, float, defloat
Add new raster layer and flood-fill with gradient of choice (style, Angle 45, Repeat 2)
Paste close-up tube of choice on top of gradient and delete
Change close-up to Luminance Hard Light
Apply Xero Bad Dream at default settings or random setting of choice
Drop opacity on close-up down to 80%
Merge close-up down on gradient layer
Effects, Texture Effects, Blinds (Width 2, Opactity 20, Horizontal and Light from left/top checked)
Delete/Hide original circle layer
Select Circle Right layer and repeat above steps
Select Square Frame layer
Select all, float, defloat
Add new raster layer and flood-fill with color of choice
Select none
Apply Eyecandy Glass at default settings
Delete/Hide original frame layer
Select Element 81 - resize by 60%
Paste and position in the center above square frame layer
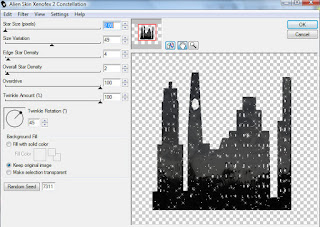
Apply Xenofex Constellation with the following settings:
Select Square Frame back layer
Select all, float, defloat
Paste paper 1
Select invert, delete, select none
Delete/Hide original square layer
Select Circle Centre layer
Select all, float, defloat
Paste paper 4
Select invert, delete, select none
Delete/Hide original circle layer
Select Element 88 - resize by 81%
Paste and position on top of centre circle layer
Select Rounded Edge Rectangle 2 layer
Select all, float, defloat
Paste paper 9
Select invert, delete, select none
Delete/Hide original rectangle layer
Select Rounded Edge Rectangle layer
Apply Effects, Texture Effects, weave (Gap size 2, Width 4, Opacity 5, Fill gaps checked, Change Gap Color to color of choice)
Select Square2 layer
Select all, float, defloat
Paste Element 6
Select invert, delete, select none
Delete/Hide original square layer
Select Square1 layer
Select all, float, defloat
Paste paper 5
Select invert, delete, select none
Delete/Hide original square layer
Select Square 3 layer and repeat above steps
Select Element 69 - resize by 65%
Paste and position on top right side above square3 layer
Copy and paste tube of choice and position where desired
Apply Xero Radiance at setting of choice
Apply Lokas 3D Shadow at default settings
Select Element 83 - resize by 30%
Paste and position on top left side
Select Element 33 - resize by 25%
Image Free Rotate Left by 15% and paste on top left corner
Select Element 31 - resize by 30%
Paste and position on bottom left side - adjust, Sharpness, Sharpen
Select Element 3 - resize by 45%
Paste and position on bottom left side
Select Element 7 - resize by 30%
Paste and positon on bottom left side
Select element 37 - resize by 40%
Paste and position on bottom right side
Select Element 34 - resize by 25%
Image Free Rotate Right by 15%
Paste and position on bottom right side
Select Element 36 - resize by 50%
Image flip and paste on bottom below the circle layers
Image duplicate and mirror
Select New raster layer and flood fill with color or gradient of choice
Move layer to the bottom of the template
Apply Mask 5
Merge group and move to the bottom
Add any additional elements you like.
Add any dropshadows you like
Crop and resize as desired
Add copyright info, license number and name
You're done! Thanks for trying my tutorial!
Labels:Scraps and the City | 0
comments
Thursday, May 16, 2013
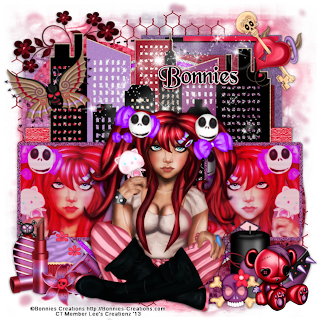
EMO PUNK
Supplies needed:
I am using the amazing art from Bonnies Creations for this tutorial, which you can find here
Scrapkit: I am using an awesome kit from Amy Marie called "Emo Alice" which you can get by going here
Punk Template 2 by Brutal Designs which can be found here
Mask 115 from Designs by Vaybs which you can find here
Plugins used: Xero-Radiance, Xero - Bad Dream, Lokas 3D Shadow
----------------------------
This tutorial is written for those who have working knowledge of PSPX2 (any version will do).
This tutorial was written by me on May 16, 2013. Please do not copy or paste on any other forum, website or blog provide link back to tut only. Please do not claim as your own. This tutorial is copyrighted to me. Any resemblance to any other tutorial is purely coincidental.
Ok - let's start and remember to save often.
Open the template and using your shortcut keys on your keyboard (SHIFT+D) duplicate the template as a new image. Close the original and delete the copywrite layer.
Select Square Raster 1 layer
Select all, float, defloat
Add new raster layer and flood-fill with gradient of choice (style, Angle 45, Repeat 2)
Paste close-up tube of choice on top of gradient and delete
Change close-up to Luminance Hard Light
Apply Xero Bad Dream at default settings or random setting of choice
Drop opacity on close-up down to 80%
Merge close-up down on gradient layer
Effects, Texture Effects, Blinds (Width 2, Opactity 20, Horizontal and Light from left/top checked)
Delete/Hide original square layer
Select Square Copy of Raster 1 layer and repeat above steps
Select Square Raster 3 layer
Select all, float, defloat
Add new raster layer and flood-fill with color of choice
Select none
Adjust, Add/Remove Noise, Add Noise (Uniform checked, Noise 60%, Monochrome checked)
Delete/Hide original square layer
Select Square Raster 4 layer and repeat above steps
Select Circle Frame Raster 5 layer
Select all, float, defloat
Add new raster layer and flood-fill with color of choice
Select none
Delete/Hide original frame layer
Select Circle Raster 6 layer
Adjust, Add/Remove Noise, Add Noise (Uniform checked, Noise 100%, Monochrome checked)
Select Skyline Element - resize by 80%
Paste and position in the center on top of circle frames
Select Square Raster 10 layer
Select all, float, defloat
Paste paper 4
Select invert, delete, select none
Delete/Hide original square layer
Select Square Raster 11 layer and repeat above steps
Select Rectangle Raster 9 layer
Select all, float, defloat
Paste paper 17
Select invert, delete, select none
Delete/Hide original rectangle layer
Select Square Raster 2 layer
Select all, float, defloat
Paste paper 12
Select invert, delete, select none
Delete/Hide original square layer
Select Circle Raster 8 layer
Select all, float, defloat
Paste paper 22
Select invert, delete, select none
Delete/Hide original circle layer
Select Circle Raster 7 layer
Select all, float, defloat
Paste paper 22
Select invert, delete, select none
Delete/Hide original circle layer
Select Square Raster 12 layer
Select all, float, defloat
Paste paper 8
Select invert, delete, select none
Delete/Hide original square layer
Select Strip Raster 14 layer
Select all, float, defloat
Add new raster layer and flood-fill with color of choice
Select none
Delete/Hide original strip layer
Select Rectangle Raster 13 layer
Select all, float, defloat
Paste paper 11
Select invert, delete, select none
Delete/Hide original rectangle layer
Copy and paste tube of choice and position where desired
Apply Xero Radiance at setting of choice
Apply Lokas 3D Shadow at default settings
Select Skeletonlock1 Element - resize by 65%
Paste and position on top right
Select Heart5 Element - resize by 40%
Paste and position on bottom right
Select Candle1 Element - resize by 40%
Paste and position on bottom right
Select Emobear1 Element - resize by 45%
Image mirror and paste on bottom right side
Select Cupcake2 Element - resize by 65%
Paste and position on bottom left side
Select Lipstick Element - resize by 50%
Paste and position on bottom left side
Select Bottle1 Element - resize by 40%
Paste and position on bottom left side
Select Wire4 Element and paste on canvas
Positon where you desire and move to bottom layer
Select New raster layer and flood fill with color or gradient of choice
Move layer to the bottom of the template
Apply Mask 115
Merge group and move to the bottom
Add any additional elements you like.
Add any dropshadows you like
Crop and resize as desired
Add copyright info, license number and name
You're done! Thanks for trying my tutorial!"
Labels:Amy Marie,Bonnies Creations | 0
comments
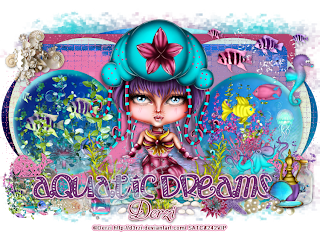
AQUATIC DREAMS
Supplies needed:
I am using the amazing art from Derzi for this tutorial, which you can find here
Scrapkit: I am using an awesome kit from Amy Marie called "Aquatic Beauty" which you can get by going here
Template 256 from Millie which can be found here
Mask 165 from Insatiable Dreams which you can find here
Plugins used: Xero-Radiance, Xero - Bad Dream, Lokas 3D Shadow
----------------------------
This tutorial is written for those who have working knowledge of PSPX2 (any version will do).
This tutorial was written by me on May 16, 2013. Please do not copy or paste on any other forum, website or blog provide link back to tut only. Please do not claim as your own. This tutorial is copyrighted to me. Any resemblance to any other tutorial is purely coincidental.
Ok - let's start and remember to save often.
Open the template and using your shortcut keys on your keyboard (SHIFT+D) duplicate the template as a new image. Close the original and delete the copywrite layer.
Adjust Canvas Size by 750 x 548 (you can resize later
Select Whale 13 layer
Select all, float, defloat
Add new raster layer and flood-fill with color of choice
Select none
Adjust, Add/Remove Noise, Add Noise (Uniform checked, Noise 40%, Monochrome checked)
Select Whale 12 layer and repeat above steps
Select Wordart 11 layer
Apply Gradient Glow at fat default settings (Glow Width 3)
Select Circle 9 layer
Select all, float, defloat
Paste paper 13
Select invert, delete
Select Element 61 - resize by 65%
Position where desired over paper layer and delete
Select none
Delete/Hide original circle layer
Select Element 40 - resize by 71%
Paste and position over circle layer
Select Circle 10 layer and repeat above steps using elements of choice (I used elements, 4, 5, 25, 26, 80 and 90)
Select Circle 7 layer
Select all, float, defloat
Paste paper 10
Select invert, delete, select none
Delete/Hide original circle layer
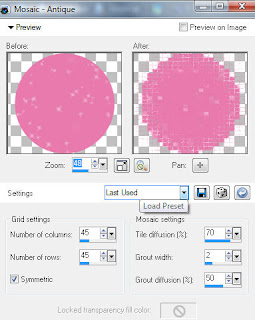
Effects, Texture Effect, Mosaic Antique with the following settings:
Select Circle 8 layer
Select all, float, defloat
Paste paper 9
Select invert, delete, select none
Delete/Hide original circle layer
Apply same Mosaic Antique texture settings from above
Select Shape 6 layer
Select all, float, defloat
Paste paper 6
Select invert, delete, select none
Delete/Hide original shape layer
Select Square 5 layer
Select all, float, defloat
Paste paper 2
Select invert, delete, select none
Delete/Hide original square layer
Select Circle 4 layer
Select all, float, defloat
Paste paper 5
Select invert, delete, select none
Delete/Hide original circle layer
Select Circle 3 layer and repeat above steps
Select Square 2 layer
Select all, float, defloat
Paste paper 7
Select invert, delete, select none
Delete/Hide original square layer
Select Oval 1 layer
Select all, float, defloat
Paste paper 14
Select invert, delete, select none
Delete/Hide original oval layer
Copy and paste tube of choice and position where desired
Apply Xero Radiance at setting of choice
Apply Lokas 3D Shadow at default settings
Select Element 74 - resize by 40%
Paste and position on top left corner
Select Element 78 - resize by 75%
Paste and position on top right side
Select Element 86 - resize by 45%
Paste and position on bottom left side below wordart layer
Select Element 27 - resize by 75%
Paste and position on the bottom below wordart layer
Select Element 72 - resize by 35%
Paste and position on bottom right side
Select Element 17 - resize by 40%
Paste and position on bottom right side
Select Element 68 - resize by 15%
Paste and position on bottom right side
Select New raster layer and flood fill with color or gradient of choice
Move layer to the bottom of the template
Apply Mask 165
Merge group and move to the bottom
Image duplicate and flip
Add any additional elements you like.
Add any dropshadows you like
Crop and resize as desired
Add copyright info, license number and name
You're done! Thanks for trying my tutorial!
Labels:Amy Marie,Derzi,Scraps and the City | 0
comments
Tuesday, May 14, 2013
TROPICANA
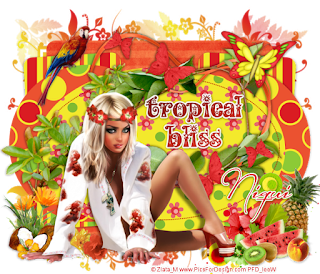
Supplies needed:
I am using the amazing art from Zlata for this tutorial, which you can find here
Scrapkit: I am using an awesome kit from Niqui's Designs called "Tropicana " which you can get by going here
Template 255 from Millie which can be found here
Mask 7 from Zuzzanna which you can find here
Plugins used: Eyecandy 4000 - Glass, Eyecandy 4000 - Gradient Glow, Xero-Radiance, Xero - Bad Dream, Lokas 3D Shadow
----------------------------
This tutorial is written for those who have working knowledge of PSPX2 (any version will do).
This tutorial was written by me on May 14, 2013. Please do not copy or paste on any other forum, website or blog provide link back to tut only. Please do not claim as your own. This tutorial is copyrighted to me. Any resemblance to any other tutorial is purely coincidental.
Ok - let's start and remember to save often.
Open the template and using your shortcut keys on your keyboard (SHIFT+D) duplicate the template as a new image. Close the original and delete the copywrite layer.
Select Palm Tree 9 layer and delete if desire
Select Wordart 8 layer
Select all, float, defloat
Add new raster layer and flood-fill with color of choice
Select none
Apply Eyecandy Glass on default settings
Apply Eyecandy Gradient Glow on fat default settings
Delete/Hide original wordart layer
Select Oval 6 layer
Select all, float, defloat
Paste paper 3
Select invert, delete, select none
Delete/Hide original oval layer
Select Circle 4 layer
Select all, float, defloat
Paste paper 5
Select invert, delete, select none
Delete/Hide original circle layer
Select Circle 5 layer and repeat above steps
Select Rectangle 2 layer
Select all, float, defloat
Paste paper 10
Select invert, delete, select none
Delete/Hide original rectangle layer
Select Rectangle 3 layer and repeat above steps
Select Square 1 layer
Select all, float, defloat
Paste paper 9
Select invert, delete, select none
Delete/Hide original square layer
Copy and paste tube of choice and position where desired
Apply Xero Radiance at setting of choice
Apply Lokas 3D Shadow at default settings
Select Element 36 - resize by 55%
Paste and position in the center behind tube layer
Select Element 42 - resize by 50%
Paste and position on left side behind tube layer
Select Element 11 - resize by 20%
Paste nad position on bottom right side
Select Element 20 - resize by 35%
Paste and position on bottom right side
Select Element 18 - resize by 15%
Paste and positon on bottom right side
Select Element 31 - resize by 30%
Paste and position on bottom left side
Select Element 19 - resize by 25%
Image mirror and paste on the bottom left side
Duplicate, mirror and resize by 85% and reposition
Select New raster layer and flood fill with color or gradient of choice
Move layer to the bottom of the template
Apply Mask 7
Merge group and move to the bottom
Add any additional elements you like.
Add any dropshadows you like
Crop and resize as desired
Add copyright info, license number and name
You're done! Thanks for trying my tutorial!
Labels:Niqui Designs | 0
comments
Monday, May 13, 2013
SIZZLIN ROXANNE
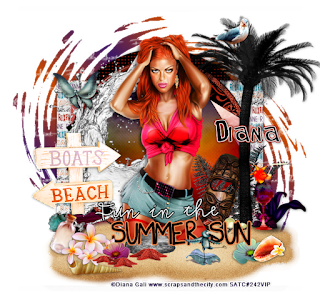
Supplies needed:
I am using the amazing art from Diana Gali for this tutorial, which you can find here
Scrapkit: I am using an awesome kit from Bibi's Collections called "Roxanne" which you can get by going here
Template 89 from Leah which can be found here
Summer Mask from MelbGyrl which you can find here
Plugins used: Eyecandy 4000 - Gradient Glow, Xero-Radiance, Xero - Bad Dream, Lokas 3D Shadow
----------------------------
This tutorial is written for those who have working knowledge of PSPX2 (any version will do).
This tutorial was written by me on May 13, 2013. Please do not copy or paste on any other forum, website or blog provide link back to tut only. Please do not claim as your own. This tutorial is copyrighted to me. Any resemblance to any other tutorial is purely coincidental.
Ok - let's start and remember to save often.
Open the template and using your shortcut keys on your keyboard (SHIFT+D) duplicate the template as a new image. Close the original and delete the copywrite layer.
Select Words Back layer
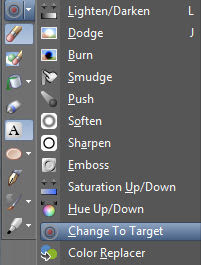
Select your Change to Target Brush and select Change to Target option and recolorize wordart (#ec6920)
Select Square1 layer
Select all, float, defloat
Paste paper 10
Select invert, delete, select none
Delete/Hide original square layer
Select Square 2 layer
Select all, float, defloat
Paste paper 5
Select invert, delete, select none
Delete/Hide original square layer
Select Frame layer
Add new raster layer and flood-fill with color of choice
Select none
Apply Eyecandy Gradient Glow on fat default settings (Glow Width 3)
Select your magic wand tool and click/select the center color of the frame
Apply Adjust, Add/Remove Noise, Add Noise (Uniform checked, Noise 60%, Monochrome checked)
Select none
Delete/Hide original frame layer
Select Circle 1 layer
Select all, float, defloat
Paste paper 2
Select invert, delete, select none
Delete/Hide original circle layer
Select Rect1 layer
Select all, float, defloat
Paste paper 6
Select invert, delete, select none
Delete/Hide original rect layer
Select Rect 2 layer and repeat above steps
Select Rect 2 layer
Select all, float, defloat
Paste paper 1
Select invert, delete, select none
Delete/Hide original rect layer
Select Rect 4 layer and repeat above steps
Select Circle 2 layer
Effects, Texture Effects, Weave (Gap size 2, Width 5, Opacity 5, fill gaps checked)
Copy and paste tube of choice and position where desired
Apply Xero Radiance at setting of choice
Apply Lokas 3D Shadow at default settings
Select Element 56 - resize by 65%
Paste and position on the bottom and move down above Rect 1 layer
Image, duplicate, flip and reposition on bottom where desired
Select Element 77 - paste and position on left side below tube layer
Select Element 62 - resize by 70%
Paste and position on right side
Select Element 23 - resize by 45%
Paste and position on left side
Select Element 3 - resize by 20%
Image Free Rotate Right by 15%
Paste and position on right side
Select Element 81 - resize by 55%
Paste and position on right side below Palm Tree Element
Select Element 31 - resize by 40%
Paste and position on bottom right side
Select Element 7 - resize by 40%
Paste and position on bottom right side
Paste and position on bottom right side
Select New raster layer and flood fill with color or gradient of choice
Move layer to the bottom of the template
Apply Summer Mask
Merge group and move to the bottom
Add any additional elements you like.
Add any dropshadows you like
Crop and resize as desired
Add copyright info, license number and name
You're done! Thanks for trying my tutorial!
Sunday, May 12, 2013
GOOD GIRL
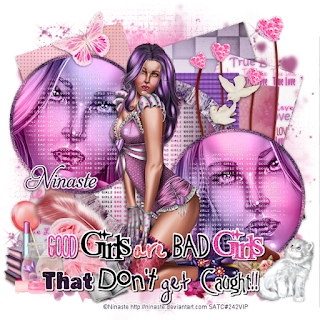
Supplies needed:
I am using the amazing art from Ninaste for this tutorial, which you can find here
Scrapkit: I am using an awesome kit from Bibi's Collections called "Happy Mama" which you can get by going here
Template 142 from Tami which can be found here
Mask M4 from Kylie which you can find on the Misfits Blog here
Plugins used: Eyecandy 4000 - Glass, Xero-Radiance, Xero - Bad Dream, Lokas 3D Shadow
----------------------------
This tutorial is written for those who have working knowledge of PSPX2 (any version will do).
This tutorial was written by me on May 12, 2013. Please do not copy or paste on any other forum, website or blog provide link back to tut only. Please do not claim as your own. This tutorial is copyrighted to me. Any resemblance to any other tutorial is purely coincidental.
Ok - let's start and remember to save often.
Open the template and using your shortcut keys on your keyboard (SHIFT+D) duplicate the template as a new image. Close the original and delete the copywrite layer.
Select Wordart Raster 14 layer
Select all, float, defloat
Add new raster layer and flood-fill with color of choice
Select none and apply Eyecandy Glass at default settings
Merge down to original wordart layer
Select Wordart Raster 12 layer and repeat above steps (before you merge down apply noise)
Apply Adjust, Add/Remove Noise, Add Noise (Uniform checked, Noise 60%, Monochrome checked)
Select Circle Frame Raster 9 layer
Select all, float, defloat
Add new raster layer and flood-fill with color of choice
Select none
Apply Adjust, Add/Remove Noise, Add Noise (Uniform checked, Noise 60%, Monochrome checked)
Delete/Hide original frame layer
Select Circle Frame Raster 10 layer and repeat above steps
Select Circle Raster 2 layer
Select all, float, defloat
Add new raster layer and flood-fill with gradient of choice (style, Angle 45, Repeat 1)
Paste close-up tube of choice on top of gradient and delete
Change close-up to Luminance (Legacy)
Apply Xero Bad Dream at default settings or random setting of choice
Merge tube down on gradient layer
Delete/Hide original circle layer
Select Copy of Raster 2 layer and repeat above steps
Select Circle Raster 3 layer
Select all, float, defloat
Paste paper 3
Select invert, delete
Now move the bottom Group Raster 16 layer wordart up on top of the paper 3 layer and delete, select none
Delete/Hide original circle layer
Select Frame Element 26 - resize by 65%
Paste and position on top center circle layer
Select Square Raster 1 layer
Select all, float, defloat
Add new raster layer and flood-fill with color of choice
Select none
Apply Effects, Texture Effects, Dither 25 Texture with the following settings:
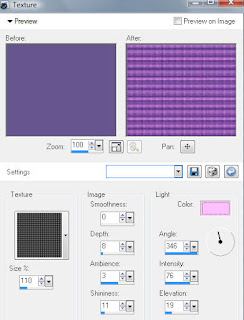
Delete/Hide original square layer
Select Square Raster 7 layer
Select all, float, defloat
Paste paper 10
Select invert, delete, select none
Delete/Hide original square layer
Select Rectangle Raster 4 layer
Select all, float, defloat
Paste paper 9
Select invert, delete, select none
Delete/Hide original rectangle layer
Select Copy of Rectangle 4 layer and repeat above steps
Select Square Raster 5 layer
Select all, float, defloat
Add new raster layer and flood-fill with color of choice
Select none
Effects, Texture Effects, Weave (Gap size 3, Width 5, Opacity 5, fill gaps checked)
Delete/Hide original square layer
Select Copy of Square Raster 5 layer and repeat above steps
Select Square Raster 6 layer
Select all, float, defloat
Paste paper 4
Select invert, delete, select none
Delete/Hide original square layer
Copy and paste tube of choice and position where desired
Apply Xero Radiance at setting of choice
Apply Lokas 3D Shadow at default settings
Select Element 53 - resize by 40%
Paste and position on top right side below right circle layer
Select Element 19 - resize by 70%
Paste and position on top right side
Select Element 18 and paste on bottom left side below wordart layers
Select Element 1 - resize by 40%
Paste and position on bottom left behind element 18 (heart)
Select Element 42 - resize by 75%
Paste and position on bottom left side behind element 18 (heart)
Select Element 12 - resize by 65%
Paste and position on bottom left side
Select Element 91 - resize by 55%
Paste and position on bottom right side
Select New raster layer and flood fill with color or gradient of choice
Move layer to the bottom of the template
Apply Mask M4
Merge group and move to the bottom
Add any additional elements you like.
Add any dropshadows you like
Crop and resize as desired
Add copyright info, license number and name
You're done! Thanks for trying my tutorial!
Friday, May 10, 2013
ANGELINE
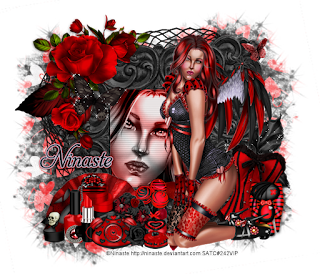
Supplies needed:
I am using the amazing art from Ninaste for this tutorial, which you can find here
Scrapkit: I am using an awesome kit from Tiny Turle Designs called "Angeline" which you can get by going here
Mask 16 from Gina Gems which you can find here
Plugins used: Alien Skin Xenofex 2 - Constellation, Xero-Radiance, Xero-Bad Dream, Lokas 3D Shadow
----------------------------
This tutorial is written for those who have working knowledge of PSPX2 (any version will do).
This tutorial was written by me on March 10, 2013. Please do not copy or paste on any other forum, website or blog provide link back to tut only. Please do not claim as your own. This tutorial is copyrighted to me. Any resemblance to any other tutorial is purely coincidental.
Ok - let's start and remember to save often.
Open up a 700 x 600 blank canvas (we can resize it later)
Select Frame 123 and paste in the center of the canvas
Resize by 80% and select your magic wand tool and click in the center of your frame (Add (Shift), RGB Value, Tolerance 25, Contiguous checked, Feather 0)
Selections, Modify, Expand by 5
Add new raster layer and flood-fill with color or gradient of choice
Paste Close-up tube of choice on top and select invert, delete, select none
Change close-up to Luminance (Legacy)
Apply Xero Bad Dream at default settings or random setting of choice
Effects, Texture Effects, Blinds (Width 2, Opactity 15, Horizontal and Light from left/top checked)
Move both g layer below frame layer
Paste tube of choice where desired on top of frame
Apply Xero Radiance at setting of choice
Apply Lokas 3D Shadow at default settings
Select Element 72 - resize by 50%
Paste and position on top left corner
Select Element 66 - resize by 40%
Image mirror and paste on bottom right side
Apply Alien Skin Constellation with the following settings:
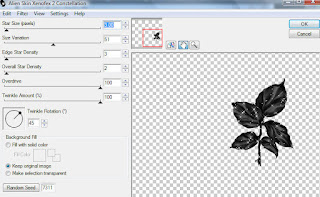
Select Element 116 - resize by 20%
Image Free Rotate Right by 15%
Paste and position on top left side
Apply above Constellation settings if desired
Select Element 60 - resize by 40%
Image Free Rotate Right by 15% and paste on bottom right side
Select Element 85 - resize by 20%
Paste and position on bottom right side
Select Element 104 - resize by 40%
Image Free Rotate Left by 15% and paste on bottom left side
Select Element 67 - resize by 25%
Paste and position on bottom left side
Select Element 95 - resize by 20%
Paste and position on bottom left side
Select Element 151 - resize by 20%
Paste and position on bottom left side
Select Element 54 - resize by 20%
Paste and position on bottom left side
Select Element 97 - resize by 20%
Paste and position on bottom left side
Select Element E102 - paste and position on bottom layer
Select Paper 4 and paste on canvas
Move layer to the bottom of the template
Apply Mask 16
Merge group and move to the bottom
Add any additional elements you like.
Add any dropshadows you like
Crop and resize as desired
Add copyright info, license number and name
You're done! Thanks for trying my tutorial!
Subscribe to:
Comments
(Atom)


