I CT For




Showing posts with label Schnegge. Show all posts
Showing posts with label Schnegge. Show all posts
Monday, July 31, 2017
DEEP WATER

Supplies needed:
I am using the stunning artwork from Andreea Cernestean for this tutorial which you can find here
Scrapkit: I am using a stunning kit from Schnegge called "Go Deep" which you can get by going here
Mask 1 from Rachel Designs which you can find here
Plugins: Lokas 3D Shadow
----------------------------
This tutorial is written for those who have working knowledge of PSPX2 (any version will do).
This tutorial was written by me on July 31, 2017. Please do not copy or paste on any other forum, website or blog provide link back to tut only. Please do not claim as your own. This tutorial is copyrighted to me. Any resemblance to any other tutorial is purely coincidental.
Ok - let's start and remember to save often.
Open up a 750 x 650 blank canvas (we can resize it later)
Select Frame Element 4
Paste and position in the center of the canvas
Select your magic wand tool and select the center of the frame (Add (Shift), RGB Value, Tolerance 25, Contiguous checked, Feather 0)
Selections, Modify, Expand by 5
Paste paper 16
Select invert, delete, select none
Move paper layer below frame layer
Select Sand Element - resize by 85%
Paste and position in the center of the frame above paper layer
Select Net 1 Element - resize by 65%
Paste and position on the top right
Select Foliage 2 Element - resize by 40%
Paste and position on the top of the frame
Select String 1 Element - resize by 55%
Paste and position on the top left
Select Foliage 3 Element - resize by 40%
Image Free Rotate Right by 15% and paste on the top left
Select WordArt2 Element - resize by 50%
Paste and position on the left side
Select Rocks Element - resize by 55%
Paste and position on the bottom
Select Stones Element - resize by 40%
Paste and position on the right side
Paste tube of choice where desired
Apply Lokas 3D Shadow at default settings
Select Boat Element - resize by 42%
Paste and position on the left side
Select Box Element - resize by 35%
Paste and position on the bottom
Select Wheel Element - resize by 50%
Paste and position on the bottom left
Select Shell 2 Element - resize by 40%
Paste and position on the bottom left
Select Shell 4 Element - resize by 25%
Paste and position on the bottom
Select Compass Element - resize by 35%
Paste and paste on the bottom right below tube layer
Select Amphore Element - resize by 30%
Paste and position on the bottom right below tube layer
Select Starfish 1 Element - resize by 30%
Paste and position on the bottom right
Select Flower 5 Element - resize by 30%
Paste and position on the bottom right
Select Seahorse Element - resize by 25%
Paste and position on the left side
Select Waterdrops 2 Element - resize by 110%
Paste and position in the center of the canvas and move to the bottom layer
Paste paper 13 on the canvas
Apply Mask 1 or mask of choice
Merge group and move to the bottom layer
Add any dropshadows you like
Sharpen any elements as needed
Crop and resize as desired
Add copyright info, license number and name
You're done! Thanks for trying my tutorial!
Monday, July 10, 2017
GUARDIAN ANGEL

Supplies needed:
I am using the stunning artwork from Anna Marine for this tutorial which you can find here
Scrapkit: I am using a stunning mega kit from Schnegge called "Guardian Angel" which you can get by going here
Mask 1 from Dee which you can find here
Plugins: Lokas 3D Shadow, Eyecandy 4000 - Gradient Glow
----------------------------
This tutorial is written for those who have working knowledge of PSPX2 (any version will do).
This tutorial was written by me on July 10, 2017. Please do not copy or paste on any other forum, website or blog provide link back to tut only. Please do not claim as your own. This tutorial is copyrighted to me. Any resemblance to any other tutorial is purely coincidental.
Ok - let's start and remember to save often.
Open up a 750 x 650 blank canvas (we can resize it later)
Select Frame Element 4
Paste and position in the center of the canvas
Select your magic wand tool and select the center of the frame (Add (Shift), RGB Value, Tolerance 25, Contiguous checked, Feather 0)
Selections, Modify, Expand by 5
Paste paper 16
Select invert, delete, select none
Move paper layer below frame layer
Select M00n Element - resize by 30%
Paste and position on the top left below the frame layer
Select Flower 11 Element - resize by 40%
Paste and position on the top left
Select Staircase Element - resize by 40%
Paste and position on the right side
Select Ruffle Element - resize by 65%
Paste and position on the top of the frame
Image duplicate, flip and reposition on the bottom of the frame
Paste tube of choice where desired
Apply Lokas 3D Shadow at default settings
Select Deco 01 Element - resize by 80%
Paste and position on the bottom
Select Butterfly 1 Element - resize by 30%
Image mirror and paste on the bottom left
Select Butterfly 9 Element - resize by 30%
Paste and position on the bottom right
Select Flower 9 Element - resize by 40%
Paste and position on the bottom right
Select Harp Element - resize by 40%
Image Free Rotate Right by 25% and paste on the bottom right
Select Unicorn Element - resize by 50%
Paste and paste on the bottom right
Select Angel 1 Element - resize by 35%
Paste and position on the bottom
Select Flower 5 Element - resize by 30%
Paste and position on the bottom
Select Wordart 6 Element - resize by 40%
Paste and position on the top left
Apply Eyecandy Gradient Glow on fat default settings (Glow width 3)
Select Stars Element - resize by 75%
Paste and position on the canvas where desired
Paste paper 25 on the canvas
Apply Mask 1 or mask of choice
Merge group and move to the bottom layer
Add any dropshadows you like
Sharpen any elements as needed
Crop and resize as desired
Add copyright info, license number and name
You're done! Thanks for trying my tutorial!
Sunday, July 2, 2017
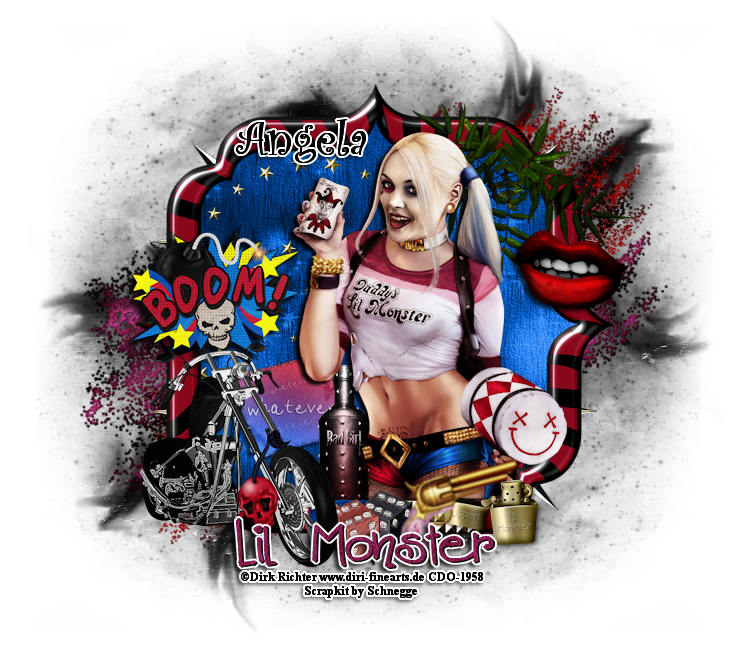
LIL MONSTER
Supplies needed:
I am using the stunning artwork from Dirk Richter for this tutorial which you can find here
Scrapkit: I am using a stunning kit from Schnegge called "IB DirkRichter 23-1" which you can get by going here
Mask 36 from Millie which you can find here
Plugins: Lokas 3D Shadow
----------------------------
This tutorial is written for those who have working knowledge of PSPX2 (any version will do).
This tutorial was written by me on July 2, 2017. Please do not copy or paste on any other forum, website or blog provide link back to tut only. Please do not claim as your own. This tutorial is copyrighted to me. Any resemblance to any other tutorial is purely coincidental.
Ok - let's start and remember to save often.
Open up a 750 x 650 blank canvas (we can resize it later)
Select Frame Element 3 - resize by 75%
Paste and position in the center of the canvas
Select your magic wand tool and select the center of the frame (Add (Shift), RGB Value, Tolerance 25, Contiguous checked, Feather 0)
Selections, Modify, Expand by 5
Paste paper 5
Select invert, delete, select none
Move paper layer below frame layer
Select Element 9 - resize by 50%
Paste on top of the paper layer where desired
Select Element 6 - resize by 40%
Image flip and paste on the top right
Select Element 13 - resize by 40%
Paste and position on the left side
Select Element 5 - resize by 40%
Paste and position on the right side
Paste tube of choice where desired
Apply Lokas 3D Shadow at default settings
Select Element 3 - resize by 40%
Paste and position on the bottom left
Select Element 14 - resize by 30%
Paste and position on the bottom left
Select Element 7 - resize by 40%
Paste and position on the bottom
Select Element 1 - resize by 40%
Paste and position on the bottom
Select Element 12 - resize by 40%
Paste and position on the bottom
Select Element 11 - resize by 30%
Paste and paste on the bottom right
Select Element 20 - resize by 30%
Paste and position on the bottom right
Select Wordart 2 Element - resize by 40%
Paste and position on the bottom
Apply Eyecandy Gradient Glow on fat default settings (Glow width 3)
Select Element 8
Image Free Rotate Left by 25% and paste in the center of the canvas
Move to the bottom layer
Paste paper 2 on the canvas
Apply Mask 36 or mask of choice
Merge group and move to the bottom layer
Add any dropshadows you like
Sharpen any elements as needed
Crop and resize as desired
Add copyright info, license number and name
You're done! Thanks for trying my tutorial!
Sunday, June 4, 2017
MY LOVE

Supplies needed:
I am using the stunning artwork from Enamorte for this tutorial which you can find here
Scrapkit: I am using a stunning kit from Schnegge called "IB Enamorte 18-2" which you can get by going here
Mask 32 from Moonbeams and Spiderwebs which you can find here
Mask 42 from Millie which you can find here
Plugins: Lokas 3D Shadow
----------------------------
This tutorial is written for those who have working knowledge of PSPX2 (any version will do).
This tutorial was written by me on June 4, 2017. Please do not copy or paste on any other forum, website or blog provide link back to tut only. Please do not claim as your own. This tutorial is copyrighted to me. Any resemblance to any other tutorial is purely coincidental.
Ok - let's start and remember to save often.
Open up a 750 x 650 blank canvas (we can resize it later)
Select Frame Element 1 - resize by 85%
Paste and position in the center of the canvas
Select your magic wand tool and select the center of the frame (Add (Shift), RGB Value, Tolerance 25, Contiguous checked, Feather 0)
Selections, Modify, Expand by 5
Paste paper 1
Select invert, delete, select none
Move paper layer below frame layer
Select Element 10 - resize by 30%
Paste and position on the top left below the frame
Select Element 15 - resize by 55%
Paste and position on the top left
Select Element 6 - resize by 30%
Paste and position on the top right
Select Wordart Element - resize by 25%
Paste and position on the top right
Select Element 4 - resize by 40%
Paste and position on the bottom left
Select Element 8 - resize by 50%
Paste and position on the bottom right
Paste tube of choice where desired
Apply Lokas 3D Shadow at default settings
Select Element 3 - resize by 30%
Paste and position on the right side
Select Element 13 - resize by 25%
Paste and position on the bottom right
Select Element 9 - resize by 30%
Paste and position on the bottom right
Select Element 19 - resize by 50%
Paste and position on the bottom left
Select Element 14 - resize by 30%
Paste and paste on the bottom left
Select Element 16 - resize by 30%
Paste and position on the bottom left
Select Element 12 - resize by 40%
Paste and position on the left side
Add new raster layer and flood-fill with color of choice
Apply Mask 42 or mask of choice
Merge group and move to the bottom layer
Paste paper 2 on the canvas
Apply Mask 32 or mask of choice
Merge group and move to the bottom layer
Add any dropshadows you like
Sharpen any elements as needed
Crop and resize as desired
Add copyright info, license number and name
You're done! Thanks for trying my tutorial!
Sunday, May 28, 2017
WICKED THORN

Supplies needed:
I am using the stunning artwork from Enamorte for this tutorial which you can find here
Scrapkit: I am using a stunning kit from Schnegge Scraps called "IB Enamorte 48-1" which you can get by going here
Mask 26 from Splitz Designz which you can find here
Plugins: Lokas 3D Shadow, Eyecandy 4000 - Gradient Glow
----------------------------
This tutorial is written for those who have working knowledge of PSPX2 (any version will do).
This tutorial was written by me on May 28, 2017. Please do not copy or paste on any other forum, website or blog provide link back to tut only. Please do not claim as your own. This tutorial is copyrighted to me. Any resemblance to any other tutorial is purely coincidental.
Ok - let's start and remember to save often.
Open up a 750 x 650 blank canvas (we can resize it later)
Select Frame Element 2 - resize by 75%
Paste and position in the center of the canvas
Select your magic wand tool and select the center of the frame (Add (Shift), RGB Value, Tolerance 25, Contiguous checked, Feather 0)
Selections, Modify, Expand by 5
Paste paper 5
Select invert, delete, select none
Move paper layer below frame layer
Select Element 7 - resize by 50%
Paste and position on the top left
Select Element 12 - resize by 30%
Paste and position on the top left
Select Element 18 - resize by 45%
Image Free Rotate Right by 15% and paste on the left side
Select Element 2 - resize by 50%
Paste and position on the bottom left
Select Element 9 - resize by 30%
Paste and position on the top right below the frame layer
Paste tube of choice where desired
Apply Lokas 3D Shadow at default settings
Select Element 11 - resize by 40%
Paste and position on the left side
Select Element 8 - resize by 40%
Paste and position on the bottom left
Select Element 5 - resize by 30%
Paste and position on the bottom left
Select Element 4 - resize by 40%
Paste and position on the bottom left
Select Element 3 - resize by 30%
Image Free Rotate Right by 15% and paste on the bottom right
Select Wordart Element - resize by 50%
Paste and paste on the bottom
Apply Eyecandy Gradient Glow on fat default settings (glow width 3)
Paste paper 4 on the canvas
Apply Mask 26 or mask of choice
Merge group and move to the bottom layer
Add any dropshadows you like
Sharpen any elements as needed
Crop and resize as desired
Add copyright info, license number and name
You're done! Thanks for trying my tutorial!
Sunday, February 21, 2016
CONTEMPLATION

Supplies needed:
I am using the stunning artwork from KiwiBG for this tutorial which you can find here
Scrapkit: I am using a stunning kit from Schnegge called "Contemplation" which you can get by going here
Mask 46 which you can find here
Plugins: Lokas 3D Shadow
----------------------------
This tutorial is written for those who have working knowledge of PSPX2 (any version will do).
This tutorial was written by me on February 21, 2016. Please do not copy or paste on any other forum, website or blog provide link back to tut only. Please do not claim as your own. This tutorial is copyrighted to me. Any resemblance to any other tutorial is purely coincidental.
Ok - let's start and remember to save often.
Open up a 750 x 650 blank canvas (we can resize it later)
Select Element 17 - resize by 85%
Paste and position in the center of the canvas
Select Element 5 - resize by 75%
Paste and position in the center of the canvas
Select Frame Element 7 - resize by 55%
Paste and position in the center of the canvas
Image Free Rotate Left by 15%
Select your magic wand tool and select the center of the frame (Add (Shift), RGB Value, Tolerance 25, Contiguous checked, Feather 0)
Selections, Modify, Expand by 5
Paste paper 1
Select invert, delete, select none
Move paper layer below frame layer
Select Element 63 - resize by 55%
Paste and position on the right side
Select Element 58 - resize by 40%
Image Free Rotate Right by 15% and paste on the right side
Select Element 26 - resize by 30%
Paste and position on the bottom right
Select Element 20 - resize by 30%
Paste and position on the bottom right
Select Element 38 - resize by 35%
Paste and position on the bottom right
Select Element 24 - resize by 30%
Paste and position on the bottom right
Paste tube of choice where desired
Apply Lokas 3D Shadow at default settings
Select Element 21 - resize by 40%
Paste and position on the bottom right
Select Element 36 - resize by 25%
Paste and position on the bottom right
Select Element 4 - resize by 25%
Paste and position on the bottom
Select Element 41 - resize by 25%
Paste and position on the bottom
Select Element 64 - resize by 30%
Paste and position on the bottom
Select Element 62 - resize by 30%
Image Free Rotate Left by 30% and paste on the bottom left
Select Element 29 - resize by 25%
Paste and position on the bottom left
Select Element 22 - resize by 30%
Paste and paste on the bottom left
Select Element 35 - resize by 20%
Paste and position on the bottom left
Select Element 16 - resize by 40%
Paste and position on the bottom left
Select Element 52 - resize by 40%
Paste and position on the bottom left
Select Element 51 - resize by 35%
Paste and position on the bottom
Select Element 44 - resize by 30%
Paste and position on the bottom
Select Element 59 - resize by 40%
Paste and position on the top left
Select Element 10 - resize by 30%
Paste and position on the top left
Select Element 23 - resize by 40%
Image Free Rotate Left by 15% and paste on the bottom where desired
Paste paper 2 on canvas
Apply Mask 46 or mask of choice
Merge group and move to the bottom layer
Add any dropshadows you like
Sharpen any elements as needed
Crop and resize as desired
Add copyright info, license number and name
You're done! Thanks for trying my tutorial!

Sunday, January 31, 2016
CUPID

Supplies needed:
I am using the stunning artwork from KiwiBG for this tutorial which you can find here
Scrapkit: I am using a stunning kit from Schnegge called "Cupid" which you can get by going here
Mask M1 from Kylie which you can find here
Plugins: Lokas 3D Shadow, Eyecandy - Gradient Glow
----------------------------
This tutorial is written for those who have working knowledge of PSPX2 (any version will do).
This tutorial was written by me on January 31, 2016. Please do not copy or paste on any other forum, website or blog provide link back to tut only. Please do not claim as your own. This tutorial is copyrighted to me. Any resemblance to any other tutorial is purely coincidental.
Ok - let's start and remember to save often.
Open up a 750 x 650 blank canvas (we can resize it later)
Select Frame Element 26 - paste and position in the center of the canvas
Select your magic wand tool and select the center of the frame (Add (Shift), RGB Value, Tolerance 25, Contiguous checked, Feather 0)
Selections, Modify, Expand by 5
Paste paper 3
Select invert, delete
Paste close-up tube on paper layer and delete
Select none
Change close-up to Screen
Apply dropshadow and merge down on paper layer
Effect, Texture Effects, Blinds (Width 3, Opactity 15, Horizontal and Light from left/top checked)
Move paper layer below frame layer
Select Element 23 - resize by 40%
Paste and position on the top center of the frame
Select Element 13 - resize by 55%
Image Free Rotate Right by 15% and paste on the top left
Apply Eyecandy Gradient Glow on fat default settings
Select Element 19 - resize by 40%
Paste and position on the right side
Select Element 55 - resize by 25%
Paste and position on the left side
Select Element 31 - resize by 65%
Paste and position on the bottom of the frame where desired
Select Element 28 - resize by 30%
Paste and position on the bottom right
Paste tube of choice where desired
Apply Lokas 3D Shadow at default settings
Select Element 58 - resize by 30%
Paste and position on the bottom below tube
Select Element 29 - resize by 35%
Paste and position on the bottom
Select Element 48 - resize by 40%
Paste and position on the bottom
Select Element 25 - resize by 40%
Image Free Rotate Left by 15% and paste on the bottom left
Select Element 18 - resize by 45%
Paste and position on the bottom left
Select Element 20 - resize by 30%
Paste and position on the bottom left
Select Element 62 - resize by 30%
Paste and paste on the bottom left
Select Element 24 - resize by 40%
Paste and position on the bottom left
Select Element 43 - resize by 40%
Paste and position on the bottom left
Select Element 52 - resize by 25%
Paste and position on the bottom left
Select Element 44 - resize by 30%
Paste and position on the bottom left
Paste paper 1 on canvas
Apply Mask M1 or mask of choice
Merge group and move to the bottom layer
Add any dropshadows you like
Sharpen any elements as needed
Crop and resize as desired
Add copyright info, license number and name
You're done! Thanks for trying my tutorial!
Sunday, January 17, 2016
FALLEN ANGEL

Supplies needed:
I am using the stunning artwork from Lorenzo Sperlonga for this tutorial which you can find here
Scrapkit: I am using a stunning kit from Schnegge called "IB-LorenzoSperlonga 73-1" which you can get by going here
Mask 32 from Moonbeams and Spiderwebs which you can find here
Plugins: Lokas 3D Shadow
----------------------------
This tutorial is written for those who have working knowledge of PSPX2 (any version will do).
This tutorial was written by me on January 17, 2016. Please do not copy or paste on any other forum, website or blog provide link back to tut only. Please do not claim as your own. This tutorial is copyrighted to me. Any resemblance to any other tutorial is purely coincidental.
Ok - let's start and remember to save often.
Open up a 750 x 650 blank canvas (we can resize it later)
Select Frame Element 1 - Paste and position in the center of the canvas
Select your magic wand tool and select the center of the frame (Add (Shift), RGB Value, Tolerance 25, Contiguous checked, Feather 0)
Selections, Modify, Expand by 5
Paste paper 5
Select invert, delete, select none
Move paper layer below frame layer
Select Moon Element - resize by 40%
Paste and position on the top where desired below the frame
Select Bow 1 Element - resize by 40%
Image Free Rotate Left by 15% and paste on the top left
Select Wordart Element - resize by 50%
Paste and position on the top right where desired
Select Feathers Element - resize by 45%
Paste and position on the right side
Select Leaves Element - resize by 40%
Paste and position on the bottom right
Select Rose 1 Element - resize by 30%
Paste and position on the bottom right
Select Candle Element - resize by 45%
Paste and position on the bottom right
Select Angel Element - resize by 40%
Paste and position on the bottom right
Paste tube of choice where desired
Apply Lokas 3D Shadow at default settings
Select Foliage Element - resize by 40%
Paste and position on the bottom left
Select Cross Element - resize by 40%
Paste and position on the bottom left
Select Button Element - resize by 40%
Paste and position on the bottom left
Select Heart Element - resize by 40%
Image Free Rotate Left by 15% and paste on the bottom
Paste paper 2 on canvas
Apply Mask 32 or mask of choice
Merge group and move to the bottom layer
Add any dropshadows you like
Sharpen any elements as needed
Crop and resize as desired
Add copyright info, license number and name
You're done! Thanks for trying my tutorial!
Sunday, August 16, 2015
SKATER GIRL

Supplies needed:
I am using the stunning artwork from Danny Lee for this tutorial which you can find here
Scrapkit: I am using a stunning kit from Schnegge called "Green Skate" which you can get by going here
Mask 40 from Becky which you can find here
Plugins: Lokas 3D Shadow, Eyecandy 4000 - Gradient Glow
----------------------------
This tutorial is written for those who have working knowledge of PSPX2 (any version will do).
This tutorial was written by me on August 16, 2015. Please do not copy or paste on any other forum, website or blog provide link back to tut only. Please do not claim as your own. This tutorial is copyrighted to me. Any resemblance to any other tutorial is purely coincidental.
Ok - let's start and remember to save often.
Open up a 750 x 650 blank canvas (we can resize it later)
Select Element 48 - resize by 50%
Paste and position in the center of the canvas
Select your magic wand tool and select the center of each square window if desired (Add (Shift), RGB Value, Tolerance 25, Contiguous checked, Feather 0)
Adjust, Add/Remove Noise, Add Noise (Uniform checked, Noise 100%, Monochrome checked)
Select none
Select Element 19 - resize by 50%
Paste and position on the right side
Select Element 31 - resize by 45%
Paste and position on the bottom where desired
Select Element 25 - resize by 50%
Paste and position on the left side
Select Element 52 - resize by 40%
Paste and position on the top left
Apply Eyecandy Gradient Glow on fat default settings (Glow Width 3)
Select Element 12 - resize by 45%
Image Free Rotate Right by 15% and paste on top right
Select Element 20 - resize by 40%
Paste and position on the bottom right
Paste tube of choice where desired
Apply Lokas 3D Shadow at default settings
Select Element 36 - resize by 40%
Paste and position on the bottom left
Select Element 34 - resize by 40%
Paste and position on the bottom left
Select Element 56 - resize by 25%
Paste and position on bottom left above element 34
Select Element 53 - resize by 25%
Paste and position on the bottom left
Select Element 57 - resize by 25%
Paste and position on the bottom left
Select Element 58 - resize by 25%
Paste and position on the bottom left
Select Element 45 - resize by 30%
Paste and position on the bottom
Select Element 59 - resize by 25%
Paste and position on the bottom
Select Element 50 - resize by 40%
Paste and position on the bottom
Select Element 61 - resize by 25%
Paste and position on the bottom
Select Element 51 - resize by 25%
Paste and position on the bottom
Select Element 22 - resize by 95%
Paste and position on the top of the canvas and move to the bottom layer
Paste paper 4 on canvas
Apply Mask 40 or mask of choice
Merge group and move to the bottom layer
Add any dropshadows you like
Sharpen any elements as needed
Crop and resize as desired
Add copyright info, license number and name
You're done! Thanks for trying my tutorial!
Friday, August 7, 2015
BLUE MERMAID

Supplies needed:
I am using the stunning artwork from Danny Lee for this tutorial which you can find here
Scrapkit: I am using a stunning kit from Schnegge called "Mermaid Yellow Blue" which you can get by going here
Mask 10 from Melissaz Creations which you can find here
Plugins: Lokas 3D Shadow
----------------------------
This tutorial is written for those who have working knowledge of PSPX2 (any version will do).
This tutorial was written by me on August 7, 2015. Please do not copy or paste on any other forum, website or blog provide link back to tut only. Please do not claim as your own. This tutorial is copyrighted to me. Any resemblance to any other tutorial is purely coincidental.
Ok - let's start and remember to save often.
Open up a 750 x 650 blank canvas (we can resize it later)
Select Frame Element 59 - resize by 90%
Paste and position in the center of the canvas
Select your magic wand tool and select the center of the frame (Add (Shift), RGB Value, Tolerance 25, Contiguous checked, Feather 0)
Selections, Modify, Expand by 5
Paste paper 10
Select invert, delete
Paste close-up tube on top of paper where desired and delete
Select none
Change close-up tube to Overlay
Apply drop shadow and merge down on paper layer
Effect, Texture Effects, Blinds (Width 2, Opactity 20, Horizontal and Light from left/top checked)
Move paper layer below window frame layer
Select Element 6 - resize by 40%
Paste and position on the right side above paper layer
Select Element 11 - resize by 40%
Paste and position on the right side
Select Element 68 - resize by 45%
Paste and position on the bottom right
Select Element 49 - resize by 30%
Paste and position on the bottom right
Select Element 47 - resize by 40%
Image mirror and paste on the bottom left
Select Element 25 - resize by 25%
Paste and position on the bottom left
Paste tube of choice where desired
Apply Lokas 3D Shadow at default settings
Select Element 20 - resize by 25%
Paste and position on the bottom right
Select Element 35 - resize by 30%
Paste and position on the right side where desired
Select Element 38 - resize by 40%
Image Free Rotate Left by 15% and paste on the bottom left
Select Element 34 - resize by 30%
Paste and position on the bottom left
Select Element 40 - resize by 40%
Paste and position on the bottom below the tube layer
Select Element 50 - resize by 35%
Image Free Rotate Left by 15% and paste on the bottom below tube
Select Element 53 - resize by 30%
Paste and position on the bottom below the tube
Select Element 23 - resize by 25%
Paste and position on the bottom
Select Element 63 - resize by 40%
Paste and position on the bottom
Select Element 9 - resize by 30%
Paste and position on the bottom
Select Element 18 - resize by 30%
Paste and position on the left side
Select Element 43 - resize by 55%
Paste and position on the top left
Select Element 71 - resize by 30%
Image mirror and paste on the top right
Paste paper 7 on canvas
Apply Mask 10 or mask of choice
Merge group and move to the bottom layer
Add any dropshadows you like
Sharpen any elements as needed
Crop and resize as desired
Add copyright info, license number and name
You're done! Thanks for trying my tutorial!
Saturday, July 25, 2015
GAME OVER

Supplies needed:
I am using the stunning artwork from Martin Abel for this tutorial which you can find here
Scrapkit: I am using a stunning kit from Schnegge called "IB-MartinAbel-34-1" which you can get by going here
Mask 34 from Becky which you can find here
Plugins: Lokas 3D Shadow
----------------------------
This tutorial is written for those who have working knowledge of PSPX2 (any version will do).
This tutorial was written by me on July 25, 2015. Please do not copy or paste on any other forum, website or blog provide link back to tut only. Please do not claim as your own. This tutorial is copyrighted to me. Any resemblance to any other tutorial is purely coincidental.
Ok - let's start and remember to save often.
Open up a 750 x 650 blank canvas (we can resize it later)
Select Frame 2 Element - resize by 75%
Paste and position in the center of the canvas
Select your magic wand tool and select the center of the frame (Add (Shift), RGB Value, Tolerance 25, Contiguous checked, Feather 0)
Selections, Modify, Expand by 5
Paste paper 1
Select invert, delete, select none
Move paper below frame
Select Element 9 - resize by 80%
Paste and position on the bottom below the frame
Select Element 2 - resize by 50%
Paste and position on the right side above frame
Select Wordart 1 Element - resize by 45%
Paste and position on the top left
Select Element 1 - resize by 45%
Image Free Rotate Right by 15% and paste on top left
Select Element 16 - resize by 30%
Paste and position the left side above bike element
Select Element 6 - resize by 40%
Paste and position on the bottom right
Paste tube of choice where desired
Apply Lokas 3D Shadow at default settings
Select Element 7 - resize by 35%
Paste and position on the bottom right
Select Element 15 - resize by 30%
Paste and position on the bottom right
Select Element 18 - resize by 35%
Paste and position on the bottom left
Select Element 12 - resize by 35%
Paste and position on the bottom below tube
Select Element 10 - resize by 25%
Image Free Rotate Left by 15% and paste on the bottom below tube
Select Element 13 - resize by 30%
Paste and position on the bottom
Select Element 4 -paste and position in the center of the canvas
Move to the bottom layer
Add new raster layer and flood-fill with color or gradient of choice
Apply Mask 34 or mask of choice
Merge group and move to the bottom layer
Add any dropshadows you like
Sharpen any elements as needed
Crop and resize as desired
Add copyright info, license number and name
You're done! Thanks for trying my tutorial!
Thursday, July 2, 2015
VACATION

Supplies needed:
I am using the stunning artwork from Andy Cooper for this tutorial which you can find here
Scrapkit: I am using a stunning kit from Schnegge called "Vacation" which you can get by going here
Mask 50 from Millie which you can find here
Plugins: Lokas 3D Shadow
----------------------------
This tutorial is written for those who have working knowledge of PSPX2 (any version will do).
This tutorial was written by me on July 2, 2015. Please do not copy or paste on any other forum, website or blog provide link back to tut only. Please do not claim as your own. This tutorial is copyrighted to me. Any resemblance to any other tutorial is purely coincidental.
Ok - let's start and remember to save often.
Open up a 750 x 650 blank canvas (we can resize it later)
Select Frame Element 46 - resize by 65%
Paste and position in the center of the canvas
Select your magic wand tool and select the center of the frame (Add (Shift), RGB Value, Tolerance 25, Contiguous checked, Feather 0)
Selections, Modify, Expand by 5
Paste paper 6
Select invert, delete
Paste close-up tube on top of paper where desired and delete
Select none
Change close-up tube to Screen
Apply drop shadow and merge down on paper layer
Effect, Texture Effects, Blinds (Width 2, Opactity 20, Horizontal and Light from left/top checked)
Move paper layer below window frame layer
Select Element 41 - resize by 65%
Paste and position on top right where desired
Select Element 37 - resize by 45%
Paste and position on bottom right
Select Element 50 - resize by 40%
Paste and position on left side where desired
Select Element 22 - resize by 40%
Paste and position on the bottom right
Paste tube of choice where desired
Apply Lokas 3D Shadow at default settings
Select Element 18 - resize by 25%
Paste and position on bottom right side
Select Element 28 - resize by 20%
Paste and position on the bottom right
Select Element 61 - resize by 22%
Paste and position on the bottom right
Select Element 39 - resize by 35%
Paste and position on the bottom left
Select Element 62 - resize by 20%
Paste and position on the bottom left
Select Element 48 - resize by 20%
Paste and position on the bottom left
Select Element 49 - resize by 20%
Paste and position on the bottom left
Select Element 8 - resize by 22%
Paste and position on the bottom left
Select Element 58 - resize by 20%
Paste and position on the bottom left
Select Element 6 - resize by 22%
Paste and position on the bottom
Select Element 38 - resize by 25%
Paste and position on the bottom
Select Element 23 - resize by 70%
Paste and position on the canvas and move to bottom layer
Add new raster layer and flood-fil with color or gradient of choice
Apply Mask 50 or mask of choice
Merge group and move to the bottom layer
Add any dropshadows you like
Sharpen any elements as needed
Crop and resize as desired
Add copyright info, license number and name
You're done! Thanks for trying my tutorial!
Sunday, June 21, 2015
TURTLE BABE

Supplies needed:
I am using the stunning artwork from Danny Lee for this tutorial which you can find here
Scrapkit: I am using a beautiful kit from Schnegge called "Turtle" which you can get by going here
Mask 8 from Gina Gems which you can find here
Plugins: Lokas 3D Shadow, Eyecandy 4000 - Gradient Glow
----------------------------
This tutorial is written for those who have working knowledge of PSPX2 (any version will do).
This tutorial was written by me on June 21, 2014. Please do not copy or paste on any other forum, website or blog provide link back to tut only. Please do not claim as your own. This tutorial is copyrighted to me. Any resemblance to any other tutorial is purely coincidental.
Ok - let's start and remember to save often.
Open up a 750 x 650 blank canvas (we can resize it later)
Select Frame Element 43 - resize by 65%
Paste and position in the center of thee canvas
Select your magic wand tool and select center of the frame (Add (Shift), RGB Value, Tolerance 25, Contiguous checked, Feather 0)
Selections, Modify, Expand by 5
Paste paper 4
Select invert, delete select none
Move paper layer below window frame layer
Select Element 54 - resize by 40%
Paste and position on on the left side below the frame
Select Element 52 - resize by 65%
Paste and position on the bottom of the frame
Select Element 2 - resize by 45%
Paste and position on the bottom right below the frame
Select Element 13 - resize by 45%
Paste and position on the top left above frame
Select Element 28 - resize by 40%
Image Free Rotate Left by 15% and paste on top left
Apply Eyecandy Gradient Glow on fat default settings (Glow Width 3)
Select Element 56 - resize by 35%
Paste and position on left side
Select Element 38 - resize by 25%
Paste and position on left side
Select Element 55 - resize by 55%
Image Free Rotate Right by 15% and paste on bottom left
Paste tube of choice where desired
Apply Lokas 3D Shadow at default settings
Select Element 58- resize by 30%
Paste and position on bottom right
Select Element 35 - resize by 30%
Paste and position on bottom right
Select Element 16 - resize by 25%
Paste and position on bottom right
Select Element 45 - resize by 30%
Paste and position on bottom left above boat element
Select Element 33 - resize by 30%
Paste and position on bottom left
Select Element 47 - resize by 22%
Image mirror and paste on the bottom left
Select Element 60 - resize by 30%
Paste and position on the bottom
Select Element 17 - resize by 30%
Paste and position on the bottom
Select Element 32 - resize by 25%
Paste and position on the bottom
Select Element 42 - resize by 30%
Paste and position in the center above the fence element
Paste paper 1 on canvas
Apply Mask 8 or mask of choice
Merge group and move to the bottom layer
Add any dropshadows you like
Sharpen any elements as needed
Crop and resize as desired
Add copyright info, license number and name
You're done! Thanks for trying my tutorial!
Wednesday, June 17, 2015
POWER GIRL

Supplies needed:
I am using the stunning artwork from The Hunter for this tutorial which you can find here
Scrapkit: I am using a stunning kit from Schnegge Productions called "Power Girl" which you can get by going here
Mask 17 from Horseplay's Pasture which you can find here
Plugins: Lokas 3D Shadow
----------------------------
This tutorial is written for those who have working knowledge of PSPX2 (any version will do).
This tutorial was written by me on June 17, 2014. Please do not copy or paste on any other forum, website or blog provide link back to tut only. Please do not claim as your own. This tutorial is copyrighted to me. Any resemblance to any other tutorial is purely coincidental.
Ok - let's start and remember to save often.
Open up a 750 x 650 blank canvas (we can resize it later)
Select Element 2 - resize by 65%
Paste and position in the center of the canvas and move up about 2 inches from top
Select Element 13 - resize by 35%
Paste and position on top right below brick building element
Select Element 27 - resize by 30%
Paste and position on top right
Select Element 36 - resize by 30%
Paste and position on top left
Select Element 63 - resize by 40%
Image Free Rotate Right by 15% and paste on left side
Select Element 12 - resize by 40%
Paste and position on bottom right
Select Element 65 - resize by 40%
Paste and position on right side below barrels element
Select Element 56 - resize by 30%
Image Free Rotate Left by 15% and paste on bottom right
Select Element 57 - resize by 25%
Image Free Rotate Right by 15% and paste on bottom right
Paste tube of choice where desired
Apply Lokas 3D Shadow at default settings
Select Element 55 - resize by 35%
Paste and position on bottom left
Select Element 62 - resize by 30%
Paste and position on bottom left
Select Element 59 - resize by 40%
Image Free Rotate Right by 15% and paste on the bottom
Select Element 53 - resize by 30%
Paste and position on the bottom
Select Element 39 - resize by 35%
Image Free Rotate Left by 15% and paste on the bottom
Select Element 64 - resize by 30%
Paste and position on the bottom
Select Element 61 - resize by 40%
Image Free Rotate Left by 15% and paste on the bottom
Select Element 3 - resize by 35%
Paste and position on the bottom
Paste paper 10 on canvas
Apply Mask 17 or mask of choice
Merge group and move to the bottom layer
Add any dropshadows you like
Sharpen any elements as needed
Crop and resize as desired
Add copyright info, license number and name
You're done! Thanks for trying my tutorial!
Sunday, June 14, 2015
AMERICAN BEAUTY

Supplies needed:
I am using the stunning artwork from Andy Cooper for this tutorial which you can find here
Scrapkit: I am using a stunning kit from Schnegge called "Beauty American" which you can get by going here
Patriotic Mask 3 from Dee which you can find here
Plugins: Lokas 3D Shadow
----------------------------
This tutorial is written for those who have working knowledge of PSPX2 (any version will do).
This tutorial was written by me on June 14, 2014. Please do not copy or paste on any other forum, website or blog provide link back to tut only. Please do not claim as your own. This tutorial is copyrighted to me. Any resemblance to any other tutorial is purely coincidental.
Ok - let's start and remember to save often.
Open up a 750 x 650 blank canvas (we can resize it later)
Select Frame Element 61 - resize by 80%
Paste and position in the center of the canvas
Select your magic wand tool and click in the center of the frame (Add (Shift), RGB Value, Tolerance 25, Contiguous checked, Feather 0)
Selections, Modify, Expand by 5
Add new raster layer and flood-fill with color or gradient of choice
Paste close-up tube of choice on color/gradient layer
Select invert, delete, select none
Change close-up to Luminance (Legacy)
Apply dropshadow and Merge down on color layer
Effect, Texture Effects, Blinds (Width 2, Opacity 20, Horizontal and Light from left/top checked)
Move paper layer below frame layer
Select Element 66 - resize by 60%
Paste and position on right side below frame
Select Element 13 - resize by 45%
Paste and position on top right
Select Element 12 - resize by 35%
Paste and position on top right
Select Element 58 - resize by 35%
Paste and position on top right
Paste tube of choice where desired
Apply Lokas 3D Shadow at default settings
Select Element 59 - resize by 45%
Paste and position on bottom right
Select Element 51 - resize by 35%
Paste and position on bottom right below car element
Select Element 38 - resize by 25%
Paste and position on bottom right
Select Element 46 - resize by 40%
Image Free Rotate Left by 15% and paste on left side
Select Element 64 - resize by 40%
Paste and position on bottom left
Select Element 70 - resize by 35%
Paste and position on bottom left
Select Element 48 - resize by 20%
Paste and position on bottom left
Select Element 69 - resize by 25%
Paste and position on the bottom left
Select Element 54 - resize by 30%
Paste and position on the bottom
Select Element 47 - resize by 30%
Paste and position on the bottom
Select Element 39 - resize by 25%
Paste and position on the bottom
Select Element 45 - resize by 25%
Paste and position on the bottom
Add new raster layer and flood-fill with color or gradient of choice
Apply Mask 3 or mask of choice
Merge group and move to the bottom layer
Add any dropshadows you like
Sharpen any elements as needed
Crop and resize as desired
Add copyright info, license number and name
You're done! Thanks for trying my tutorial!
Subscribe to:
Posts
(Atom)


