I CT For




Showing posts with label Bonnies Creations. Show all posts
Showing posts with label Bonnies Creations. Show all posts
Thursday, May 16, 2013
EMO PUNK

Supplies needed:
I am using the amazing art from Bonnies Creations for this tutorial, which you can find here
Scrapkit: I am using an awesome kit from Amy Marie called "Emo Alice" which you can get by going here
Punk Template 2 by Brutal Designs which can be found here
Mask 115 from Designs by Vaybs which you can find here
Plugins used: Xero-Radiance, Xero - Bad Dream, Lokas 3D Shadow
----------------------------
This tutorial is written for those who have working knowledge of PSPX2 (any version will do).
This tutorial was written by me on May 16, 2013. Please do not copy or paste on any other forum, website or blog provide link back to tut only. Please do not claim as your own. This tutorial is copyrighted to me. Any resemblance to any other tutorial is purely coincidental.
Ok - let's start and remember to save often.
Open the template and using your shortcut keys on your keyboard (SHIFT+D) duplicate the template as a new image. Close the original and delete the copywrite layer.
Select Square Raster 1 layer
Select all, float, defloat
Add new raster layer and flood-fill with gradient of choice (style, Angle 45, Repeat 2)
Paste close-up tube of choice on top of gradient and delete
Change close-up to Luminance Hard Light
Apply Xero Bad Dream at default settings or random setting of choice
Drop opacity on close-up down to 80%
Merge close-up down on gradient layer
Effects, Texture Effects, Blinds (Width 2, Opactity 20, Horizontal and Light from left/top checked)
Delete/Hide original square layer
Select Square Copy of Raster 1 layer and repeat above steps
Select Square Raster 3 layer
Select all, float, defloat
Add new raster layer and flood-fill with color of choice
Select none
Adjust, Add/Remove Noise, Add Noise (Uniform checked, Noise 60%, Monochrome checked)
Delete/Hide original square layer
Select Square Raster 4 layer and repeat above steps
Select Circle Frame Raster 5 layer
Select all, float, defloat
Add new raster layer and flood-fill with color of choice
Select none
Delete/Hide original frame layer
Select Circle Raster 6 layer
Adjust, Add/Remove Noise, Add Noise (Uniform checked, Noise 100%, Monochrome checked)
Select Skyline Element - resize by 80%
Paste and position in the center on top of circle frames
Select Square Raster 10 layer
Select all, float, defloat
Paste paper 4
Select invert, delete, select none
Delete/Hide original square layer
Select Square Raster 11 layer and repeat above steps
Select Rectangle Raster 9 layer
Select all, float, defloat
Paste paper 17
Select invert, delete, select none
Delete/Hide original rectangle layer
Select Square Raster 2 layer
Select all, float, defloat
Paste paper 12
Select invert, delete, select none
Delete/Hide original square layer
Select Circle Raster 8 layer
Select all, float, defloat
Paste paper 22
Select invert, delete, select none
Delete/Hide original circle layer
Select Circle Raster 7 layer
Select all, float, defloat
Paste paper 22
Select invert, delete, select none
Delete/Hide original circle layer
Select Square Raster 12 layer
Select all, float, defloat
Paste paper 8
Select invert, delete, select none
Delete/Hide original square layer
Select Strip Raster 14 layer
Select all, float, defloat
Add new raster layer and flood-fill with color of choice
Select none
Delete/Hide original strip layer
Select Rectangle Raster 13 layer
Select all, float, defloat
Paste paper 11
Select invert, delete, select none
Delete/Hide original rectangle layer
Copy and paste tube of choice and position where desired
Apply Xero Radiance at setting of choice
Apply Lokas 3D Shadow at default settings
Select Skeletonlock1 Element - resize by 65%
Paste and position on top right
Select Heart5 Element - resize by 40%
Paste and position on bottom right
Select Candle1 Element - resize by 40%
Paste and position on bottom right
Select Emobear1 Element - resize by 45%
Image mirror and paste on bottom right side
Select Cupcake2 Element - resize by 65%
Paste and position on bottom left side
Select Lipstick Element - resize by 50%
Paste and position on bottom left side
Select Bottle1 Element - resize by 40%
Paste and position on bottom left side
Select Wire4 Element and paste on canvas
Positon where you desire and move to bottom layer
Select New raster layer and flood fill with color or gradient of choice
Move layer to the bottom of the template
Apply Mask 115
Merge group and move to the bottom
Add any additional elements you like.
Add any dropshadows you like
Crop and resize as desired
Add copyright info, license number and name
You're done! Thanks for trying my tutorial!"
Saturday, March 30, 2013
LIL' PRINCESS EXTRAS


These Extra's were made using the amazing art by Bonnies Creations, which you can find here
These extra's were made by me and my own creativity. Please do not rip apart, destroy, alter them or claim them as your own. Thanks.
Sunday, March 10, 2013
WILD LITTLE GOTH

Supplies needed:
I am using the amazing art from Bonnies Creations for this tutorial, which you can find here
Scrapkit: I am a gorgeous kit from Amy Marie called "Wild One" which you can get by going here
Mask 279 from Trese which you can find here
Plugins used: Xero-Radiance, Xero-Bad Dream, Lokas 3D Shadow
----------------------------
This tutorial is written for those who have working knowledge of PSPX2 (any version will do).
This tutorial was written by me on March 10, 2013. Please do not copy or paste on any other forum, website or blog provide link back to tut only. Please do not claim as your own. This tutorial is copyrighted to me. Any resemblance to any other tutorial is purely coincidental.
Ok - let's start and remember to save often.
Open up a 800 x 800 blank canvas (we can resize it later)
Select Frame 5 and paste in the center of the canvas
Select your magic wand tool and click in the center of each frame (hold shift) (Add (Shift), RGB Value, Tolerance 25, Contiguous checked, Feather 0)
Selections, Modify, Expand by 2
Paste paper 7
Select invert, delete
Paste Close-up tube on top of paper where desired and delete
Select none
Change close-up to Hard Light
Drop opacity on close-up down to 70%
Apply Dropshadow on tube and merge down on top of paper
Move paper below frame layer
Paste tube of choice where desired on top of frame
Apply Xero Radiance at setting of choice
Apply Lokas 3D Shadow at default settings
Select Element 10 - resize by 45%
Image Free Rotate Right by 15%
Paste and position on top right side
Select Element 26 - Image Free Rotate Right by 20%
Paste and position on right side below tube layer
Select Element 8 - resize by 70%
Paste and position on bottom right side
Select Element 37 - resize by 50%
Image mirror and paste on the bottom right above element 8
Select Element 32 - resize by 50%
Paste and position on bottom left side
Select Element 35 - resize by 45%
Paste and position on bottom left side
Select Element 67 - resize by 90%
Paste in the center of canvas and move to the bottom layer
Select New raster layer and flood fill with color or gradient of choice
Move layer to the bottom of the template
Apply Mask 279
Merge group and move to the bottom
Add any additional elements you like.
Add any dropshadows you like
Crop and resize as desired
Add copyright info, license number and name
You're done! Thanks for trying my tutorial!
Thursday, February 14, 2013
WAITING FOR YOUR LOVE

Supplies needed:
I am using the amazing art from Bonnies Creations for this tutorial, which you can find here
Scrapkit: I am using a gorgeous kit from Bibi's Collections called "Sabina Love" which you can get by going here
Template 3 from Millie which can be found here
M4 Mask from Kylie which you can find on the Misfits Blog here
Plugins used: Eyecandy 4000 - Glass, Xero-Radiance, Xero-Bad Dream, Lokas 3D Shadow
----------------------------
This tutorial is written for those who have working knowledge of PSPX2 (any version will do).
This tutorial was written by me on February 14, 2013. Please do not copy or paste on any other forum, website or blog provide link back to tut only. Please do not claim as your own. This tutorial is copyrighted to me. Any resemblance to any other tutorial is purely coincidental.
Ok - let's start and remember to save often.
Open the template and using your shortcut keys on your keyboard (SHIFT+D) duplicate the template as a new image. Close the original and delete the copywrite layer.
Select Hearts 12 layer
Select all, float, defloat
Paste paper 10
Select invert, delete, select none
Apply Eyecandy 4000 - Glass at default settings
Delete/Hide original hearts layer
Select Square 11 layer
Select all, float, defloat
Add new raster layer and flood-fill with gradient colors of choice
(Linear style, Angle 45, Repeat 1)
Paste close-up tube of choice on top of gradient and delete
Change close-ups to Luminance (Legacy)
Apply Xero Bad Dream at default settings or random setting of choice
Drop opacity on close-up down to 90%
Apply dropshadow and merge down on top of gradient layer
Delete/Hide original square layer
Select Squares 8, 9, and 10 layers and repeat above steps
Select Rectangle 7 layer
Select all, float, defloat
Paste paper 13
Select invert, delete, select none
Delete/Hide original rectangle layer
Select Rectangle 5 layer and repeat above steps
Select Rectangle 6 layer
Select all, float, defloat
Paste paper 14
Select invert, delete, select none
Delete/Hide original rectangle layer
Select Square 4 layer
Select all, float, defloat
Paste paper 3
Select invert, delete, select none
Delete/Hide original square layer
Select Square 3 layer and repeat above steps
Select Double Circle 2 layer
Select all, float, defloat
Paste paper 15
Select invert, delete, select none
Delete/Hide original circles layer
Select Double Circles 1 layer and repeat above steps
Copy and paste tube of choice and position where desired
Apply Xero Radiance at setting of choice
Apply Lokas 3D Shadow at default settings
Select Element 41 - resize by 65%
Paste and position on top right corner
Select Element 10 - resize by 65%
Paste and position on right side
Select Element 43 - resize by 40%
Paste and position on bottom left side
Select Element 98 - resize by 55%
Paste and position on bottom left behind element 43
Select Element 81 - resize by 55%
Select Element 44 - resize by 35%
Paste and position on bottom right above element 44
Image, mirror and paste on bottom right side
Select New raster layer and flood fill with color or gradient of choice
Move layer to the bottom of the template
Apply M4 Mask
Merge group and move to the bottom
Add any additional elements you like.
Add any dropshadows you like
Crop and resize as desired
Add copyright info, license number and name
You're done! Thanks for trying my tutorial!
Sunday, January 20, 2013
VALENTINE ANGEL

Supplies needed:
I am using the amazing art from Bonnies Creations for this tutorial, which you can find here
Scrapkit: I am using a kit from Designs by Joan called "Love" which you can get by going here
Heart Template 2 from Tamie which can be found here
Heart Mask here
Plugins used: Alien Skin Eyecandy 5 Impact - Glass, Xero-Radiance, Xero-Bad Dream, Lokas 3D Shadow
----------------------------
This tutorial is written for those who have working knowledge of PSPX2 (any version will do).
This tutorial was written by me on January 20, 2013. Please do not copy or paste on any other forum, website or blog provide link back to tut only. Please do not claim as your own. This tutorial is copyrighted to me. Any resemblance to any other tutorial is purely coincidental.
Ok - let's start and remember to save often.
Open the template and using your shortcut keys on your keyboard (SHIFT+D) duplicate the template as a new image. Close the original and delete the copywrite layer.
Select Wordart layer and move if you desire
Adjust, Add/Remove Noise, Add Noise (Uniform checked, Noise 85%, Monochrome checked)
Select Hearts layer
Select all, float, defloat
Add new raster layer and flood-fill with color of choice
Select none
Adjust, Add/Remove Noise, Add Noise (Uniform checked, Noise 55%, Monochrome checked)
Apply Alien Skin Impact Glass on factory default settings
Delete/Hide original hearts layer
Select Middle Heart layer
Select all, float, defloat
Paste paper 3
Select invert, delete, select none
Apply Alien Skin Impact Glass on factory default settings
Delete/Hide original heart layer
Select Love66 Element
Paste and position on top of heart layer
Select Love14 Element - resize by 80%
Image mirror - paste and position on top of heart layer
Select Circle2 layer
Select all, float, defloat
Paste paper 7
Select invert, delete, select none
Delete/Hide original circle layer
Select Circle layer
Select all, float, defloat
Paste paper 10
Select invert, delete, select none
Delete/Hide original circle layer
Copy and paste tube of choice and position where desired
Apply Xero Radiance at setting of choice
Apply Lokas 3D Shadow at default settings
Select Love55 Element - resize by 65%
Paste and position on top left side
Select Love80Element - resize by 40%
Paste and position on bottom right side - move to bottom layer
Image, duplicate, flip and position where you prefer
Select New raster layer and flood fill with color or gradient of choice
Move layer to the bottom of the template
Apply Heart Mask
Merge group and move to the bottom
Add any additional elements you like.
Add any dropshadows you like
Crop and resize as desired
Add copyright info, license number and name
You're done! Thanks for trying my tutorial!
Friday, November 2, 2012
SECRET GARDEN

Supplies needed:
I am using the amazing art from Bonnies Creations for this tutorial, which you can find here
Scrapkit: I am using an beautiful kit from Eclipse Creations called "My Secret Garden" which you can get by going here
Yezmask 070 here
Plugins used: Xero-Radiance, Lokas 3D Shadow
----------------------------
This tutorial is written for those who have working knowledge of PSPX2 (any version will do).
This tutorial was written by me on November 2, 2012. Please do not copy or paste on any other forum, website or blog provide link back to tut only. Please do not claim as your own. This tutorial is copyrighted to me. Any resemblance to any other tutorial is purely coincidental.
Ok - let's start and remember to save often.
Open up a 750 x 650 blank canvas (we can resize it later)
Select EC_MSG_Window element
Paste in the center of the canvas
Select your magic wand and click in the center of your Window (Add (Shift), RGB Value, Tolerance 10, Contiguous checked, Feather 0)
Selections, Modify, Expand by 5
Paste paper EC_MSG_P4
Select invert, delete, select none
Select EC_MSG_Sign element - resize by 65%
Paste and position on left side of window element
Select EC_MSG_Log element - resize by 75%
Paste and position on the right side of window frame
Select EC_MSG_umbrella element
Paste and position on top of log element
Select EC_MSG_Light2 element - resize by 50%
Paste and position on top of log element
Select EC_MSG_Mushroom3 element
Paste and position on the right side of window frame
Copy and paste tube of choice and position where desired
Apply Xero Radiance at setting of choice
Apply Lokas 3D Shadow at default settings
Select EC_MSG_Grass
Paste and reposition on the bottom
Move to the bottom layer
Select New raster layer and flood fill with color or gradient of choice
Move layer to the bottom of the template
Apply Mask 70
Merge group and move to the bottom
Add any additional elements you like.
Add any dropshadows you like
Crop and resize as desired
Add copyright info, license number and name
You're done! Thanks for trying my tutorial!
Tuesday, October 16, 2012
SWEET HALLOW EXTRA'S


These extra's were made by me and my own creativity. Please do not rip apart, destroy, alter them or claim them as your own. Thanks.
Sunday, September 30, 2012
DARK ELIZABETH

Supplies needed:
I am using the amazing art from Bonnies Creations for this tutorial, which you can find here
Scrapkit: I am using an awesome kit from Amy Marie called "Devilish" which you can get by going here
Plugins used: Xero-Radiance, Xero-Bad Dream, Lokas 3D Shadow
----------------------------
This tutorial is written for those who have working knowledge of PSPX2 (any version will do).
This tutorial was written by me on September 30, 2012. Please do not copy or paste on any other forum, website or blog provide link back to tut only. Please do not claim as your own. This tutorial is copyrighted to me. Any resemblance to any other tutorial is purely coincidental.
Ok - let's start and remember to save often.
Open up a 700 x 650 blank canvas
Select Mask 2 element and paste in the center of your canvas
Select frame 2 element
Paste in the center on top of mask layer
Select your magic wand and click in the center of your frame (Add (Shift), RGB Value, Tolerance 10, Contiguous checked, Feather 0)
Selections, Modify, Expand by 5
Paste paper pp012
Select invert, delete, select none
Move paper below frame layer
Select Scrunched Ribbon element and move on the bottom on top of frame layer
Select frame 8 element - resize by 35%
Paste and reposition on bottom right on top of frame 2 layer
Select your magic wand again and click in the center of each square
Selections, Modify, Expand by 2
Add new raster layer and flood-fill with gradient of choice (Linear style, Angle 45, Repeat 2)
Copy and paste close-up tube of choice
Select invert, delete, select none
Change tube to Luminence (Legacy)
Apply Xero Bad Dream at default settings
Drop the opacity on close-up down to about 70%
Apply dropshadow and merge tube down on top of gradient
Move gradient/tube layer below frame element
Apply dropshadow to frame and merge together with gradient/tube layer
Copy and paste tube of choice and position where desired
Apply Xero Radiance at setting of choice
Apply Lokas 3D Shadow at default settings
Select Deadtree element - resize by 85%
Paste and reposition under frame 8 layer to the right
Select MoonWGlow element - resize by 40%
Paste and reposition on top right of mask 2 layer
Add any additional elements you like.
Add any dropshadows you like
Crop and resize as desired
Add copyright info, license number and name
You're done! Thanks for trying my tutorial!
Wednesday, September 12, 2012
EMO CAROUSEL

Supplies needed:
I am using the amazing art from Bonnies Creations for this tutorial, which you can find here
Scrapkit: I am using an awesome kit from Irish Bitch Designs called "Emo Carousel" which you can get by going here
Temp 185 from Tami which can be found here
Mask of choice
Plugins used: Tramages - Tow the Line, Eyecandy 4000 - Glass, Penta - Colordots, Xero-Radiance, VM Extravaganza - Transmission, Xero-Bad Dream, Lokas 3D Shadow
----------------------------
This tutorial is written for those who have working knowledge of PSPX2 (any version will do).
This tutorial was written by me on September 12, 2012. Please do not copy or paste on any other forum, website or blog provide link back to tut only. Please do not claim as your own. This tutorial is copyrighted to me. Any resemblance to any other tutorial is purely coincidental.
Ok - let's start and remember to save often.
Open the template and using your shortcut keys on your keyboard (SHIFT+D) duplicate the template as a new image. Close the original and delete the copywrite layer.
Select Circle Frame Raster 11 layer
Select all, float, and defloat
Add new raster layer and flood-fill with color of choice
Select none
Apply Eyecandy - Glass with default settings
Delete/Hide original frame layer
Select Circle Raster 4 layer
Select all, float, defloat
Add new raster layer and flood fill with gradient of choice (Linear style, Angle 45, Repeat 2)
Paste close-up tube of choice on top of gradient and delete
Change closeup to Luminance (Legacy)
Apply Xero Bad Dream at default settings
Drop the opacity on close-ups down to about 50%
Apply dropshadow and merge down on top of paper
Apply Effect, Texture Effects, Blinds (Width 2, Opactity 20, Horizontal and Light from left/top checked)
Hide/Delete original circle layer
Select Square Copy of Raster 12 layer
Select all, float, defloat
Add new raster layer and flood-fill with color of choice
Select none
Delete/Hide original square layer
Select Oval Raster 2 layer
Select all, float, defloat
Add new raster layer and flood-fill with color of choice
Select none
Apply VM Extravaganza - Transmission with the following settings:

Delete/Hide original oval layer
Select Square Raster 12 layer
Select all, float, defloat
Add new raster layer and flood-fill with color of choice
Select none
Apply Tramages - Tow the Line with the following settings:

Delete/Hide original square layer
Select Circle Raster 3 layer
Select all, float, defloat
Paste IBD_Paper13
Select invert, delete, select none
Delete/Hide original circle layer
Select Rectangle Raster 8 layer
Select all, float, defloat
Add new raster layer and flood-fill with gradient of choice (Linear style, Angle 0, Repeat 1)
Select none
Delete/Hide original rectangle layer
Select Square Raster 7 layer
Select all, float, defloat
Paste IBD_Paper8
Select invert, delete, select none
Delete/Hide original square layer
Select Square Raster 6 layer
Select all, float, defloat
Add new raster layer and flood-fill with color of choice
Select none
Delete/Hide original square layer
Select Square Raster 5 layer
Select all, float, defloat
Add new raster layer and flood-fill with color of choice
Select none
Apply Penta - Color dots with the following settings:
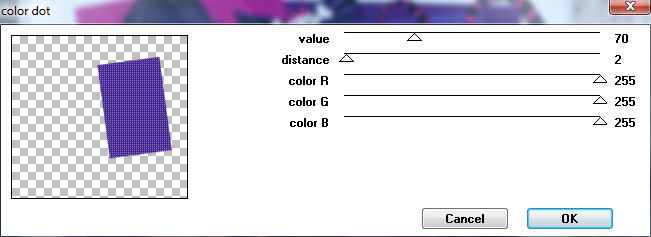
Delete/Hide original square layer
Select Square Raster 9 layer
Select all, float, defloat
Add new raster layer and flood-fill with color of choice
Select none
Apply Texture, Texture Effects, Weave (Gap size 3, Width 5, Opactity 10, Fill gaps checked)
Delete/Hide original square layer
Select Square Raster 10 layer
Select all, float, defloat
Paste IBD_Paper 17
Select invert, delete, select none
Delete/Hide original square layer
Copy and paste tube of choice and position where desired
Apply Xero Radiance at setting of choice
Apply Lokas 3D Shadow
Select New raster layer and flood fill with color or gradient of choice
Move layer to the bottom of the template
Apply mask of choice
Merge group and move to the bottom
Add any additional elements you like.
Add any dropshadows you like
Crop and resize as desired
Add copyright info, license number and name
You're done! Thanks for trying my tutorial!
Wednesday, August 29, 2012
ACHLY'S DARKNESS EXTRA'S


These extra's were made by me and my own creativity. Please do not rip apart, destroy, alter them or claim them as your own. Thanks.
Monday, August 20, 2012
CRAZY LOVE

Supplies needed:
I am using the amazing art from Bonnie's Creations for this tutorial, which you can find here
Scrapkit: I am using an awesome kit from AmyMarie called "EmoMarie" which you can get by going here
Template 18 from Rosa which can be found here
Gems mask 34 here
Plugins used: Eyecandy 4000 Glass, Xero-Radiance, Xero-Bad Dream, Penta - Color dotd, Lokas 3D Shadow
----------------------------
This tutorial is written for those who have working knowledge of PSPX2 (any version will do).
This tutorial was written by me on August 20, 2012. Please do not copy or paste on any other forum, website or blog provide link back to tut only. Please do not claim as your own. This tutorial is copyrighted to me. Any resemblance to any other tutorial is purely coincidental.
Ok - let's start and remember to save often.
Open the template and using your shortcut keys on your keyboard (SHIFT+D) duplicate the template as a new image. Close the original and delete the copywrite layer.
Select Capa 11 and 12 heart layers and delete
Select Capa 10 wordart layer
Select all, float, and defloat
Add new raster layer and flood fill with color of choice
Select none
Apply Eyecandy 4000 Gradient Glow (Glow width 3)
Delete/Hide original wordart layer
Select Capa 9 wordart layer
Select all, float, defloat
Add new raster layer and flood fill with color of choice
Select none
Delete/Hide original wordart layer
Select Capa 8 wordart layer
Apply Adjust, Add/Remove Noise, Add Noise (Uniform checked, Noise 75%, Monochrome checked)
Delete/Hide original wordart layer
Select Capa 7 heart layer
Select all, float, defloat
Add new raster layer and flood fill with color of choice
Select none
Apply Eyecandy 4000 Glass with the following settings:

Delete/Hide original heart layer
Select Capa 6 raster layer
Apply Noise with same settings from above
Delete/Hide original heart layer
Select Capa 4 Raster layer
Select all, float, defloat
Paste paper pp013
Select invert, delete, select none
Delete/Hide original circle layer
Select Capa 5 dotted line layer
Add new raster layer and flood fill with color of choice
Select Capa 5 layer again
Select all, float, defloat, select invert
Select color layer you just filled and delete
Select none
Delete original dotted line layer
Select Capa 3 Square layer
Select all, float, defloat
Add new raster layer and flood fill with color of choice
Paste close up tube of choice on top of paper and delete
Change closeup to Luminance (Legacy)
Apply Xero Bad Dream at default settings
Drop the opacity on close-ups down to about 70%
Apply dropshadow and merge down on top of paper
Apply Effect, Texture Effects, Blinds (Width 2, Opactity 15, Horizontal and Light from left/top checked)
Hide/Delete original square layer
Select Capa 2 Square raster layer
Select all, float, defloat
Add new raster layer and flood fill with gradient of choice
Select none
Apply Penta Jeans at default setting
Delete/Hide original square layer
Select Capa 1 Oval layer
Apply Alien Skin Xenofax 2 - Rip Open with these settings (you can change the colors to whatever you desire):

Now take your magic want and click in the center of your oval
Apply Effect, Texture Effects, Weave (Gap Size 3, Width 7, Opactity 6, Fill gaps checked)
Select none
Copy and paste tube of choice and position where desired
Apply Xero Radiance at setting of choice
Apply Lokas 3D Shadow
Select New raster layer and flood fill with color or gradient of choice
Move layer to the bottom of the template
Apply Gem Mask 34
Merge group and move to the bottom
Add any additional elements you like.
Add any dropshadows you like
Crop and resize as desired
Add copyright info, license number and name
You're done! Thanks for trying my tutorial!
Subscribe to:
Posts
(Atom)


