I CT For


Sunday, June 30, 2013
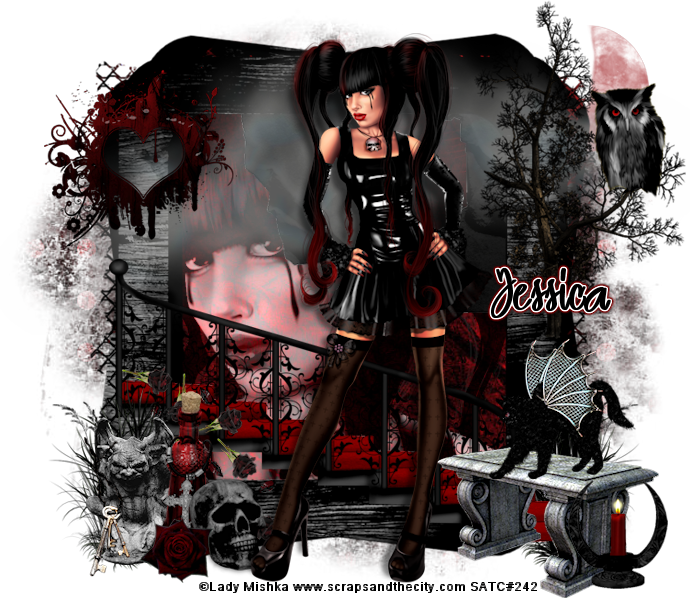
A GOTHIC TOUCH
Supplies needed:
I am using the amazing art from Lady Mishka for this tutorial, which you can now find here
Scrapkit: I am a stunninh kit from Gothic Inspirations called "A Gothic Touch" which you can get by going here
GrungeMask 1 from Boundless Bliss. Unfortunately Theresa no longer has her site but I believe she allows
her masks to be shared, you can get it here
Plugins used: Xero-Radiance, Xero-Bad Dream, Lokas 3D Shadow
----------------------------
This tutorial is written for those who have working knowledge of PSPX2 (any version will do).
This tutorial was written by me on February 8, 2013. Please do not copy or paste on any other forum, website or blog provide link back to tut only. Please do not claim as your own. This tutorial is copyrighted to me. Any resemblance to any other tutorial is purely coincidental.
Ok - let's start and remember to save often.
Open up a 750 x 650 blank canvas (we can resize it later)
Select Frame 4 and paste in the center of the canvas
Resize by 80%
Select your magic wand tool and click in the center of your original frame (Add (Shift), RGB Value, Tolerance 25, Contiguous checked, Feather 0)
Selections, Modify, Expand by 5
Paste paper 9
Select invert, delete
Copy and paste close-up tube of choice on paper layer
Delete, select none
Change close-up to Luminence (Legacy)
Apply Xero - Bad Dream at default setting or setting of choice
Drop opacity down to 80%
Apply dropshadow and merge down on top of paper layer
Move layer below frame
Select Stairway Element - resize by 65%
Paste and position on bottom above frame
Paste tube of choice where desired on top of frame
Apply Xero Radiance at setting of choice
Apply Lokas 3D Shadow at default settings
Select BrushedHeart Element - resize by 30%
Paste and position on top left above frame
Select Bench Element - resize by 35%
Paste and position on bottom right side
Select Cat Element - resize by 30%
Paste and position on bottom right side
Select Spill Element - resize by 40%
Paste and position on bottom left side
Select Grass Element - resize by 40%
Paste and position on bottom left side
Select Gargoyle1 Element - resize by 25%
Paste and position on bottom left side
Select Bottle Element - resize by 25%
Paste and position on bottom left side
Select Skull Element - resize by 15%
Paste and position on bottom left
Select Rose1 Element - resize by 15%
Select Candle Element - resize by 25%
Paste and position on bottom right
Paste and position on bottom left
Select Tree Element - resize by 50%
Paste and position on right side
Select HalfMoon Element - resize by 30%
Paste and position on top right below frame and colorize with the following settings:
Select Owl Element - resize by 25%
Paste and position on top right
Select Cloud Element and paste on top
Drop opacity down to 70%
Paste paper 5
Move layer to the bottom of the template
Apply GrungeMask 1
Merge group and move to the bottom
Add any additional elements you like.
Add any dropshadows you like
Crop and resize as desired
Add copyright info, license number and name
You're done! Thanks for trying my tutorial!
Saturday, June 29, 2013
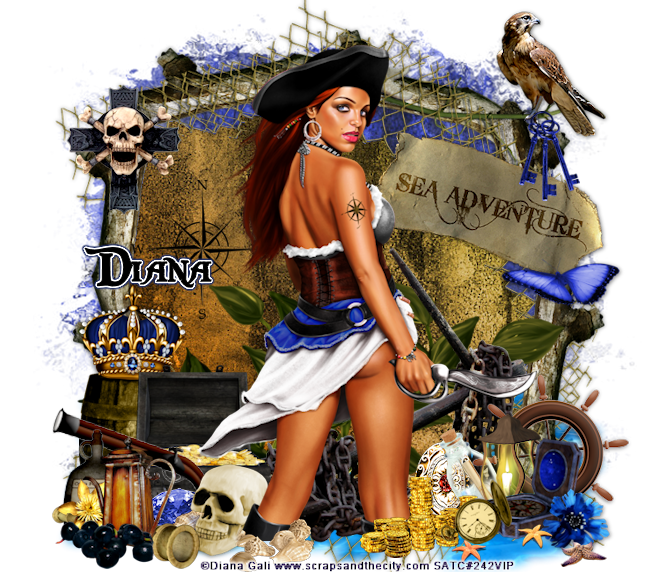
SEA ADVENTURE
Supplies needed:
I am using the amazing art from Diana Gali for this tutorial, which you can find here
Scrapkit: I am a gorgeous kit from Disturbed Scraps called "Sea Pirate" which you can get by going here
Mask 37 from Yez Doodles which you can find here
Plugins used: Xero-Radiance, Xero-Bad Dream, Lokas 3D Shadow
----------------------------
This tutorial is written for those who have working knowledge of PSPX2 (any version will do).
This tutorial was written by me on June 29, 2013. Please do not copy or paste on any other forum, website or blog provide link back to tut only. Please do not claim as your own. This tutorial is copyrighted to me. Any resemblance to any other tutorial is purely coincidental.
Ok - let's start and remember to save often.
Open up a 750 x 650 blank canvas (we can resize it later)
Select Frame/Element 97 and paste in the center of the canvas
Resize by 80%
Select your magic wand tool and click in the center of your original frame (Add (Shift), RGB Value, Tolerance 25, Contiguous checked, Feather 0)
Selections, Modify, Expand by 1
Paste paper 11
Select invert, delete, select none
Move paper below frame layer
Paste tube of choice where desired on top of frame
Apply Xero Radiance at setting of choice
Apply Lokas 3D Shadow at default settings
Select Element 33 - resize by 75%
Image mirror and paste on bottom right below tube layer
Select Element 28 - resize by 40%
Image Free Rotate Right by 15%
Paste and position on top right below tube layer
Select Element 40 - resize by 40%
Paste and position on bottom left side
Select Element 29 - resize by 40%
Paste and position on bottom left
Select Element 55 - resize by 30%
Paste and position on bottom left
Select Element 75 - resize by 25%
Paste and position on bottom left
Select Element 25 - resize by 30%
Image mirror and Free Rotate Right by 15%
Paste and position on bottom left
Select Element 84 - resize by 30%
Paste and position on left side
Select Element 26 - resize by 40%
Paste and position on bottom right side
Select Element 37 - resize by 25%
Paste and position on bottom right
Select Element 78 - resize by 30%
Paste and position on bottom right
Select Element 21 - resize by 30%
Paste and position on bottom right
Select Element 59 - resize by 40%
Paste and position on bottom right
Select Element 152 - resize by 85%
Paste and position on bottom - move down to bottom layer
Select Element 32 - resize by 40%
Paste and position on top left
Paste paper 14 onto canvas
Move layer to the bottom layer
Apply Mask 37
Merge group and move to the bottom
Add any additional elements you like.
Add any dropshadows you like
Crop and resize as desired
Add copyright info, license number and name
You're done! Thanks for trying my tutorial!
Thursday, June 27, 2013
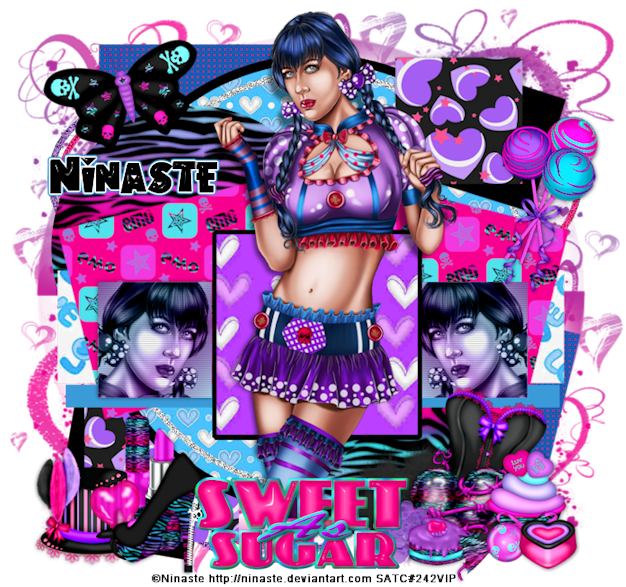
SWEET AS SUGAR
Supplies needed:
I am using the amazing art from Ninaste for this tutorial, which you can now find here
Scrapkit: I am using a stunning kit from Tiny Turtle Designs called "Zebra Punk" which you can get by going here
Punk Template 3 from Brutal Designs which can be found here
Mask 83 from Simone which you can find on the Misfits Blog here
Wordart from Tragedy here
Plugins used: Xero-Radiance, Xero - Bad Dream, Lokas 3D Shadow
----------------------------
This tutorial is written for those who have working knowledge of PSPX2 (any version will do).
This tutorial was written by me on June 26, 2013. Please do not copy or paste on any other forum, website or blog provide link back to tut only. Please do not claim as your own. This tutorial is copyrighted to me. Any resemblance to any other tutorial is purely coincidental.
Ok - let's start and remember to save often.
Open the template and using your shortcut keys on your keyboard (SHIFT+D) duplicate the template as a new image. Close the original and delete the copywrite layer.
Select Square Raster 14 layer
Select all, float, defloat
Paste paper 23
Select invert, delete, select none
Delete/Hide original square layer
Select Square Raster 15 layer and repeat above steps
Select Square Raster 2 layer
Select all, float, defloat
Paste paper 14
Select invert, delete, select none
Delete/hide original square layer
Select Square Raster 10 layer
Select all, float, defloat
Add new raster layer and flood-fill with gradient colors of choice (Linear style, Angle 45, Repeat 2)
Paste close-up tube of choice on top of gradient and delete
Select none
Change closeup to Luminance (Legacy)
Apply Xero Bad Dream at setting of choice
Apply dropshadow and merge down on top of paper layer
Effect, Texture Effects, Blinds (Width 2, Opactity 20, Horizontal and Light from left/top checked)
Delete/Hide original square layer
Select Square Copy of Raster 10 and repeat above steps
Select Strip Raster 13 layer
Select all, float, defloat
Add new raster layer and flood-fill with color of choice
Select none
Delete/Hide original strip layer
Select Strip Copy of Raster 13 and repeat above
Select Square Raster 1 layer
Select all, float, defloat
Paste paper 5
Select invert, delete, select none
Delete/Hide original square layer
Select Square Copy of Raster 1 and repeat above steps
Select Rectangle Raster 4 layer
Select all, float, defloat
Paste paper 12
Select invert, delete, select none
Delete/Hide original rectangle layer
Select Circle Raster 9 layer
Select all, float, defloat
Paste paper 1
Select invert, delete, select none
Delete/Hide original circle layer
Select Circle Raster 8 layer and repeat above steps
Select Circle Raster 5 layer
Select all, float, defloat
Paste paper 11
Select invert, delete, select none
Delete/Hide original circle layer
Select Square Raster 11 layer
Select all, float, defloat
Add new raster layer and flood-fill with color of choice
Select none
Apply Effects, Texture effects, weave (Gap size 2, Width 5, Opacity 5, Fill gaps checked, Change Gap Color to color of choice)
Delete/Hide original square layer
Select Square Raster 12 layer and repeat above steps
Select Circle Raster 21 layer
Select all, float, defloat
Add new raster layer and flood-fill with color of choice
Select none
Adjust, Add/Remove Noise, Add Noise (Uniform checked, Noise 75%, Monochrome checked)
Delete/Hide original circle layer
Select Circle Raster 19 and Circle Raster 20 and repeat above steps
Copy and paste tube of choice and position where desired
Apply Xero Radiance at setting of choice
Apply Lokas 3D Shadow at default settings
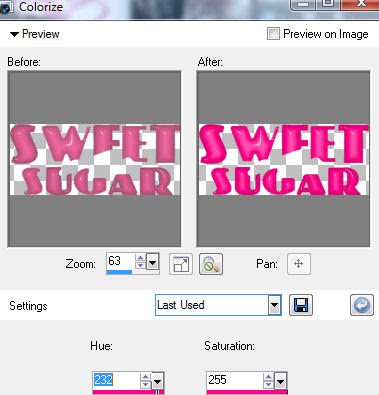
Select Wordart and paste where desires
If you would like to recolor it select the areas you want to change with your magic wand and colorize with the following settings:
Select Element 43 - resize by 30%
Paste and position on bottom left side
Select Element 4 - resize by 28%
Paste and position on bottom left side
Select Element 5 - resize by 30%
Paste and position on bottom left
Select Element 54 - resize by 20%
Paste and position on bottom left
Select Element 25 - resize by 30%
Paste and position on bottom left
Select Element 44 - resize by 40%
Image Free Rotate Right by 15%
Paste and position on bottom right side
Select Element 3 - resize by 28%
Paste and position on bottom right side
Select Element 12 - resize by 35%
Paste and position on bottom right
Select Element 50 - resize by 15%
Paste and position on bottom right side
Select Select New raster layer and flood fill with color or gradient of choice
Move layer to the bottom of the template
Apply Mask 83
Merge group and move to the bottom
Add any additional elements you like.
Add any dropshadows you like
Crop and resize as desired
Add copyright info, license number and name
You're done! Thanks for trying my tutorial!
Sunday, June 23, 2013
ROCK CHICK

Supplies needed:
I am using the amazing art from Derzi for this tutorial, which you can find here
Scrapkit: I am using a stunning kit from Hania's Designs called "Rock Chick" which you can get by going here
Template 9 from Millie which can be found here
DMSK0311 Mask which you can find here
Plugins used: Photoeffex - Scanlines, Eyecandy 4000 - Glass, Xero-Radiance, Xero - Bad Dream, Lokas 3D Shadow
----------------------------
This tutorial is written for those who have working knowledge of PSPX2 (any version will do).
This tutorial was written by me on June 23, 2013. Please do not copy or paste on any other forum, website or blog provide link back to tut only. Please do not claim as your own. This tutorial is copyrighted to me. Any resemblance to any other tutorial is purely coincidental.
Ok - let's start and remember to save often.
Open the template and using your shortcut keys on your keyboard (SHIFT+D) duplicate the template as a new image. Close the original and delete the copywrite layer.
Select Strips 10 layer
Select All, float, defloat
Paste paper 5
Select invert, delete, select none
Delete/Hide original strips layer
Select Wordart 9 layer
Select all, float, defloat
Add new raster layer and flood-fill with color or gradient of choice
Select none
Apply Eyecandy Glass on default settings
Delete/hide original wordart layer
Select Rectangle 8 layer
Select all, float, defloat
Add new raster layer and flood-fill with color of choice
Select none
Apply Photoeffex Scanlines with the following settings:

Delete/hide original rectangle layer
Select Circle 7 layer
Select all, float, defloat
Add new raster layer and flood-fill with gradient colors of choice (Linear style, Angle 45, Repeat 2)
Paste close-up tube of choice on top of gradient and delete
Change closeup to Luminance (Legacy)
Apply Xero Bad Dream at setting of choice
Drop opacity on tube down to 65%
Apply dropshadow and merge down on top of gradient layer
Effects, Texture Effects, Blinds (Width 2, Opactity 20, Horizontal and Light from left/top checked)
Delete/Hide original circle layer
Select Circle 6 layer
Select all, float, defloat
Paste paper 6
Select invert, delete, select none
Delete/hide original circle layer
Select Square 5 layer
Select all, float, defloat
Paste paper 7
Select invert, delete, select none
Delete/hide original square layer
Select Square 4 layer and repeat above steps
Select Circle 3 layer
Select all, float, defloat
Add new raster layer and flood-fill with color of choice
Select none
Delete/Hide original circle layer
Select Circle 2 layer
Select all, float, defloat
Paste paper 9
Select invert, delete, select none
Delete/hide original circle layer
Copy and paste tube of choice and position where desired
Apply Xero Radiance at setting of choice
Apply Lokas 3D Shadow at default settings
Select Element 4 - resize by 70%
Paste and position on bottom right side below tube layer
Select Element 44 - resize by 60%
Image Free Rotate Left by 15%
Paste and position on left side
Select Element 36 - resize by 55%
Image Free Rotate Right by 15%
Paste and position on bottom left side
Select Element 26 - resize by 55%
Paste and position on bottom left side
Select Element 38 - resize by 45%
Paste and position on bottom left side
Select Element 34 - resize by 35%
Paste and position on bottom left side
Select Element 25 - resize by 60%
Paste and position on bototm
Select Element 23 - resize by 40%
Paste nad position on bottom
Select Select New raster layer and flood fill with color or gradient of choice
Move layer to the bottom of the template
Apply Mask 311
Merge group and move to the bottom
Add any additional elements you like.
Add any dropshadows you like
Crop and resize as desired
Add copyright info, license number and name
You're done! Thanks for trying my tutorial!
Friday, June 21, 2013
MOON RISE

Supplies needed:
I am using the amazing art from Michele Ann for this tutorial, which you cannot purchase right now but if she decides to sell again her link is here
Scrapkit: I am a gorgeous kit from Gothic Inspirations called "MoonRise" which you can get by going here
Mask 113 from Trese which you can find here
Plugins used: Xero-Radiance, Lokas 3D Shadow
----------------------------
This tutorial is written for those who have working knowledge of PSPX2 (any version will do).
This tutorial was written by me on June 21, 2013. Please do not copy or paste on any other forum, website or blog provide link back to tut only. Please do not claim as your own. This tutorial is copyrighted to me. Any resemblance to any other tutorial is purely coincidental.
Ok - let's start and remember to save often.
Open up a 700 x 600 blank canvas (we can resize it later)
Select Windows Element and paste in the center of the canvas
Resize by 80%
Select your magic wand tool and click in the center of each window frame (Add (Shift), RGB Value, Tolerance 25, Contiguous checked, Feather 0)
Selections, Modify, Expand by 5
Now Select your Freehand Magic wand and expand any areas that you need to fix (hold shift key)
Paste paper 6
Select invert, delete, select none
Move paper below frame layer
Change paper to Hard Light
Paste tube of choice where desired on top of frames
Apply Xero Radiance at setting of choice
Apply Lokas 3D Shadow at default settings
Select Butterflies Element - resize by 65%
Paste and position in the center of canvas behind tube layer
Select Rocks Element - resize by 50%
Paste and position on bottom right side behind tube layer
Select Leaves2 Element - resize by 40%
Paste and position on bottom left side
Select Mist Element - resize by 68%
Paste and position on top of frame layer below tube layer
Select Lantern Element - resize by 30%
Paste and position on bottom left side
Select MaskFace Element - resize by 25%
Paste and position on bottom left side
Select Book Element - resize by 22%
Image Free Rotate Right by 15% and paste on bottom right side
Select Bottle Element - resize by 30%
Paste and position on bottom right side
Select Charm2 Element - resize by 25%
Paste and position on bottom right side
Select Feather Element - resize by 25%
Paste and position on bottom right
Select Key Element - resize by 30%
Paste and position on bottom right side
Paste paper 5
Move layer to the bottom
Apply Mask 113
Merge group and move to the bottom
Add any additional elements you like.
Add any dropshadows you like
Crop and resize as desired
Add copyright info, license number and name
You're done! Thanks for trying my tutorial!
VAMPIRE WIDOW

Supplies needed:
I am using the amazing art from Diana Gali for this tutorial, which you can find here
Scrapkit: I am using a stunning kit from Bibi's Collection called "Vampire Widow " which you can get by going here
Template 182 from Pooker which can be found here
Mask 112 from Trese which you can find here
Plugins used: Eyecandy 4000 - Marble, VM - Extravaganza - Transmission, Xero-Radiance, Xero - Bad Dream, Lokas 3D Shadow
----------------------------
This tutorial is written for those who have working knowledge of PSPX2 (any version will do).
This tutorial was written by me on June 21, 2013. Please do not copy or paste on any other forum, website or blog provide link back to tut only. Please do not claim as your own. This tutorial is copyrighted to me. Any resemblance to any other tutorial is purely coincidental.
Ok - let's start and remember to save often.
Open the template and using your shortcut keys on your keyboard (SHIFT+D) duplicate the template as a new image. Close the original and delete the copywrite layer.
Select White Square layer
Select All, float, defloat
Add new raster layer and flood-fill with color of choice
Select none
Apply Eyecandy Marble with the following settings:

Delete/hide original square layer
Select Pink Square layer
Select all, float, defloat
Add new raster layer and flood-fill with color of choice
Select none
Delete/hide original square layer
Select Black Squares layer
Select all, float, defloat
Add new raster layer and flood-fill with color of choice
Select none
Apply same Eyecandy Marble settings from above
Delete/Hide original squares layer
Select Grey Circle layer
Select all, float, defloat
Paste paper 4
Delete/hide original circle layer
Select Lt. Pink Shapes layer
Select all, float, defloat
Paste paper 2
Select invert, delete, select none
Delete/hide original shapes layer
Select Pink Squares layer
Select all, float, defloat
Paste paper 10
Select invert, delete, select none
Delete/hide original squares layer
Select White Circles layer
Select all, float, defloat
Paste paper 9
Select invert, delete, select none
Delete/hide original circles layer
Select Pink Circles layer
Select all, float, defloat
Add new raster layer and flood-fill with color of choice
Select none
Delete/hide original circles layer
Select White Circle layer
Select all, float, defloat
Add new raster layer and flood-fill with color of choice
Select none
Apply VM Extravaganza - Transmission with the following settings:
Delete/Hide original circle layer
Select Pink Rectangles layer
Select all, float, defloat
Paste paper 7
Select invert, delete, select none
Delete/hide original rectangles layer
Select Grey Rectangles layer
Select all, float, defloat
Paste paper 5
Select invert, delete, select none
Delete/hide original rectangles layer
Copy and paste tube of choice and position where desired
Apply Xero Radiance at setting of choice
Apply Lokas 3D Shadow at default settings
Select Element 18 - resize by 95%
Paste and position in the center below tube layer
Select Element 100 - resize by 40%
Paste and position on left side
Select Element 103 - image mirror and paste on bottom left side below tube layer
Select Element 28 - resize by 70%
Paste and position on bottom left side
Select Element 82 - resize by 50%
Paste and position on bottom left
Select Element 127 - Image Free Rotate Right by 20%
Paste and position on bottom right side below stair element
Select Element 42 - resize by 55%
Image mirror and paste on bottom right side below stair element
Select Element 3 - resize by 45%
Paste and position on bottom right
Select Element 65 - resize by 60%
Paste and position on top right and move to bottom layer
Select Select New raster layer and flood fill with color or gradient of choice
Move layer to the bottom of the template
Apply Mask 112
Merge group and move to the bottom
Add any additional elements you like.
Add any dropshadows you like
Crop and resize as desired
Add copyright info, license number and name
You're done! Thanks for trying my tutorial!
Wednesday, June 19, 2013
DARK QUEEN

Supplies needed:
I am using the amazing art from Alex Prihodko for this tutorial, which you can find here
Scrapkit: I am using a stunning kit from Amy Marie called "Dark Queen" which you can get by going here
Template 241 from Denz Designz which can be found here
Mask 22 from Gina Gem which you can find here
Plugins used: Eyecandy 4000 - Marble, Xero-Radiance, Xero - Bad Dream, Lokas 3D Shadow
----------------------------
This tutorial is written for those who have working knowledge of PSPX2 (any version will do).
This tutorial was written by me on June 19, 2013. Please do not copy or paste on any other forum, website or blog provide link back to tut only. Please do not claim as your own. This tutorial is copyrighted to me. Any resemblance to any other tutorial is purely coincidental.
Ok - let's start and remember to save often.
Open the template and using your shortcut keys on your keyboard (SHIFT+D) duplicate the template as a new image. Close the original and delete the copywrite layer.
Select Tiny Circles layer
Select All, float, defloat
Add new raster layer and flood-fill with color of choice
Select none
Delete/hide original circles layer
Select Small Circles layer
Select all, float, defloat
Add new raster layer and flood-fill with color of choice
Select none
Adjust, Add/Remove Noise, Add Noise (Uniform checked, Noise 55%, Monochrome checked)
Delete/hide original circles layer
Select Shape 1 layer
Select all, float, defloat
Paste paper 39
Select invert, delete, select none
Delete/Hide original shape layer
Select Shape 2 layer and repeat above steps
Select Rectangle 1 layer
Add new raster layer and flood-fill with gradient colors of choice (Linear style, Angle 45, Repeat 2)
Paste close-up tube of choice on top of gradient and delete
Change closeup to Hard Light
Apply Xero Bad Dream at setting of choice
Drop opacity on tube down to 75%
Apply dropshadow and merge down on top of gradient layer
Delete/Hide original rectangle layer
Select Rectangle 3 layer and repeat above steps
Select Rectangle 2 layer
Select all, float, defloat
Add new raster layer and flood-fill with color of choice
Select none
Apply Eyecandy Marble with the following settings:

Delete/hide original rectangle layer
Select Circle 1 layer
Select all, float, defloat
Paste paper 1
Select invert, delete, select none
Delete/hide original circle layer
Select Circle 2 layer and repeat above steps
Select Large Shape 1 layer
Select all, float, defloat
Paste paper 25
Select invert, delete, select none
Delete/hide original shape layer
Select Large Shape 2 layer and repeat above steps
Copy and paste tube of choice and position where desired
Apply Xero Radiance at setting of choice
Apply Lokas 3D Shadow at default settings
Select Element 71 - resize by 30%
Paste and position on bottom right side
Select Element 106 - resize by 30%
Image mirror and paste one bottom right side
Select Element 34 - resize by 50%
Paste and position on bottom right side
Select Element 78 - resize by 90%
Paste and position on bottom right side
Select Element 79 - resize by 17%
Image, Free Rotate Left by 15% and paste on bottom right
Select Element 103 - resize by 50%
Image Free Rotate Left by 15% and paste on top left below tube layer
Select Element 87 - resize by 35%
Image Free Rotate Left by 15% and paste on bottom left below tube layer
Select Element 84 - resize by 40%
Paste and position on bottom left
Select Element 67 - resize by 30%
Paste and position on bottom left
Select Element 59 - resize by 25%
Paste and position on bottom left side
Select New raster layer and flood fill with color or gradient of choice
Move layer to the bottom of the template
Apply Mask 22
Merge group and move to the bottom
Add any additional elements you like.
Add any dropshadows you like
Crop and resize as desired
Add copyright info, license number and name
You're done! Thanks for trying my tutorial!
Tuesday, June 18, 2013
STEAMPUNK RENEGADE

Supplies needed:
I am using the amazing art from Marc Duval for this tutorial, which you can find here
Scrapkit: I am using a stunning kit from Bibi's Collection called "Steampunk" which you can get by going here
Template 175 from Pooker which can be found here
Mask 2 from Bitzy Beez Designz which you can find here
Plugins used: Penta - Jeans, Xero-Radiance, Lokas 3D Shadow
----------------------------
This tutorial is written for those who have working knowledge of PSPX2 (any version will do).
This tutorial was written by me on June 18, 2013. Please do not copy or paste on any other forum, website or blog provide link back to tut only. Please do not claim as your own. This tutorial is copyrighted to me. Any resemblance to any other tutorial is purely coincidental.
Ok - let's start and remember to save often.
Open the template and using your shortcut keys on your keyboard (SHIFT+D) duplicate the template as a new image. Close the original and delete the copywrite layer.
Select Pink Shape layer
Select all, float, defloat
Paste paper 3
Select invert, delete, select none
Delete/Hide original shape layer
Select Grey Shape layer and repeat above steps
Select Lt. Pink Shape layer
Select all, float, defloat
Paste paper 13
Select invert, delete, select none
Delete/hide orginal shape layer
Select Black Shape layer and repeat above steps
Select White Circles layer
Select all, float, defloat
Add new raster layer and flood-fill with gradient colors of choice (Linear style, Angle 45, Repeat 2)
Paste close-up tubes of choice on top of gradient and delete
Change closeups to Hard Light
Apply dropshadow and merge down on top of gradient layer
Delete/Hide original circles layer
Select Pink Circle layer
Select all, float, defloat
Add new raster layer and flood-fill with color of choice
Select none
Apply Eyecandy Glass with the following settings:

Delete/Hide original circle layer
Select Grey Circle layer and repeat above steps
Select Lt. Pink Rectangle layer
Select all, float, defloat
Paste paper 5
Select invert, delete, select none
Delete/hide original rectangles layer
Select Pink Rectangle layer
Select all, float, defloat
Paste paper 1
Select invert, delete, select none
Delete/hide original rectangle layer
Select Black Rectangles layer
Select all, float, defloat
Paste paper 15
Select invert, delete, select none
Delete/hide original rectangles layer
Select Lt. Pink Shape2 layer
Select all, float, defloat
Paste paper 2
Select invert, delete, select none
Delete/hide original shape layer
Select White Circle 2 layer
Select all, float, defloat
Paste paper 14
Select invert, delete, select none
Delete/hide original circle layer
Select Grey Circle layer
Select all, float, defloat
Add new raster layer and flood-fill with color of choice
Select none
Apply Penta - Jeans with the following settings:

Delete/hide original circle layer
Copy and paste tube of choice and position where desired
Apply Xero Radiance at setting of choice
Apply Lokas 3D Shadow at default settings
Select Element 83 - resize by 30%
Paste and position on left side
Select Element 95 - resize by 30%
Image flip and paste on top right corner
Select Element 9 - resize by 75%
Paste and position on bottom right
Select Element 80 - resize by 35%
Image Free Rotate Right by 15% and paste on bottom right
Select Element 118 - resize by 40%
Image Free Rotate Right by 15% and paste on bottom right
Select Element 17 - resize by 50%
Paste and position on bottom
Select Element 20 - resize by 25%
Paste and position on bottom left side
Select Element 130 - resize by 40%
Paste and position on bottom left
Select Element 79 - resize by 35%
Paste and position on bottom left
Select New raster layer and flood fill with color or gradient of choice
Move layer to the bottom of the template
Apply Mask 2
Merge group and move to the bottom
Add any additional elements you like.
Add any dropshadows you like
Crop and resize as desired
Add copyright info, license number and name
You're done! Thanks for trying my tutorial!
PUNKY POP

Supplies needed:
I am using the amazing art from Martin Abel for this tutorial, which you can find here
Scrapkit: I am using a stunning kit from Irish Princess Designs called "Punky Pop" which you can get by going here
Collabe Template from Millie & Rissa which can be found here
Mask 22 from Becky which you can find here
Plugins used: Alien Skin Xenofex 2 - Constellation, Cybia - Screenworks, Alien Skin - Eyecandy 5 Impact - Chrome, Eyecandy 4000 - Marble, Xero-Radiance, Eyecandy 4000 Gradient Glow, Xero-Bad Dream, Lokas 3D Shadow
----------------------------
This tutorial is written for those who have working knowledge of PSPX2 (any version will do).
This tutorial was written by me on June 18, 2013. Please do not copy or paste on any other forum, website or blog provide link back to tut only. Please do not claim as your own. This tutorial is copyrighted to me. Any resemblance to any other tutorial is purely coincidental.
Ok - let's start and remember to save often.
Open the template and using your shortcut keys on your keyboard (SHIFT+D) duplicate the template as a new image. Close the original and delete the copywrite layer.
Adjust Canvas Size by 750 x 600 (you can resize later)
Select Wordart 12 layer
Apply Gradient Glow on fat default settings (Glow Width 3)
Select Rectangle 11 layer
Select all, float, defloat
Paste paper 2
Select invert, delete, select none
Delete/Hide original rectangle layer
Select Rectangle 10 layer
Select all, float, defloat
Add new raster layer and flood-fill with color of choice
Select none
Delete/hide orginal rectangle layer
Select Oval 9 layer
Select all, float, defloat
Paste paper 5
Select invert, delete, select none
Apply Alien Skin Chrome with the following settings:

Delete/Hide original oval layer
Select Rectangle 8 layer
Select all, float, defloat
Add new raster layer and flood-fill with color of choice
Select none
Apply Cybia - Screenworks with Cresent Wave on the following settings:

Delete/Hide original rectangle layer
Select Rectangle 7 layer and repeat above steps
Select Circle 6 layer
Select all, float, defloat
Add new raster layer and flood-fill with color of choice
Select none
Apply Eyecandy Marble with the following settings:

Delete/Hide original circle layer
Select Circle 5 layer and repeat above steps
Select Rectangles 4 layer
Select all, float, defloat
Add new raster layer and flood-fill with color of choice
Select none
Delete/hide original rectangles layer
Select Circle 3 layer
Select all, float, defloat
Add new raster layer and flood-fill with gradient colors of choice (Sunburst style, Angle 45, Repeat 3)
Paste close-up tube of choice on top of gradient and delete
Change closeups to Luminance (Legacy)
Apply Xero Bad Dream at default settings or random setting of choice
Drop opacity on close-up down to 75%
Apply dropshadow and merge down on top of gradient layer
Effects, Texture Effects, Blinds (Width 2, Opactity 20, Horizontal and Light from left/top checked)
Delete/Hide original circle layer
Select Circle 2 layer and repeat above steps
Select Rectangle 1 layer
Select all, float, defloat
Add new raster layer and flood-fill with color of choice
Select none
Delete/Hide original rectangle layer
Copy and paste tube of choice and position where desired
Apply Xero Radiance at setting of choice
Apply Lokas 3D Shadow at default settings
Select City Element - resize by 88%
Paste and position in the center behind tube layer
Apply Xenofex 2 - Constellation with the following settings:

Select Flames Element - resize by 90%
Paste and position on bottom
Select Corset Element - resize by 35%
Image Free Rotate Left by 15% and paste on bottom left side
Select Punky Skull Element - resize by 25%
Paste and position on bottom left side
Select Cuff Element - resize by 25%
Paste and position on bottom left side
Select Ipod Element - resize by 20%
Paste and position on bottom
Select Car Element - resize by 40%
Paste and position on bottom
Select Barrells Element - resize by 35%
Image mirror and paste on bottom right side
Select Cupcake Element - resize by 20%
Paste and position on bottom right side
Select Bear Element - resize by 20%
Paste and position on bottom right
Select New raster layer and flood fill with color or gradient of choice
Move layer to the bottom of the template
Apply Mask 22
Merge group and move to the bottom
Add any additional elements you like.
Add any dropshadows you like
Crop and resize as desired
Add copyright info, license number and name
You're done! Thanks for trying my tutorial!
Thursday, June 13, 2013
LITTLE LADY

Supplies needed:
I am using the amazing art from Derzi for this tutorial, which you can find here
Scrapkit: I am an awesome kit from Hania's Designs called "Little Lady" which you can get by going here
Mask 6 from Gina Gems which you can find here
Plugins used: Xero-Radiance, Xero-Bad Dream, Lokas 3D Shadow
----------------------------
This tutorial is written for those who have working knowledge of PSPX2 (any version will do).
This tutorial was written by me on June 13, 2013. Please do not copy or paste on any other forum, website or blog provide link back to tut only. Please do not claim as your own. This tutorial is copyrighted to me. Any resemblance to any other tutorial is purely coincidental.
Ok - let's start and remember to save often.
Open up a 700 x 550 blank canvas (we can resize it later)
Select Frame Element 109 - resize by 75% and paste in the center of the canvas
Select your magic wand tool and click in the 2 center squares of your frame (Add (Shift), RGB Value, Tolerance 25, Contiguous checked, Feather 0)
Selections, Modify, Expand by 5
Paste paper 3
Select invert, delete, select none
Move paper below frame layer
Paste tube of choice where desired on top of frame
Apply Xero Radiance at setting of choice
Apply Lokas 3D Shadow at default settings
Select Element 99 - resize by 95%
Paste and position on bottom below frame layer
Select Element 17 - resize by 50%
Paste and position on top left corner
Select Element 49 - resize by 50%
Paste and position on top left corner
Select Element 16 - resize by 35%
Image Free Rotate Left by 15% and paste on bottom left side
Select Element 33 - resize by 30%
Paste and position on bottom left side
Select Element 102 - resize by 20%
Paste and position on bottom left side
Select Element 45 - resize by 45%
Paste and position on bottom left
Select Element 6 - resize by 25%
Paste and position on bottom
Select Element 73 - resize by 30%
Paste and position on bottom
Select Element 80 - resize by 30%
Paste and position on bottom
Select Element 24 - resize by 45%
Paste and position on bottom
Select Element 22 - resize by 35%
Paste and position on bottom on top of element 24
Select Element 4 - resize by 30%
Paste and position on bottom
Select Element 44 - resize by 35%
Paste and position on bottom right
Select Element 11 - resize by 25%
Paste and position on bottom right
Select Element 41 - resize by 90%
Paste and position in the center and move to the bottom layer
Select new raster layer and flood-fill with gradient of choice
Apply Gina Gems Mask and merge group
Add any additional elements you like.
Add any dropshadows you like
Crop and resize as desired
Add copyright info, license number and name
You're done! Thanks for trying my tutorial!
MILITARY BABE

Supplies needed:
I am using the amazing art from Diana Gali for this tutorial, which you can find here
Scrapkit: I am a stunning kit from Bibi's Collection called "Army Babe" which you can get by going here
Mask 7 from CandyTreat which you can find here
Mask 5 from Gina Gems which you can find here
Top Secret font here
Plugins used: Xero-Radiance, Xero-Bad Dream, Lokas 3D Shadow
----------------------------
This tutorial is written for those who have working knowledge of PSPX2 (any version will do).
This tutorial was written by me on June 13, 2013. Please do not copy or paste on any other forum, website or blog provide link back to tut only. Please do not claim as your own. This tutorial is copyrighted to me. Any resemblance to any other tutorial is purely coincidental.
Ok - let's start and remember to save often.
Open up a 750 x 550 blank canvas (we can resize it later)
Select Frame Element 17 - resize by 55% and paste in the center of the canvas where desired
Select your magic wand tool and click in the center of each circle (Add (Shift), RGB Value, Tolerance 25, Contiguous checked, Feather 0)
Selections, Modify, Expand by 5
Paste paper 8
Select invert, delete, select none
Copy and paste close-up tubes of choice on top of paper layer and delete
Select none
Change closeups to screen
Apply dropshadow and merge down on top of paper layer
Move paper below frame layer
Select Element 7 - resize by 45%
Paste and position on right side above frame layer
Paste tube of choice where desired on top of frames
Apply Xero Radiance at setting of choice
Apply Lokas 3D Shadow at default settings
Select Element 61 - resize by 50%
Paste and position on bottom above tube layer
Select Element 87 - resize by 55%
Image mirror and paste on bottom right side
Select Element 74 - resize by 50%
Paste and position on right side above barrel element
Select Element 68 - resize by 45%
Image Free Rotate Left by 15% and paste on right side below barrel element
Select Element 86 - resize by 30%
Image Free Rotate Left by 15% and paste on bottom right side
Select Element 60 - resize by 35%
Paste and position on bottom left side
Select Element 67 - resize by 25%
Paste and position on bottom left side
Select Element 13 - resize by 40%
Paste and position on bottom left side
Select Element 51 - resize by 35%
Paste and position on bottom left side behind tube layer
Select Element 83 - resize by 50%
Image mirror and paste on top right side below frame layer
Select Element 30 - resize by 50%
Paste and position on left side below frame layer
Select new raster layer and flood-fill with color of choice
Select none
Move layer to the bottom of the template
Apply Candy Treats Mask 7
Merge group and move to the bottom
Paste paper 11 on top of mask layer
Apply Gina Gems Mask and merge group
Add any additional elements you like.
Add any dropshadows you like
Crop and resize as desired
Add copyright info, license number and name
You're done! Thanks for trying my tutorial!
Tuesday, June 11, 2013
ROCKIN USA

Supplies needed:
I am using the amazing art from Keith Garvey for this tutorial, which you can find here
Scrapkit: I am using a stunning Mega kit from Amy Marie called "Rockin USA" which you can get by going here
Stars and Bars Template from Nat's Nonsense which can also be found in the kit
Mask 2 from Melissaz Creationz which you can find here
Plugins used: Xero-Radiance, Xero-Bad Dream, Lokas 3D Shadow
----------------------------
This tutorial is written for those who have working knowledge of PSPX2 (any version will do).
This tutorial was written by me on June 11, 2013. Please do not copy or paste on any other forum, website or blog provide link back to tut only. Please do not claim as your own. This tutorial is copyrighted to me. Any resemblance to any other tutorial is purely coincidental.
Ok - let's start and remember to save often.
Open the template and using your shortcut keys on your keyboard (SHIFT+D) duplicate the template as a new image. Close the original and delete the copywrite layer.
Adjust Canvas Size by 700 x 600 (you can resize later)
Select Med Star Frame
Select all, float, defloat
Add new raster layer and flood-fill with color of choice
Select none
Adjust, Add/Remove Noise, Add Noise (Uniform checked, Noise 65%, Monochrome checked)
Delete/Hide original star layer
Select Med Star Back layer
Select all, float, defloat
Paste paper 18
Select invert, delete, select none
Delete/Hide original star back layer
Select Small Star Back layer
Select all, float, defloat
Paste paper 17
Select invert, delete, select none
Delete/Hide original star back layer
Select Big Star Frame Back layer
Select all, float, defloat
Add new raster layer and flood-fill with gradient colors of choice (Linear style, Angle 45, Repeat 2)
Paste close-up tube of choice on top of gradient and delete
Change closeup to Luminance (Legacy)
Apply Xero Bad Dream at default settings or random setting of choice
Drop opacity on close-up down to 65%
Apply dropshadow and merge down on top of gradient layer
Effects, Texture Effects, Blinds (Width 2, Opactity 20, Horizontal and Light from left/top checked)
Delete/Hide original star back layer
Select Big Rectangle layer
Select all, float, defloat
Paste paper 7
Select invert, delete, select none
Delete/Hide original rectangle layer
Select Thin Rectangle 3 layer
Select all, float, defloat
Paste paper 9
Select invert, delete, select none
Delete/Hide original rectangle layer
Select Thin Rectangle 2 layer
Select all, float, defloat
Paste paper 12
Select invert, delete, select none
Delete/Hide original rectangle layer
Select Thin Rectangle 1 layer
Select all, float, defloat
Paste paper 10
Select invert, delete, select none
Delete/Hide original rectangle layer
Select Circle Raster 2 layer
Select all, float, defloat
Paste paper 19
Select invert, delete, select none
Delete/Hide original circle layer
Select Bottom Rectangle layer
Select all, float, defloat
Paste paper 16
Select invert, delete, select none
Delete/Hide original rectangle layer
Copy and paste tube of choice and position where desired
Apply Xero Radiance at setting of choice
Apply Lokas 3D Shadow at default settings
Select Element 61 - resize by 25%
Image Free Rotate Left by 15% and paste on bottom left side
Select Element 112 - resize by 25%
Paste and position on bottom left side
Select Element 29 - resize by 25%
Image mirror and paste on bottom left side
Select Element 90 - resize by 20%
Paste and position on bottom left
Select Element 170 - resize by 25%
Paste and position on bottom left side
Select Element 97 - resize by 30%
Paste and position on bottom left side
Select Element 172 - resize by 20%
Paste and position on bottom leftr side
Select Element 149 - resize by 50%
Image Free Rotate Left by 15% and paste on top right side
Select Element 63 - resize by 30%
Paste and position on bottom right
Select Element 171 - resize by 25%
Paste and position on bottom right side
Select Element 78 - resize by 30%
Image Free Rotate Left by 15% and paste on bottom right side
Select New raster layer and flood fill with color or gradient of choice
Move layer to the bottom of the template
Apply Mask 2
Merge group and move to the bottom
Add any additional elements you like.
Add any dropshadows you like
Crop and resize as desired
Add copyright info, license number and name
You're done! Thanks for trying my tutorial!
FAIRY OF DARKNESS

Supplies needed:
I am using the amazing art from Ninaste for this tutorial, which you can find here
Scrapkit: I am a gorgeous kit from Bibi's Collection called "Dark Fairy" which you can get by going here
Mask 20 from Moonbeams & Spiderwebs which you can find here
Plugins used: Eyecandy 4000 - Gradient Glow, Xero-Radiance, Xero-Bad Dream, Lokas 3D Shadow
----------------------------
This tutorial is written for those who have working knowledge of PSPX2 (any version will do).
This tutorial was written by me on June 11, 2013. Please do not copy or paste on any other forum, website or blog provide link back to tut only. Please do not claim as your own. This tutorial is copyrighted to me. Any resemblance to any other tutorial is purely coincidental.
Ok - let's start and remember to save often.
Open up a 700 x 650 blank canvas (we can resize it later)
Select Frame 90 and paste in the center of the canvas
Resize by 50% and move slightly up
Select your magic wand tool and click in the center of your original frame (Add (Shift), RGB Value, Tolerance 25, Contiguous checked, Feather 0)
Selections, Modify, Expand by 5
Paste paper 12
Select invert, delete, select none
Move paper below frame layer
Select Element 89 - resize by 80%
Paste and position in the center and move to bottom layer
Select Element 54 - resize by 50%
Paste and position on bottom left side above element 89
Select Element 16 - resize by 30%
Image Free Rotate Left by 15% and paste on bottom left side
Select Element 49 - resize by 70%
Paste and position on the right side of frame layer where desired
Paste tube of choice where desired on top of frames
Apply Xero Radiance at setting of choice
Apply Lokas 3D Shadow at default settings
Select Element 83 - resize by 40%
Image Free Rotate Left by 15% and paste on right side of frame where desired
Select Element 8 - resize by 45%
Image mirror and paste on bottom right side
Select Element 48 - resize by 50%
Paste and position on bottom right side
Select Element 80 - resize by 35%
Paste and position on bottom right
Select Element 72 - resize by 35%
Paste and position on bottom right side
Select Element 84 - resize by 25%
Paste and position on bottom right side
Select Element 23 - resize by 35%
Paste and position on bottom
Select Element 10 - resize by 35%
Paste and position on bottom
Select New raster layer and flood fill with color or gradient of choice
Move layer to the bottom of the template
Apply Mask 20
Merge group and move to the bottom
Add any additional elements you like.
Add any dropshadows you like
Crop and resize as desired
Add copyright info, license number and name
You're done! Thanks for trying my tutorial!
Saturday, June 8, 2013
GYPSY

Supplies needed:
I am using the amazing Exclusive art from Picsfordesign for this tutorial, which you can find here
Scrapkit: I am using an awesome kit from Amy Marie called "Gypsy" which you can get by going here
Template 173 from Pooker which can be found here
Mask 20 from Moonbeams and Spiderwebs which you can find here
Plugins used: Xero-Radiance, Xero-Bad Dream, Lokas 3D Shadow
----------------------------
This tutorial is written for those who have working knowledge of PSPX2 (any version will do).
This tutorial was written by me on June 8, 2013. Please do not copy or paste on any other forum, website or blog provide link back to tut only. Please do not claim as your own. This tutorial is copyrighted to me. Any resemblance to any other tutorial is purely coincidental.
Ok - let's start and remember to save often.
Open the template and using your shortcut keys on your keyboard (SHIFT+D) duplicate the template as a new image. Close the original and delete the copywrite layer.
Select White Circle layer
Select all, float, defloat
Paste paper 2
Select invert, delete, select none
Delete/Hide original circle layer
Select Pink Circle layer
Select all, float, defloat
Paste paper 20
Select invert, delete, select none
Delete/Hide original circle layer
Select Grey Shape layer
Select all, float, defloat
Paste paper 17
Select invert, delete, select none
Delete/Hide original shape layer
Select Lt. Pink Circ Rect layer
Select all, float, defloat
Add new raster layer and flood-fill with gradient of choice(Linear style, Angle 45, Repeat 2)
Paste close-up tubes of choice on top of gradient and delete
Change closeups to Luminance (Legacy)
Apply Xero Bad Dream at default settings or random setting of choice
Drop opacity on close-ups down to 85%
Apply dropshadow and merge down on top of gradient layer
Effects, Texture Effects, Blinds (Width 2, Opactity 20, Horizontal and Light from left/top checked)
Delete/Hide original circle rec layer
Select Pink Circ Rect layer
Select all, float, defloat
Paste paper 5 - resize by 115%
Select invert, delete, select none
Delete/Hide original rect layer
Select White Circles layer
Select all, float, defloat
Paste paper 3 - resize by 115%
Select invert, delete, select none
Delete/Hide original circles layer
Select Grey Circles layer
Select all, float, defloat
Add new raster layer and flood-fill with color of choice
Select none
Delete/Hide original circles layer
Select White Strips layer
Select all, float, defloat
Paste paper 13
Select invert, delete, select none
Delete/Hide original strips layer
Select Black Circ Rects layer
Apply Effects, Texture effects, weave (Gap size 2, Width 4, Opacity 5, Fill gaps checked, Change Gap Color to color of choice)
Copy and paste tube of choice and position where desired
Apply Xero Radiance at setting of choice
Apply Lokas 3D Shadow at default settings
Select Element 86 - resize by 80%
Paste and position on top left below tube layer
Select Element 9 - resize by 65%
Paste and position on bottom left side
Select Element 35 - resize by 65%
Paste and position on bottom left
Select Element 87 - resize by 65%
Paste and position on bottom left side
Select Element 80 - resize by 50%
Paste and position on bottom left
Select Element 51 - resize by 40%
Paste and position on bottom left
Select Element 10 - resize by 55%
Paste and position on bottom right
Select Element 7 - resize by 55%
Paste and position on bottom right side
Select Element 78 - resize by 35%
Paste and position on bottom right side
Select Element 95 - resize by 35%
Paste and position on bottom right
Select Element 6 - resize by 45%
Paste and position on bottom right
Select Element 28 - resize by 50%
Paste and position on bottom
Select Element 113 - resize by 90%
Paste and position on bottom
Select New raster layer and flood fill with color or gradient of choice
Move layer to the bottom of the template
Apply Mask 20
Merge group and move to the bottom and flip
Add any additional elements you like.
Add any dropshadows you like
Crop and resize as desired
Add copyright info, license number and name
You're done! Thanks for trying my tutorial!
Friday, June 7, 2013
GIRLY CUTENESS

Supplies needed:
I am using the amazing art from Sarafairy for this tutorial, which you can find here
Scrapkit: I am using an awesome kit from Hania's Designs called "Miss Cupcake" which you can get by going here
Girly Cuteness Template from Leah which can be found here
Mask 236 from Weescotslass which you can find here
Plugins used: Xero-Radiance, Xero-Bad Dream, Lokas 3D Shadow
----------------------------
This tutorial is written for those who have working knowledge of PSPX2 (any version will do).
This tutorial was written by me on June 7, 2013. Please do not copy or paste on any other forum, website or blog provide link back to tut only. Please do not claim as your own. This tutorial is copyrighted to me. Any resemblance to any other tutorial is purely coincidental.
Ok - let's start and remember to save often.
Open the template and using your shortcut keys on your keyboard (SHIFT+D) duplicate the template as a new image. Close the original and delete the copywrite layer.
Adjust Canvas Size by 650 x 600 (you can resize later)
Select Words 1 layer
Select all, float, defloat
Add new raster layer and flood-fill with color of choice
Select none
Adjust, Add/Remove Noise, Add Noise (Uniform checked, Noise 55%, Monochrome checked)
Merge down on top of original wordart layer
Select Words 2 layer
Select all, float, defloat
Add new raster layer and flood-fill with color of choice
Select none
Delete/Hide original wordart layer
Select Circle 1 layer
Select all, float, defloat
Add new raster layer and flood-fill with gradient of choice(Linear style, Angle 45, Repeat 2)
Paste close-up tube of choice on top of gradient and delete
Change closeup to Luminance (Legacy)
Apply Xero Bad Dream at default settings or random setting of choice
Drop opacity on close-ups down to 75%
Apply dropshadow and merge down on top of gradient layer
Delete/Hide original circle layer
Select Circle 2 layer
Select all, float, defloat
Add new raster layer and flood-fill with gradient of choice(Linear style, Angle 45, Repeat 2)
Select none
Delete/Hide original circle layer
Select Circle 3 layer
Select all, float, defloat
Paste paper 4
Select invert, delete, select none
Delete/Hide original circle layer
Select Square 4 layer
Select all, float, defloat
Add new raster layer and flood-fill with color of choice
Select none
Delete/Hide original square layer
Select Square 5 layer and repeat above steps
Select Dots 2 layer
Add new raster layer and flood-fill with color of choice
Reselect dots 2 layer
Select all, float, defloat
Go back to color layer you just filled
Select invert, delete, select none
Adjust, Add/Remove Noise, Add Noise (Uniform checked, Noise 70%, Monochrome checked)
Delete/Hide original dots layer
Select Circle 7 layer
Select all, float, defloat
Add new raster layer and flood-fill with color of choice
Select none
Effects, Texture Effect, Mosaic - Antique with the following settings:

Delete/Hide original circle layer
Select Circle 8 layer
Select all, float, defloat
Add new raster layer and flood-fill with color of choice
Select none
Delete/Hide original raster layer
Select Circle 9 layer
Select all, float, defloat
Paste paper 2
Select invert, delete, select none
Delete/Hide original circle layer
Select Circle 10 layer and repeat above steps
Select Circle 11 layer
Select all, float, defloat
Add new raster layer and flood-fill with color of choice
Select none
Apply Effects, Texture effects, weave (Gap size 2, Width 4, Opacity 5, Fill gaps checked, Change Gap Color to color of choice)
Delete/Hide original circle layer
Select Circle 12 layer and repeat above steps
Copy and paste tube of choice and position where desired
Apply Xero Radiance at setting of choice
Apply Lokas 3D Shadow at default settings
Select Element 67 - resize by 50%
Paste and position on bottom below tube layer
Select Element 42 - resize by 45%
Image Free Rotate Left by 15% and paste on bottom left side
Select Element 65 - resize by 40%
Paste and position on bottom left side
Select Element 51 - resize by 30%
Paste and position on bottom left side
Select Element 70 - resize by 25%
Paste and position on bottom right side
Select Element 10 - resize by 25%
Paste and position on bottom right side
Select Element 57 - resize by 25%
Image mirror and paste on bottom right side
Select Element 54 - resize by 35%
Paste and position on bottom right side
Select Element 24 - resize by 50%
Paste and position on bottom right side
Select New raster layer and flood fill with color or gradient of choice
Move layer to the bottom of the template
Apply Mask 236
Merge group and move to the bottom
Add any additional elements you like.
Add any dropshadows you like
Crop and resize as desired
Add copyright info, license number and name
You're done! Thanks for trying my tutorial!
Thursday, June 6, 2013
TENNIS SWEETHEART

Supplies needed:
I am using the amazing art from Diana Gali for this tutorial, which you can find here
Scrapkit: I am using an awesome kit from Disturbed Scraps called "Tennis USA Sweetheart" which you can get by going here
Template 402 from Missy which can be found here
Mask 1 from Rieka Rafita which you can find here
Plugins used: Xero-Radiance, Xero-Bad Dream, Lokas 3D Shadow
----------------------------
This tutorial is written for those who have working knowledge of PSPX2 (any version will do).
This tutorial was written by me on June 7, 2013. Please do not copy or paste on any other forum, website or blog provide link back to tut only. Please do not claim as your own. This tutorial is copyrighted to me. Any resemblance to any other tutorial is purely coincidental.
Ok - let's start and remember to save often.
Open the template and using your shortcut keys on your keyboard (SHIFT+D) duplicate the template as a new image. Close the original and delete the copywrite layer.
Adjust Canvas Size by 700 x 625 (you can resize later)
Select Frame 2 layer
Adjust, Add/Remove Noise, Add Noise (Uniform checked, Noise 100%, Monochrome checked)
Select Frame Back 2 layer
Select all, float, defloat
Add new raster layer and flood-fill with gradient of choice(Linear style, Angle 45, Repeat 2)
Paste tube of choice on top of gradient and delete
Change closeup to Hard Light
Apply Xero Bad Dream at default settings or random setting of choice
Drop opacity on close-ups down to 85%
Apply dropshadow and merge down on top of gradient layer
Effects, Texture Effects, Blinds (Width 2, Opactity 20, Horizontal and Light from left/top checked)
Delete/Hide original frame back layer
Select Frame layer
Adjust, Add/Remove Noise, Add Noise (Uniform checked, Noise 100%, Monochrome checked)
Select Frame Back layer
Select all, float, defloat
Add new raster layer and flood-fill with gradient of choice(Linear style, Angle 45, Repeat 2)
Paste tube of choice on top of gradient and delete
Change closeup to Luminance (Legacy)
Apply Xero Bad Dream at default settings or random setting of choice
Drop opacity on close-ups down to 80%
Apply dropshadow and merge down on top of gradient layer
Delete/Hide original frame back layer
Select Rectangle Shape 3 layer
Select all, float, defloat
Paste paper 11
Select invert, delete, select none
Delete/Hide original rectangle layer
Select Square layer
Select all, float, defloat
Paste paper 16
Select invert, delete, select none
Delete/Hide original square layer
Select Rectangle layer
Select all, float, defloat
Paste paper 12
Select invert, delete, select none
Delete/Hide original rectangle layer
Select Rectangle Shape 2 layer
Select all, float, defloat
Paste paper 2
Select invert, delete, select none
Delete/Hide original rectangle layer
Select Rectangle Shape layer
Select all, float, defloat
Paste paper 3
Select invert, delete, select none
Delete/Hide original rectangle layer
Copy and paste tube of choice and position where desired
Apply Xero Radiance at setting of choice
Apply Lokas 3D Shadow at default settings
Select Element 66 - resize by 35%
Paste and position on bottom left side
Select Element 72 - resize by 25%
Paste and position on bottom left side
Select Element 113 - resize by 25%
Paste and position on bottom left side
Select Element 86 - resize by 30%
Paste and position on bottom left side
Select Element 64 - resize by 25%
Paste and position on bottom left side
Select Element 121 - resize by 30%
Paste and position on bottom right side
Select Element 67 - resize by 30%
Paste and position on bottom right side
Select Element 92 - resize by 40%
Paste and position on bottom right side
Select Element 74 - resize by 40%
Paste and position on bottom
Select New raster layer and flood fill with color or gradient of choice
Move layer to the bottom of the template
Apply Mask 1
Merge group and move to the bottom
Add any additional elements you like.
Add any dropshadows you like
Crop and resize as desired
Add copyright info, license number and name
You're done! Thanks for trying my tutorial!
Wednesday, June 5, 2013
SAILOR GIRL

Supplies needed:
I am using the amazing art from Ninaste for this tutorial, which you can find here
Scrapkit: I am using a stunning kit from Amy Marie called "Sailor Girl" which you can get by going here
Template 202 from Kristen which can be found here
Mask 81 from Trese which you can find here
Plugins used: Xero-Radiance, Xero-Bad Dream, Lokas 3D Shadow
----------------------------
This tutorial is written for those who have working knowledge of PSPX2 (any version will do).
This tutorial was written by me on June 6, 2013. Please do not copy or paste on any other forum, website or blog provide link back to tut only. Please do not claim as your own. This tutorial is copyrighted to me. Any resemblance to any other tutorial is purely coincidental.
Ok - let's start and remember to save often.
Open the template and using your shortcut keys on your keyboard (SHIFT+D) duplicate the template as a new image. Close the original and delete the copywrite layer.
Select Circle Copy of Raster 1 layer
Select all, float, defloat
Paste paper 7
Select invert, delete, select none
Delete/Hide original circle layer
Select Element 97 - resize by 80%
Paste and position on top of center circle
Select Star Promoted Selection 1 layer
Select all, float, defloat
Add new raster layer and flood-fill with gradient of choice(Linear style, Angle 45, Repeat 2)
Paste close-up tube of choice on top of gradient and delete
Change closeup to Luminance (Legacy)
Apply Xero Bad Dream at default settings or random setting of choice
Drop opacity on close-ups down to 75%
Apply dropshadow and merge down on top of gradient layer
Effects, Texture Effects, Blinds (Width 2, Opactity 20, Horizontal and Light from left/top checked)
Delete/Hide original star layer
Select Circle Copy of Raster 1 layer and repeat above steps
Select Square Raster 3 layer
Select all, float, defloat
Paste paper 10
Select invert, delete, select none
Delete/Hide original square layer
Select Square Copy of Raster 3 layer and repeat above steps
Select Square Raster 5 layer
Select all, float, defloat
Add new raster layer and flood-fill with color of choice
Select none
Apply Effects, Texture Effects, Weave (Gap size 2, Width 4, Opacity 5, Fill gaps checked, change Gap and Weave color to one of choice)
Delete/Hide original square layer
Select Square Copy of Raster 5 and repeat above steps
Select Square Raster 4 layer
Select all, float defloat
Paste paper 9
Select invert, delete, select none
Delete/Hide original square layer
Select Copy of Raster 4 layer and repeat above steps
Select Square Raster 6 layer
Select all, float, defloat
Paste paper 4
Select invert, delete, select none
Delete/Hide original square layer
Select Square Copy of Raster 6 layer and repeat above steps
Select Square Raster 7 layer
Select all, float, defloat
Paste paper 8
Select invert, delete, select none
Delete/Hide original square layer
Select Square Copy of Raster 7 layer and repeat above steps
Select Rectangle Raster 9 layer
Select all, float, defloat
Paste paper 3
Select invert, delete, select none
Delete/Hide original rectangle layer
Select Rectangle Copy of Raster 9 and repeat above steps
Select Rectangle Raster 8 layer
Select all, float, defloat
Paste paper 1
Select invert, delete, select none
Delete/Hide original rectangle layer
Select Rectangle Copy of Raster 8 layer and repeat above steps
Copy and paste tube of choice and position where desired
Apply Xero Radiance at setting of choice
Apply Lokas 3D Shadow at default settings
Select Element 7 - resize by 42%
Paste and position on top right corner
Select Element 24 - resize by 80%
Paste and position on left side behind star shape
Select Element 8 - resize by 35%
Paste and position on bottom left side
Select Element 9 - resize by 40%
Paste and position on bottom left side
Select Element 40 - resize by 40%
Paste and position on bottom left side
Select Element 65 - resize by 25%
Paste and position on bottom left side
Select Element 134 - resize by 30%
Image mirror and psaste on bottom left side
Select Element 11 - resize by 40%
Image Free Rotate Left by 15% and paste on bottom right side
Select Element 128 - resize by 35%
Paste and position on bottom right
Select Element 18 - resize by 32%
Image mirror and paste on bottom right side
Select Element 39 - resize by 20%
Paste and position on bottom right side
Select New raster layer and flood fill with color or gradient of choice
Move layer to the bottom of the template
Apply Mask 81
Merge group and move to the bottom
Add any additional elements you like.
Add any dropshadows you like
Crop and resize as desired
Add copyright info, license number and name
You're done! Thanks for trying my tutorial!
Subscribe to:
Posts
(Atom)


