I CT For




Showing posts with label Niqui Designs. Show all posts
Showing posts with label Niqui Designs. Show all posts
Monday, April 27, 2015
ALICE MADNESS

Supplies needed:
Scrapkit: I am using a stunning kit from Niqui's Designs called "Alice Madness 2" which you can get by going here
Mask 21 from Moonbeams and Spiderwebs which you can find here
Plugins: Lokas 3D Shadow
----------------------------
This tutorial is written for those who have working knowledge of PSPX2 (any version will do).
This tutorial was written by me on April 27, 2014. Please do not copy or paste on any other forum, website or blog provide link back to tut only. Please do not claim as your own. This tutorial is copyrighted to me. Any resemblance to any other tutorial is purely coincidental.
Ok - let's start and remember to save often.
Open up a 750 x 650 blank canvas (we can resize it later)
Select Frame Element 19 and paste in the center of the canvas
Resize by 65%
Select your magic wand tool and click in the center of the Frame (Add (Shift), RGB Value, Tolerance 25, Contiguous checked, Feather 0)
Selections, Modify, Expand by 5
Paste paper 8
Select invert, delete
Paste close-up tube of choice on top of paper layer and delete
Select none
Change close-up to Overlay
Apply dropshadow and merge close-up down on paper
Move paper below frame
Select Element 59 - resize by 22%
Image Free Rotate Right by 15% and paste on top left
Select Element 57- resize by 30%
Paste and position on bottom left
Select Element 29- resize by 15%
Paste on top of table element
Select Element 45 - resize by 15%
Paste and position on top of table element
Select Element 18 - resize by 25%
Paste and position on top of table element
Select Element 25 - resize by 30%
Paste and position on right side where desired
Paste tube of choice where desired
Apply Lokas 3D Shadow at default settings
Select Element 21 - resize by 55%
Paste and position on bottom right
Select Element 30 - resize by 40%
Paste and position on bottom right
Select Element 26 - resize by 15%
Paste and position on bottom right
Select Element 28 - resize by 30%
Paste and postion on bottom left
Select Element 31 - resize by 25%
Image Free Rotate Right by 15% and paste on bottom left
Select Element 12 - resize by 15%
Paste and position on bottom left
Select Element 47 - resize by 15%
Paste and position on bottom
Select Element 22 - resize by 15%
Paste and position on bottom left
Add new raster and flood-fill with color or gradient of choice
Apply Mask 21 or mask of choice
Merge group and move to the bottom layer
Add any dropshadows you like
Sharpen any elements as needed
Crop and resize as desired
Add copyright info, license number and name
You're done! Thanks for trying my tutorial!

Thursday, April 16, 2015
GOTH LOVE
.png)
Supplies needed:
I am using the stunning artwork from Arthur Crowe for this tutorial which you can find here
I am using a gorgeous kit from Niqui's Designs called "Gothic Love" which you can get by going here
Mask 4 from ButterflyFlutterby which you can find here
Mask 4 from Melissaz Creations which you can find here
Plugins: Lokas 3D Shadow
----------------------------
This tutorial is written for those who have working knowledge of PSPX2 (any version will do).
This tutorial was written by me on April 16, 2015. Please do not copy or paste on any other forum, website or blog provide link back to tut only. Please do not claim as your own. This tutorial is copyrighted to me. Any resemblance to any other tutorial is purely coincidental.
Ok - let's start and remember to save often.
Open up a 750 x 650 blank canvas (we can resize it later)
Select Element 9 and paste in the center of the canvas
Select Element 26 - resize by 55%
Paste and position above Element 9
Select Element 58 - resize by 25%
Paste and position on top left
Image duplicate and mirror
Select Element 3 - resize by 55%
Paste and position on right side where desired
Paste tube of choice where desired
Apply Lokas 3D Shadow at default settings
Select Element 8 - resize by 35%
Paste and position on bottom left
Select Element 13 - resize by 35%
Image Free Rotate Left by 15% and paste on bottom left
Select Element 70 - resize by 25%
Paste and position on bottom left
Select Element 64 - resize by 25%
Paste and position on bottom left
Select Element 50 - resize by 20%
Paste and position on bottom left
Select Element 56 - resize by 28%
Image mirror and paste on bottom
Select Element 27 - resize by 12%
Paste and position on bottom left
Select Element 51 - resize by 22%
Paste and position on bottom
Select Element 48 - resize by 22%
Paste and position on bottom right
Select Element 47 - resize by 25%
Paste and position on bottom right
Select Element 2 - resize by 30%
Paste and position on bottom right
Select Element 59 - resize by 17%
Paste and position on bottom
Select Element 7 - resize by 95%
Paste and position on canvas and move to bottom layer
Add new raster layer and flood-fill with color or gradient of choice
Apply Mask 4 or mask of choice
Merge group and move to the bottom layer
Add new raster and flood-fill with color of choice
Apply Mask 4 from Melissaz Creations and merge group
Add any dropshadows you like
Sharpen any elements as needed
Crop and resize as desired
Add copyright info, license number and name
You're done! Thanks for trying my tutorial!
Thursday, April 2, 2015
EBONY

Supplies needed:
I am using the stunning artwork from Souldesigner for this tutorial which you can find here
I am using a gorgeous kit from Niqui's Designs called "Ebony" which you can get by going here
Mask 236 from Weescotlass which you can find here
Plugins: Lokas 3D Shadow
----------------------------
This tutorial is written for those who have working knowledge of PSPX2 (any version will do).
This tutorial was written by me on April 2, 2015. Please do not copy or paste on any other forum, website or blog provide link back to tut only. Please do not claim as your own. This tutorial is copyrighted to me. Any resemblance to any other tutorial is purely coincidental.
Ok - let's start and remember to save often.
Open up a 750 x 650 blank canvas (we can resize it later)
Select Element 52 - paste and position in the center of the canvas
Select Frame Element 3 and paste in the center of the canvas
Resize by 65%
Select your selections tool and select the center of the Frame
(Add (Shift), RGB Value, Tolerance 25, Contiguous checked,
Feather 0)
Select modify, expand by 5
Paste paper 7
Select invert, delete
Paste close-up tube on left side of paper and delete, select none
Change close-up to Luminance (Legacy) and apply dropshadow
Drop opacity down to 65%
Merge close-up down onto paper layer
Move paper below frame
Select Frame Element 26 - resize by 45%
Paste and position right side above circle frame
Select your selections tool and select the center of each of the
squares (Add (Shift), RGB Value, Tolerance 25, Contiguous
checked, Feather 0)
Select modify, expand by 5
Paste paper 8
Select invert, delete
Paste close-up tubes of choice in each of the squares above
paper and delete, select none
Change tubes to view of preference (I used burn, hard light and
luminance (legacy).
Select Element 2 - resize by 30%
Image Free Rotate Left by 15% and paste on top left
Paste tube of choice where desired
Apply Lokas 3D Shadow at default settings
Select Element 22 - resize by 45%
Paste and position on bottom left side
Select Element 23 - resize by 35%
Paste and position on bottom left
Select Element 66 - resize by 40%
Paste and position on bottom left
Select Element 32 - resize by 15%
Paste and position on bottom left
Select Element 47 - resize by 25%
Paste and position on bottom left
Select Element 48 - resize by 25%
Paste and position on right side
Select Element 20 - resize by 25%
Image Free Rotate Left by 15% and paste on bottom right
Select Element 60 - resize by 25%
Paste and position on bottom right
Select Element 31 - resize by 30%
Paste and position on bottom right
Select Element 59 - resize by 40%
Paste and position on bottom right
Select Element 4 - resize by 65%
Paste and position on top left and move to bottom layer
Image duplicate, mirror and flip (reposition as needed)
Add new raster layer and flood-fill with color or gradient of choice
Apply Mask 236 or mask of choice
Merge group and move to the bottom layer
Add any dropshadows you like
Sharpen any elements as needed
Crop and resize as desired
Add copyright info, license number and name
You're done! Thanks for trying my tutorial!
Tuesday, October 22, 2013
CHECK YOUR RACK

Supplies needed:
I am using the amazing artwork from Kiwifirestorm for this tutorial which you can find here
Scrapkit: I am using a beautiful kit from Niqui's Designs called "Thinking Pink" which you can get by going here
BCA Template by Vaybs which can be found here
Edge Mask which you can find here
Plugins used: Xero - Fritillary, Eyecandy 4000 - Glass, Xero-Radiance, Xero - Bad Dream, Lokas 3D Shadow
----------------------------
This tutorial is written for those who have working knowledge of PSPX2 (any version will do).
This tutorial was written by me on October 21, 2013. Please do not copy or paste on any other forum, website or blog provide link back to tut only. Please do not claim as your own. This tutorial is copyrighted to me. Any resemblance to any other tutorial is purely coincidental.
Ok - let's start and remember to save often.
Open the template and using your shortcut keys on your keyboard (SHIFT+D) duplicate the template as a new image. Close the original and delete the copywrite layer.
Select Check Your Rack "CYR" Wordart layer
Apply Eyecandy Glass on default settings
Select Frame 1 layer
Select all, float, defloat
Add new raster layer and flood-fill with color of choice
Select none
Apply Eyecandy Glass on default settings
Delete/Hide original frame layer
Select Frame 2 and repeat above steps
Select Circle 9 layer
Select all, float, defloat
Add new raster layer and flood-fill with gradient or color of choice (Linear style, Angle 45, Repeat 2)
Paste close-up tube of choice on top of gradient and delete
Select none
Change closeups to Luminance (Legacy)
Apply Xero Bad Dream at setting of choice
Drop opacity down to 75% on tube
Apply dropshadow and merge tube down on top of gradient layer
Effect, Texture Effects, Blinds (Width 2, Opactity 10, Horizontal and Light from left/top checked)
Delete/Hide original circle layer
Select Circle 8 layer and repeat above steps
Select Circle 7 layer
Select all, float, defloat
Paste paper 10
Select invert, delete, select none
Delete/hide original circle layer
Select Circle 6 layer
Select all, float, defloat
Add new raster layer and flood-fill with color of choice
Select none
Adjust, Add/Remove Noise, Add Noise (Uniform checked, Noise 75%, Monochrome checked)
Delete/Hide original circle layer
Select Circle 5 layer
Apply Xero - Fritillary with the following settings:

Select Square 3 layer
Select all, float, defloat
Paste paper 8
Select invert, delete, select none
Delete/Hide original square layer
Select Square 2 layer and repeat above steps
Select Circle 4 layer
Select all, float, defloat
Paste paper 6
Select invert, delete, select none
Delete/Hide original circle layer
Select Circle 3 layer and repeat above steps
Select Circle 2 layer
Select all, float, defloat
Paste paper 7
Select invert, delete, select none
Delete/Hide original circle layer
Select Circle 1 layer
Select all, float, defloat
Add new raster layer and flood-fill with color of choice
Select none
Apply same Xero Fritillary settings from above
Delete/Hide original circle layer
Copy and paste tube of choice and position where desired
Apply Xero Radiance at setting of choice
Apply Lokas 3D Shadow at default settings
Select Element 2 - resize by 25%
Paste and position on top left
Select Element 12 - resize by 25%
Image Free Rotate Left by 20% and paste on left side
Select Element 22 - resize by 75%
Paste and position in the center of canvas below tube layer
Select Element 14 - resize by 30%
Paste and position on bottom left
Select Element 34 - resize by 20%
Image mirror and paste on bottom left
Select Element 5 - resize by 25%
Image mirror and paste on bottom right
Select Element 35 - resize by 20%
Paste and position on bottom right
Select Element 21 - resize by 25%
Paste and position on bottom right
Select Element 7 - resize by 25%
Paste and position on right side
Select New raster layer and flood fill with color or gradient of choice
Move layer to the bottom of the template
Apply Edge Mask
Merge group and move to the bottom
Add any additional elements you like.
Add any dropshadows you like
Crop and resize as desired
Add copyright info, license number and name
You're done! Thanks for trying my tutorial!
Thursday, September 26, 2013
PEEK A BOO

Supplies needed:
I am using the amazing art from Alex Prihodko for this tutorial which you can find here
Scrapkit: I am using an awesome kit from Niqui's Designs called "Peek A Boo" which you can get by going here
Template 27 from Vickie which can be found here
Halloween Bats Mask from Tonya which you can get on the Misfits Blog here
Halloween Mask from Vix which you can find here
Plugins used: Xero-Radiance, Xero - Bad Dream, Lokas 3D Shadow
----------------------------
This tutorial is written for those who have working knowledge of PSPX2 (any version will do).
This tutorial was written by me on September 26, 2013. Please do not copy or paste on any other forum, website or blog provide link back to tut only. Please do not claim as your own. This tutorial is copyrighted to me. Any resemblance to any other tutorial is purely coincidental.
Ok - let's start and remember to save often.
Open the template and using your shortcut keys on your keyboard (SHIFT+D) duplicate the template as a new image. Close the original and delete the copywrite layer.
Adjust and resize canvas to 750 x 650
Select Circle 4 layer
Select all, float, defloat
Add new raster layer and flood-fill with gradient or color of choice (Linear style, Angle 45, Repeat 2)
Paste close-up tube of choice on top of gradient and delete
Select none
Change closeup to Luminance (Legacy)
Apply Xero Bad Dream at setting of choice
Apply dropshadow and merge tube down on top of gradient layer
Delete/Hide original circle layer
Select Circle 3 and Circle 3 Frame layer
Move it above Rec 3 layer
Reselect Circle 3
Select all, float, defloat
Paste paper 10
Select invert, delete, select none
Delete/Hide original circle layer
Select Element 11 - resize by 65%
Paste and position on top of Paper 10 layer
Select Rec 2 layer
Select all, float, defloat
Paste paper 7
Select invert, delete, select none
Delete/hide original rectangle layer
Select Circle 2 layer
Select all, float, defloat
Paste paper 6
Select invert, delete, select none
Delete/Hide original circle layer
Select Circle 1 layer
Select all, float, defloat
Add new raster layer and flood-fill with color of choice
Select none
Apply Effects, Texture Effects, weave (Gap size 2, Width 4, Opacity 5, Fill gaps checked, Change Gap Color to color of choice)
Delete/Hide original circle layer
Select Rec 1 layer
Select all, float, defloat
Paste paper 3
Select invert, delete, select none
Delete/Hide original rec layer
Copy and paste tube of choice and position where desired
Apply Xero Radiance at setting of choice
Apply Lokas 3D Shadow at default settings
Select Element 27 - resize by 55%
Paste and position on right side
Select Element 34 - resize by 30%
Paste and position on bottom right
Select Element 14 - resize by 35%
Paste and position on bottom right
Select Element 12 - resize by 25%
Paste and position on bottom right
Select Element 36 - resize by 25%
Paste and position on bottom left
Select Element 15 - resize by 30%
Paste and position on bottom left
Select Element 42 - resize by 40%
Paste and position on top left
Select Element 42 - resize by 30%
Image mirror and paste on top
Select New raster layer and flood fill with color or gradient of choice
Move layer to the bottom of the template
Apply Vix Halloween mask
Merge group and move to the bottom
Add new raster layer and again flood-fill with color of choice
Apply Bats Mask and merge group
Add any additional elements you like.
Add any dropshadows you like
Crop and resize as desired
Add copyright info, license number and name
You're done! Thanks for trying my tutorial!
Tuesday, August 13, 2013
BAD STUDENT

Supplies needed:
I am using an Exclusive from Picsfordesign which you can find here
Scrapkit: I am using an awesome kit from Niqui's Designs called "Back To School" which you can get by going here
Collab Template 4 from Millie and Rissa which can be found here
Circle Mask 2 from Aqua which you can get on the Misfits Blog here
Plugins used: Alien Skin Eyecandy 6 - Glass, Eyecandy 6 - Gradient Glow, Xero-Radiance, Xero - Bad Dream, Lokas 3D Shadow
----------------------------
This tutorial is written for those who have working knowledge of PSPX2 (any version will do).
This tutorial was written by me on August 13, 2013. Please do not copy or paste on any other forum, website or blog provide link back to tut only. Please do not claim as your own. This tutorial is copyrighted to me. Any resemblance to any other tutorial is purely coincidental.
Ok - let's start and remember to save often.
Open the template and using your shortcut keys on your keyboard (SHIFT+D) duplicate the template as a new image.
Close the original and delete the copywrite layer.
Select Star 13 layer
Select all, float, defloat
Add new raster layer and flood-fill with color or gradient of choice (Linear style, Angle 45, Repeat 2)
Copy close-up tube of choice and position where desired
Select invert, delete, select none
Change closeup to Luminance (Legacy)
Apply Xero Bad Dream at setting of choice
Apply dropshadow and merge tube down on top of gradient layer
Apply Eyecandy 6 - Glass on Clear Gentle factory settings
Delete/Hide original star layer
Select Star 12 layer and repeat above steps
Select Strip 10 layer
Select all, float, defloat
Add new raster layer and flood-fill with color of choice
Select none
Apply Eyecandy 6 Glass on factory default settings
Delete/Hide original strip layer
Select Circle 9 layer
Select all, float, defloat
Paste paper 2
Select invert, delete, select none
Effects, Texture Effects, Texture with the following canvas settings:

Delete/Hide original circle layer
Select Circle 8 layer and repeat above steps
Select Square 7 layer
Select all, float, defloat
Paste paper 10
Select invert, delete, select none
Delete/Hide original square layer
Select Square 6 layer and repeat above steps
Select Rectangle 5 layer
Select all, float, defloat
Paste paper 9
Select invert, delete, select none
Delete/Hide original rectangle layer
Select Wordart 4 layer and apply Eyecandy Gradient Glow on default settings of choice - I chose the Patriotic Glow setting (Glow width 3)
Select Circle 3 layer
Select all, float, defloat
Add new raster layer and flood-fill with color of choice
Select none
Adjust, Add/Remove Noise, Add Noise (Uniform checked, Noise 70%, Monochrome checked)
Delete/Hide original circle layer
Select Circle 2 layer
Select all, float, defloat
Paste paper 13
Select invert, delete, select none
Delete/Hide original circle layer
Select Oval 1 layer
Select all, float, defloat
Paste paper 14
Select invert, delete, select none
Delete/Hide original oval layer
Copy and paste tube of choice and position where desired
Apply Xero Radiance at setting of choice
Apply Lokas 3D Shadow at default settings
Select Element 2 - resize by 25%
Paste and position on bottom left
Select Element 57 - resize by 25%
Paste and position on bottom left
Select Element 8 - resize by 25%
Paste and position on bottom left
Select Element 29 - resize by 25%
Paste and position on bottom left
Select Element 4 - resize by 25%
Paste and position on bottom right
Select Element 48 - resize by 25%
Image Free Rotate Left by 15% and paste on bottom right
Select Element 5 - resize by 20%
Paste and position on bottom right
Select Element 3 - resize by 20%
Paste and position on bottom right
Select Element 6 - resize by 20%
Paste and position on bottom right
Select Element 40 - resize by 25%
Select Element 26 - paste and position on top and move to bottom layer
Paste and position on bottom right side
Paste paper 5
Move layer to the bottom of the template
Apply Mask 2 from Aqua
Merge group and move to the bottom
Add any additional elements you like.
Add any dropshadows you like
Crop and resize as desired
Add copyright info, license number and name
You're done! Thanks for trying my tutorial!
Tuesday, July 2, 2013
FIREWORKS

Supplies needed:
I am using the amazing art from Jose Cano for this tutorial, which you can now find here
Scrapkit: I am using a stunning kit from Niqui's Designs called "Fireworks" which you can get by going here
Template 273 from Millie which can be found here
Mask 8 from Gina Gems which you can find here
Plugins used: Alien Skin Eyecandy 5 Impact - Glass, Xero-Radiance, Xero - Bad Dream, Lokas 3D Shadow
----------------------------
This tutorial is written for those who have working knowledge of PSPX2 (any version will do).
This tutorial was written by me on July 2, 2013. Please do not copy or paste on any other forum, website or blog provide link back to tut only. Please do not claim as your own. This tutorial is copyrighted to me. Any resemblance to any other tutorial is purely coincidental.
Ok - let's start and remember to save often.
Open the template and using your shortcut keys on your keyboard (SHIFT+D) duplicate the template as a new image. Close the original and delete the copywrite layer.
Adjust canvas size to 750 x 650 (you can resize later)
Select Star 10 layer
Select All, float, defloat
Add new raster layer and flood-fill with color or gradient of choice
Select none
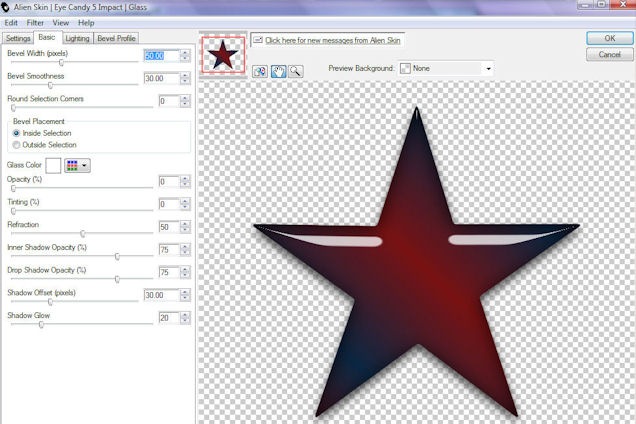
Apply Alien Skin Impact - Glass with the following settings:
Select Star 9 layer
Select all, float, defloat
Add new raster layer and flood-fill with color of choice
Select none
Delete/hide original star layer
Select Star 6, 7 and 8 layers and repeat above steps
Select Circle 5 layer
Select all, float, defloat
Paste paper 4
Select invert, delete, select none
Delete/hide original circle layer
Select Rectangle 4 layer
Select all, float, defloat
Paste paper 10
Select invert, delete, select none
Delete/hide original rectangle layer
Select Oval 3 layer
Select all, float, defloat
Paste paper 3
Select invert, delete, select none
Delete/hide original oval layer
Select Rectangle 2 layer
Select all, float, defloat
Add new raster layer and flood-fill with color of choice
Select none
Apply Effects, Texture effects, weave (Gap size 2, Width 5, Opacity 5, Fill gaps checked, Change Gap Color to color of choice)
Delete/Hide original rectangle layer
Select Circle 1 layer
Select all, float, defloat
Paste paper 5
Select invert, delete, select none
Delete/hide original circle layer
Copy and paste tube of choice and position where desired
Apply Xero Radiance at setting of choice
Apply Lokas 3D Shadow at default settings
Select Element 13 - resize by 40%
Paste and position on top left
Select Element 36 - resize by 50%
Image Free Rotate Left by 15% and paste on top right
Select Element 37 - resize by 40%
Paste and position on bottom left
Select Element 17 - resize by 25%
Paste and position on bottom right
Select Element 31 - resize by 25%
Paste and position on bottom right
Select Element 34 - resize by 30%
Image Free Rotate Right by 15% and paste on bottom right
Select Select New raster layer and flood fill with color or gradient of choice
Move layer to the bottom of the template
Apply Mask 8
Merge group and move to the bottom
Add any additional elements you like.
Add any dropshadows you like
Crop and resize as desired
Add copyright info, license number and name
You're done! Thanks for trying my tutorial!
Monday, June 3, 2013
SUMMER DAYS

Supplies needed:
I am using the amazing art from Jose Cano for this tutorial, which you can find here
Scrapkit: I am using a beautiful kit from Niqui's Designs called "At The Beach" which you can get by going here
Template 264 from Millie which can be found here
Summer Mask 5 from Jenny which you can find on the Misfits Blog here
Plugins used: VM Extravaganza - Transmission, Eyecandy 4000 - Marble, Eyecandy 4000 - Glass, Eyecandy 4000 - Gradient Glow, Xero-Radiance, Xero-Bad Dream, Lokas 3D Shadow
----------------------------
This tutorial is written for those who have working knowledge of PSPX2 (any version will do).
This tutorial was written by me on June 3, 2013. Please do not copy or paste on any other forum, website or blog provide link back to tut only. Please do not claim as your own. This tutorial is copyrighted to me. Any resemblance to any other tutorial is purely coincidental.
Ok - let's start and remember to save often.
Open the template and using your shortcut keys on your keyboard (SHIFT+D) duplicate the template as a new image. Close the original and delete the copywrite layer.
Select Wordart 8 layer
Add new raster layer and flood-fill with color of choice
Go back to workart layer - Select all, float, defloat
Reselect color layer you just filled
Select invert, delete, select none
Adjust, Add/Remove Noise, Add Noise (Uniform checked, Noise 40%, Monochrome checked)
Apply Eyecandy Gradient Glow on fat default settings (Glow Width 3)
Delete/Hide original wordart layer
Select Wordart 7 layer
Select all, float, defloat
Add new raster layer and flood-fill with color of choice
Select none
Apply Eyecandy Marble with the following settings:

Apply Eyecandy Glass on default settings
Delete/Hide original wordart layer
Select Circle 6 layer
Select all, float, defloat
Paste paper 6
Select invert, delete, select none
Delete/Hide original circle layer
Select Square 5 layer
Select all, float, defloat
Paste paper 9
Select invert, delete, select none
Delete/Hide original square layer
Select Square 4 layer and repeat above steps
Select Rectangle 3 layer
Select all, float, defloat
Add new raster layer and flood-fill with color of choice
Select none
Apply VM - Transmission with the following settings:

Delete/Hide original rectangle layer
Select Circle 2 layer
Select all, float, defloat
Paste paper 1
Select invert, delete, select none
Delete/Hide original circle layer
Select Circle 1 layer
Select all, float, defloat
Paste paper 2
Select invert, delete, select none
Delete/Hide original circle layer
Copy and paste tube of choice and position where desired
Apply Xero Radiance at setting of choice
Apply Lokas 3D Shadow at default settings
Select Element 54 - resize by 85%
Paste on the bottom below center circle layer
Image duplicate and mirror
Select Element 48 - resize by 75%
Paste and position on top of sand element under tube layer
Select Element 30 - resize by 75%
Paste and position on right side below blanket element
Select Element 50 - resize by 40%
Paste and position on top right below palm tree element
Select Element 7 - resize by 40%
Image mirror and paste on left side above center rectangle layer
Select Element 31 - resize by 35%
Paste and position on bottom left side
Select Element 59 - resize by 40%
Paste and position on bottom right side
Select Element 18 - resize by 25%
Paste and position on bottom right side
Select Element 17 - resize by 25%
Paste and position on bottom right side
Select New raster layer and flood fill with color or gradient of choice
Move layer to the bottom of the template
Apply Summer Mask 5
Merge group and move to the bottom
Add any additional elements you like.
Add any dropshadows you like
Crop and resize as desired
Add copyright info, license number and name
You're done! Thanks for trying my tutorial!
Tuesday, May 14, 2013
TROPICANA

Supplies needed:
I am using the amazing art from Zlata for this tutorial, which you can find here
Scrapkit: I am using an awesome kit from Niqui's Designs called "Tropicana " which you can get by going here
Template 255 from Millie which can be found here
Mask 7 from Zuzzanna which you can find here
Plugins used: Eyecandy 4000 - Glass, Eyecandy 4000 - Gradient Glow, Xero-Radiance, Xero - Bad Dream, Lokas 3D Shadow
----------------------------
This tutorial is written for those who have working knowledge of PSPX2 (any version will do).
This tutorial was written by me on May 14, 2013. Please do not copy or paste on any other forum, website or blog provide link back to tut only. Please do not claim as your own. This tutorial is copyrighted to me. Any resemblance to any other tutorial is purely coincidental.
Ok - let's start and remember to save often.
Open the template and using your shortcut keys on your keyboard (SHIFT+D) duplicate the template as a new image. Close the original and delete the copywrite layer.
Select Palm Tree 9 layer and delete if desire
Select Wordart 8 layer
Select all, float, defloat
Add new raster layer and flood-fill with color of choice
Select none
Apply Eyecandy Glass on default settings
Apply Eyecandy Gradient Glow on fat default settings
Delete/Hide original wordart layer
Select Oval 6 layer
Select all, float, defloat
Paste paper 3
Select invert, delete, select none
Delete/Hide original oval layer
Select Circle 4 layer
Select all, float, defloat
Paste paper 5
Select invert, delete, select none
Delete/Hide original circle layer
Select Circle 5 layer and repeat above steps
Select Rectangle 2 layer
Select all, float, defloat
Paste paper 10
Select invert, delete, select none
Delete/Hide original rectangle layer
Select Rectangle 3 layer and repeat above steps
Select Square 1 layer
Select all, float, defloat
Paste paper 9
Select invert, delete, select none
Delete/Hide original square layer
Copy and paste tube of choice and position where desired
Apply Xero Radiance at setting of choice
Apply Lokas 3D Shadow at default settings
Select Element 36 - resize by 55%
Paste and position in the center behind tube layer
Select Element 42 - resize by 50%
Paste and position on left side behind tube layer
Select Element 11 - resize by 20%
Paste nad position on bottom right side
Select Element 20 - resize by 35%
Paste and position on bottom right side
Select Element 18 - resize by 15%
Paste and positon on bottom right side
Select Element 31 - resize by 30%
Paste and position on bottom left side
Select Element 19 - resize by 25%
Image mirror and paste on the bottom left side
Duplicate, mirror and resize by 85% and reposition
Select New raster layer and flood fill with color or gradient of choice
Move layer to the bottom of the template
Apply Mask 7
Merge group and move to the bottom
Add any additional elements you like.
Add any dropshadows you like
Crop and resize as desired
Add copyright info, license number and name
You're done! Thanks for trying my tutorial!
Friday, April 19, 2013
FEEL THE MUSIC

Supplies needed:
I am using the amazing art from Celineart Pinup for this tutorial, which you can find here
Scrapkit: I am using a stunning kit from Niqui's Designs called "Feeling The Music" which you can get by going here
Template 207 from Millie which can be found here
Mask 249 from Trese which you can find here
Plugins used: Penta - Color Dot, Xero-Radiance, Xero-Bad Dream, Lokas 3D Shadow
----------------------------
This tutorial is written for those who have working knowledge of PSPX2 (any version will do).
This tutorial was written by me on April 19, 2013. Please do not copy or paste on any other forum, website or blog provide link back to tut only. Please do not claim as your own. This tutorial is copyrighted to me. Any resemblance to any other tutorial is purely coincidental.
Ok - let's start and remember to save often.
Open the template and using your shortcut keys on your keyboard (SHIFT+D) duplicate the template as a new image. Close the original and delete the copywrite layer.
Select wordart layer 9
Select all, float, defloat
Add new raster layer and flood-fill with color or gradient of choice
Select none
Adjust, Add/Remove Noise, Add Noise (Uniform checked, Noise 40%, Monochrome checked)
Apply Eyecandy Glass at default settings
Apply Eyecandy Gradient Glow at fat default settings (Glow Width 3)
Delete/Hide original wordart layer
Select Wordart 10 layer
Add new raster layer and flood-fill with color of choice
Reselect "Crazy wordart"
Select all, float, defloat
Go back and select your color layer you just filled
Select invert, delete, select none
Apply Eyecandy Gradient Glow on Medium default settings
Delete/Hide original wordart layer
Select Rectangle 11 layer
Select all, float, defloat
Paste paper 12
Select invert, delete, select none
Apply Penta Color dot with the following settings:

Delete/Hide original rectangle layer
Select Rectangle 8 layer
Select all, float, defloat
Paste paper 4
Select invert, delete, select none
Delete/Hide original rectangle layer
Select Star 7 layer and delete
Select Square 6 layer
Select all, float, defloat
Paste paper 5
Select invert, delete
Paste close-up tube of choice on the left side and delete
Select none
Change close-up to Luminance and drop opacity down to 85%
Apply Xero Bad Dream at default settings
Apply dropshadows and merge down on top of paper layer
Delete/Hide original square layer
Select Square 4 layer
Select all, float, defloat
Paste paper 1
Select invert, delete, select none
Delete/Hide original square layer
Select Circle 3 layer
Select all, float, defloat
Paste paper 8
Select invert, delete, select none
Delete/Hide original circle layer
Select Square 2 layer
Select invert, delete, select none
Delete/Hide original square layer
Select Square 1 layer and repeat above steps
Copy and paste tube of choice and position where desired
Apply Xero Radiance at setting of choice
Apply Lokas 3D Shadow at default settings
Select Element 12 - resize by 50%
Paste and position on bottom left side
Select Element 31 - resize by 65%
Image Free Rotate Left by 15% and paste on left side
Select Element 30 - resize by 30%
Select your magic wand tool and click in the center box of the element (Add (Shift), RGB Value, Tolerance 10, Contiguous checked, Feather 0)
Selections, Modify and Expand by 5
Paste a paper and tube of choice on top of selection
Select invert, delete, select none
Image Free Rotate Left by 15% and paste on bottom left side
Select Element 18 - resize by 60%
Paste and position on the bottom behind tube layer
Select Element 19 - resize by 30%
Paste and position on the bottom right side
Select Element 37 - resize by 25%
Image mirror and paste on the bottom right side
Select Element 22 - resize by 30%
Paste and position on bottom right side
Select Element 40 - resize by 50%
Paste and position on right side
Select New raster layer and flood fill with color or gradient of choice
Move layer to the bottom of the template
Apply Mask 249
Merge group and move to the bottom
Add any additional elements you like.
Add any dropshadows you like
Crop and resize as desired
Add copyright info, license number and name
You're done! Thanks for trying my tutorial!
Friday, April 5, 2013
WELCOME SPRING

Supplies needed:
I am using an exclusive artwork from Lady Mishka for this tutorial, which you can find here
Scrapkit: I am a gorgeous kit from Niqui's Designs called "Welcome Spring" which you can get by going here
Mask 249 from Trese which you can find here
Plugins used: Xero-Radiance, Lokas 3D Shadow
----------------------------
This tutorial is written for those who have working knowledge of PSPX2 (any version will do).
This tutorial was written by me on April 5, 2013. Please do not copy or paste on any other forum, website or blog provide link back to tut only. Please do not claim as your own. This tutorial is copyrighted to me. Any resemblance to any other tutorial is purely coincidental.
Ok - let's start and remember to save often.
Open up a 750 x 650 blank canvas (we can resize it later)
Select Frame 41 and paste in the center of the canvas - resize by 75%
Select your magic wand tool and click in the center of your frame (Add (Shift), RGB Value, Tolerance 25, Contiguous checked, Feather 0)
Selections, Modify, Expand by 5
Paste paper 2
Select invert, delete, select none
Move paper below frame layer
Paste tube of choice where desired on top of frame
Apply Xero Radiance at setting of choice
Apply Lokas 3D Shadow at default settings
Select Element 52 - resize by 68%
Paste and position on top above frame layer
Select Element 14 - resize by 17%
Image mirror and paste on top left corner of frame
Select Element 45 - resize by 30%
Paste and position on bottom right side
Select Element 17 - resize by 30%
Image mirror and paste on bottom right side
Select Element 4 - resize by 30%
Paste and postion on bottom right side
Select Element 47 - resize by 36%
Paste and postion on bottom left side
Select Element 30 - resize by 35%
Paste and position on bottom left side below element 47
Select New raster layer and flood fill with color or gradient of choice
Move layer to the bottom of the template
Apply Mask 249
Merge group and move to the bottom
Add any additional elements you like.
Add any dropshadows you like
Crop and resize as desired
Add copyright info, license number and name
You're done! Thanks for trying my tutorial!
Wednesday, March 6, 2013
HAPPY SPRING

Supplies needed:
I am using the Exclusive art from Lady Mishka for this tutorial, which you can find here
Scrapkit: I am using an awesome kit from Niqui's Designs called "Blessed Easter" which you can get by going here
Template 8 from Angie which can be found on the Misfits Blog here
Easter/Spring Mask From Sabine and which you can find on the Misfits Blog here
Plugins used: Xero-Fritillary, Xero-Bad Dream, Lokas 3D Shadow
----------------------------
This tutorial is written for those who have working knowledge of PSPX2 (any version will do).
This tutorial was written by me on March 6, 2013. Please do not copy or paste on any other forum, website or blog provide link back to tut only. Please do not claim as your own. This tutorial is copyrighted to me. Any resemblance to any other tutorial is purely coincidental.
Ok - let's start and remember to save often.
Open the template and using your shortcut keys on your keyboard (SHIFT+D) duplicate the template as a new image. Close the original and delete the copywrite layer.
Adjust Canvas Size by 800 x 750 (you can resize later)
Select Happy Spring Wordart layer
Select all, float, defloat
Add new raster layer and flood-fill with color or gradient of choice
Select none
Adjust, Add/Remove Noise, Add Noise (Uniform checked, Noise 40%, Monochrome checked)
Delete/Hide wordart layer
Select Wordart Back layer
Adjust, Add/Remove Noise, Add Noise (Uniform checked, Noise 80%, Monochrome checked)
Select Wordart Green Back and delete
Select Center Circle layer
Select all, float, defloat
Paste paper 11
Select invert, delete, select none
Delete/Hide original circle layer
Select Center Circle Back layer
Select all, float, defloat
Add new raster layer and flood-fill with color of choice
Select none
Adjust, Add/Remove Noise, Add Noise (Uniform checked, Noise 40%, Monochrome checked)
Delete/Hide original Circle Back layer
Select Bottom Right Rectangle layer
Select all, float, defloat
Add new raster layer and flood-fill with gradient of choice (style, Angle 45, Repeat 2)
Paste close-up tube of choice on top of gradient and delete
Change close-up to Overlay
Apply Xero Bad Dream at default settings or random setting of choice
Apply dropshadow and merge close-up down on top of gradient layer
Effects, Texture Effects, Blinds (Width 2, Opactity 15, Horizontal and Light from left/top checked)
Delete/Hide original rectangle layer
Select Top Left Rectangle layer and repeat above steps
Select Center Square layer
Select all, float, defloat
Add new raster layer and flood-fill with color of choice
Apply Xero-Fritillary with the following settings:

Delete/Hide original square layer
Select Center Angled Square layer
Select all, float, defloat
Paste paper 10
Select invert, delete, select none
Delete/Hide original square layer
Select Top Right Textured Rectangle layer
Paste paper 9
Select invert, delete, select none
Delete/Hide original rectangle layer
Select Bottom Left Textured Rectangle layer and repeat above steps
Select Top Left Circle
Select all, float, defloat
Paste paper 4
Select invert, delete, select none
Delete/Hide original circle layer
Select Bottom Right Circle layer and repeat above steps
Copy and paste tube of choice and position where desired
Apply Lokas 3D Shadow at default settings
Select Element 9 - resize by 50%
Paste and position on bottom right side
Select Element 8 - resize by 20%
Paste and position on top of basket element
Select Elements 6 and 7 and repeat above step
Select your Lasso tool and make a selection around basket as shown:

Select Egg Elements and delete
Select Element 1 - resize by 35%
Paste and position on bottom left side
Select Element 26 - resize by 25%
Paste and position on bottom left side
Select New raster layer and flood fill with color or gradient of choice
Move layer to the bottom of the template
Apply Sabine's Mask or Mask of Choice
Merge group and move to the bottom
Add any additional elements you like.
Add any dropshadows you like
Crop and resize as desired
Add copyright info, license number and name
You're done! Thanks for trying my tutorial!
Tuesday, February 19, 2013
KISS MY SHAMROCKS

Supplies needed:
I am using the amazing art from Elias Chatzoudis for this tutorial, which you can find here
Scrapkit: I am using an awesome kit from Niqui's Designs called "Lucky Me" which you can get by going here
Template 200 from Millie, which can be found here
Mask 03 from Uchy which you can find on the Misfits Blog here
Plugins used: Eyecandy 4000 - Gradient Glow, Eyecandy 4000 - Glass, Xero-Radiance, Xero-Bad Dream, Lokas 3D Shadow
----------------------------
This tutorial is written for those who have working knowledge of PSPX2 (any version will do).
This tutorial was written by me on February 19, 2013. Please do not copy or paste on any other forum, website or blog provide link back to tut only. Please do not claim as your own. This tutorial is copyrighted to me. Any resemblance to any other tutorial is purely coincidental.
Ok - let's start and remember to save often.
Open the template and using your shortcut keys on your keyboard (SHIFT+D) duplicate the template as a new image. Close the original and delete the copywrite layer.
Adjust Canvas Size by 800 x 650 (you can resize later)
Select deco's 7 and 8 layers and delete
Select Wordart 9 layer
Select all, float, defloat
Add new raster layer and flood-fill with color of choice
Select none
Apply Eyecandy Glass on default settings
Apply Eyecandy Gradient Glow on fat default settings (Glow width 3)
Delete/Hide original wordart layer
Select Wordart "Kiss My" 10 layer and move if desired
Select Circle 6 layer
Select all, float, defloat
Add new raster layer and flood-fill with gradient colors of choice
(Linear style, Angle 45, Repeat 2)
Paste close-up tube of choice on top of gradient and delete
Change close-up to Overlay
Apply Xero Bad Dream at default settings or random setting of choice
Drop opacity on close-up down to 65%
Apply dropshadow and merge down on top of gradient layer
Apply Effect, Texture Effects, Blinds (Width 2, Opactity 20, Horizontal and Light from left/top checked)
Delete/Hide original circle layer
Select Element 60 - resize by 25%
Paste and position on right side on top of circle layer
Select Circle 5 layer
Select all, float, defloat
Add new raster layer and flood-fill with color of choice
Select none
Adjust, Add/Remove Noise, Add Noise (Uniform checked, Noise 85%, Monochrome checked)
Delete/Hide original circle layer
Select Square 4 layer
Select all, float, defloat
Paste nq-paper 2
Select invert, delete, select none
Delete/Hide original square layer
Select Square 3 layer and repeat above steps
Select Rectangle 2 layer
Select all, float, defloat
Paste nq-paper 6
Select invert, delete, select none
Delete/Hide original rectangle layer
Select Element 42 - resize by 30%
Image, Free Rotate Left by 10%
Paste and position on top left above rectangle layer
Select Element 41 - resize by 30%
Image flip, mirror and paste on top left above rainbow element
Select Circle 1 layer
Select all, float, defloat
Paste nq-paper 7
Select invert, delete, select none
Delete/Hide original circle layer
Copy and paste tube of choice and position where desired
Apply Xero Radiance at setting of choice
Apply Lokas 3D Shadow at default settings
Select Element 5 - resize by 55%
Paste and position below tube layer towards left side
Select Element 9 - resize by 35%
Paste and position on bottom left
Select Element 16 - resize by 25%
Paste and position on left side above element 9
Select Element 43 - resize by 50%
Paste and position on bottom right side
Select Element 21 - resize by 30%
Paste and position on bottom right side next to element 43
Select New raster layer and flood fill with color or gradient of choice
Move layer to the bottom of the template
Apply Mask 3
Merge group and move to the bottom
Add any additional elements you like.
Add any dropshadows you like
Crop and resize as desired
Add copyright info, license number and name
You're done! Thanks for trying my tutorial!
Friday, February 8, 2013
SWEET TOOTH CUTIE

Supplies needed:
I am using the amazing art from Celineart Pinup for this tutorial, which you can find here
Scrapkit: I am using a gorgeous kit from Niqui's Designs called "Love Cupcakes" which you can get by going here
Template 344 from Missy which can be found here
Mask 80 by Simone which you can find on the Misfits blog here
Plugins used: Alien Skin Eyecandy 5 - Impact/Glass, Eyecandy 4000 - Gradient Glow, Xero-Radiance, Xero-Bad Dream, Lokas 3D Shadow
----------------------------
This tutorial is written for those who have working knowledge of PSPX2 (any version will do).
This tutorial was written by me on February 7, 2013. Please do not copy or paste on any other forum, website or blog provide link back to tut only. Please do not claim as your own. This tutorial is copyrighted to me. Any resemblance to any other tutorial is purely coincidental.
Ok - let's start and remember to save often.
Open the template and using your shortcut keys on your keyboard (SHIFT+D) duplicate the template as a new image. Close the original and delete the copywrite layer.
Select glittered sweet tooth wordart layer
Add new raster layer and flood-fill with color of choice
Select none
Reselect your wordart layer
Select all, float, defloat
Click on the color layer you just filled
Select invert, delete, select none
Delete/Hide original wordart layer
Select your sweet tooth wordart, thin rectangle and dotted line layers
Group all of these layers together and move down a bit if you desire
Select your Sweet Tooth wordart layer
Add new raster layer and flood-fill with color of choice
Reselect wordart layer
Select all, float, defloat
Select your color layer you just filled
Select invert, delete, select none
Apply Eyecandy Gradient Glow on fat default settings (Glow width 3)
Delete/Hide original sweet tooth wordart
Select Thin Rectangle layer
Select all, float, defloat
Paste nq-paper 6
Select invert, delete, select none
Delete/Hide original rectangle layer
Select Small Circle Right layer
Select all, float, defloat
Add new raster layer and flood-fill with gradient of choice
(Linear style, Angle 45, Repeat 1)
Select none
Paste close-up tube of choice on top of gradient and delete
Change closeups to Hard Light
Apply Xero Bad Dream at default settings or random setting of choice
Drop opacity on close-up down to 75%
Apply dropshadow and merge down on top of gradient layer
Delete/Hide original circle layer
Select Small Circle Left layer and repeat above steps
Select Small glittered Circle Right layer
Select all, float, defloat
Add new raster layer and flood-fill with color of choice
Select none
Adjust, Add/Remove Noise, Add Noise (Uniform checked, Noise 85%, Monochrome checked)
Delete/Hide original circle layer
Select Small Glittered Circle Left layer and repeat above steps
Select Centre Frame layer
Select all, float, defloat
Add new raster layer and flood-fill with color of choice
Select none
Apply Alien Skin Eyecandy 5 - Impact/Glass at factory default settings
Delete/Hide original frame layer
Select Centre Circle layer
Select all, float, defloat
Paste nq-paper 2
Select invert, delete, select none
Delete/Hide original circle layer
Select Circle Right layer
Select all, float, defloat
Paste nq-paper 9
Select invert, delete, select none
Delete/Hide original circle layer
Select Circle Left layer and repeat above steps
Select Glittered Circle Right layer
Select all, float, defloat
Add new raster layer and flood-fill with color of choice
Select none
Adjust, Add/Remove Noise, Add Noise (Uniform checked, Noise 85%, Monochrome checked)
Delete/Hide original circle layer
Select Glittered Circle Left layer and repeat above steps
Select Element 32 - resize by 45%
Paste and position on top of Circle Left
Image, duplicate, mirror and flip
Select Rectangle Left layer
Select all, float, defloat
Paste nq-paper 5
Select invert, delete, select none
Delete/Hide original rectangle layer
Select Rectangle Right layer and repeat above steps
Select Glittered Rectangle Left layer
Select all, float, defloat
Add new raster layer and flood-fill with color of choice
Select none
Adjust, Add/Remove Noise, Add Noise (Uniform checked, Noise 85%, Monochrome checked)
Delete/Hide original rectangle layer
Select Glittered Rectangle Right layer and repeat above steps
Select Hearts layer
Select all, float, defloat
Add new raster layer and flood-fill with color of choice
Select none
Adjust, Add/Remove Noise, Add Noise (Uniform checked, Noise 85%, Monochrome checked)
Delete/Hide original hearts layer
Select Square 2 layer
Select all, float, defloat
Paste nq-paper 10
Select invert, delete, select none
Delete/Hide original square layer
Select Square 1 layer
Select all, float, defloat
Paste nq-paper 7
Select invert, delete, select none
Delete/Hide original square layer
Copy and paste tube of choice and position where desired
Apply Xero Radiance at setting of choice
Apply Lokas 3D Shadow at default settings
Select Element 10 - resize by 50%
Paste and position on top behind tube layer
Select Element 15 - resize by 25%
Paste and position on top right - image, free rotate right by 20%
Select New raster layer and flood fill with color or gradient of choice
Move layer to the bottom of the template
Apply Mask 80
Merge group and move to the bottom
Add any additional elements you like.
Add any dropshadows you like
Crop and resize as desired
Add copyright info, license number and name
You're done! Thanks for trying my tutorial!
Friday, January 18, 2013
QUEEN OF HEARTS

Supplies needed:
I am using the amazing art from Tony Tzanoukakis for this tutorial, which you can find here
Scrapkit: I am using an awesome kit from Niquie's Designs called "My Love" which you can get by going here
Template 149 from Pooker which can be found here
M1 Mask from Kylie which can be found on the Misfits Blog here
Plugins used: Eyecandy 4000 - Glass, Xero-Radiance, Xero-Bad Dream, Lokas 3D Shadow
----------------------------
This tutorial is written for those who have working knowledge of PSPX2 (any version will do).
This tutorial was written by me on January 18, 2013. Please do not copy or paste on any other forum, website or blog provide link back to tut only. Please do not claim as your own. This tutorial is copyrighted to me. Any resemblance to any other tutorial is purely coincidental.
Ok - let's start and remember to save often.
Open the template and using your shortcut keys on your keyboard (SHIFT+D) duplicate the template as a new image. Close the original and delete the copywrite layer.
Select Sideways Hearts layer
Select all, float, defloat
Add new raster layer and flood-fill with color of choice
Select none
Adjust, Add/Remove Noise, Add Noise (Uniform checked, Noise 80%, Monochrome checked)
Apply Eyecandy Glass at default settings
Delete/Hide original hearts layer
Select Pink Heart Strips layer
Select all, float, defloat
Add new raster layer and flood-fill with color of choice
Select none
Delete/Hide original strip layer
Select White Squares layer
Select all, float, defloat
Add new raster layer and flood-fill with gradient of choice (Linear style, Angle 45, Repeat 2)
Paste close-up tubes of choice on top of gradient and delete
Change closeups to Luminance (Legacy)
Apply Xero Bad Dream at default settings or random setting of choice
Drop the opacity on close-up down to about 75%
Apply dropshadow and merge down on top of gradient layer
Delete/Hide original rectangles layer
Select Pink Backgrounds layer
Select all, float, defloat
Add new raster layer and flood-fill with color of choice
Select none
Delete/Hide original backgrounds layer
Select White Circle 1 layer
Select all, float, defloat
Paste nq-paper 9
Select invert, delete, select none
Delete/Hide original circle layer
Select Black Dotted Circle1 and delete
Select Lt Pink Circle1 layer
Select all, float, defloat
Paste nq-paper 6
Select invert, delete, select none
Delete/Hide original circle layer
Select Element 23 - resize by 46%
Paste and position on top of circle1 layer
Select White Circles2 layer
Select all, float, defloat
Paste nq-paper 11
Select invert, delete, select none
Delete/Hide original circles layer
Select Lt Pink Circles2 layer
Select all, float, defloat
Add new raster layer and flood-fill with color of choice
Select none
Adjust, Add/Remove Noise, Add Noise (Uniform checked, Noise 80%, Monochrome checked)
Delete/Hide original circles layer
Select Pink Circles layer
Select all, float, defloat
Paste nq-paper 8
Select invert, delete, select none
Delete/Hide original circles layer
Select Grey Squares layer
Select all, float, defloat
Paste nq-paper 1
Select invert, delete, select none
Delete/Hide original squares layer
Select White Strips layer
Select all, float, defloat
Add new raster layer and flood-fill with color of choice
Select none
Adjust, Add/Remove Noise, Add Noise (Uniform checked, Noise 80%, Monochrome checked)
Delete/Hide original strips layer
Select Pink Squares layer
Select all, float, defloat
Add new raster layer and flood-fill with gradient of choice
Select none
Apply Effect, Texture Effects, Blinds (Width 3, Opactity 15, Horizontal and Light from left/top checked)
Delete/Hide original squares layer
Select White Heart Lines layer
Select all, float, defloat
Paste nq-paper 11
Select invert, delete, select none
Delete/Hide original hearts layer
Select Pink Dotted Outlines layer
Add new raster layer and flood-fill with black or color of choice
Reselect Dotted Outlines layer
Select all, float, defloat
Go back and select color layer you just filled
Select invert, delete, select none
Delete/Hide original dotted layer
Copy and paste tube of choice and position where desired
Apply Xero Radiance at setting of choice
Apply Lokas 3D Shadow at default settings
Select Element 50 - resize by 40%
Paste and position on right side behind frames layer
Select Element 13 - resize by 32%
Paste and position on upper left side
Select New raster layer and flood fill with color or gradient of choice
Move layer to the bottom of the template
Apply Mask M1
Merge group and move to the bottom
Add any additional elements you like.
Add any dropshadows you like
Crop and resize as desired
Add copyright info, license number and name
You're done! Thanks for trying my tutorial!
Saturday, January 12, 2013
PINK LOVE

Supplies needed:
I am using the amazing art from Ismael Rac for this tutorial, which you can find here
Scrapkit: I am using a beautiful kit from Niqui's Designs called "Pink Love" which you can get by going here
Template 210 from Beth which can be found here
Mask M3 from Kylie on the Mistfits Blog here
Plugins used: Eyecandy 4000 - Glass, Eyecandy 4000 - Gradient Glow, Xero-Radiance, Xero-Bad Dream, Lokas 3D Shadow
----------------------------
This tutorial is written for those who have working knowledge of PSPX2 (any version will do).
This tutorial was written by me on January 12, 2013. Please do not copy or paste on any other forum, website or blog provide link back to tut only. Please do not claim as your own. This tutorial is copyrighted to me. Any resemblance to any other tutorial is purely coincidental.
Ok - let's start and remember to save often.
Open the template and using your shortcut keys on your keyboard (SHIFT+D) duplicate the template as a new image. Close the original and delete the copywrite layer.
Select Arrow1 layer
Select all, float, defloat
Selections, Modify, Contract by 2
Add new raster layer and flood-fill with color of choice
Select none
Apply Eyecandy Glass at default settings
Apply Eyecandy Gradient Glow on fat default settings (Glow width 3)
Delete/Hide original arrow layer
Select Arrow 2 layer and repeat above steps
Select Heart1 and Heart2 layer and move if desired
Select Heartbreaker wordart layer and move to the bottom like I did or keep in original place
Select all, float, defloat
Selections, Modify, Contract by 3
Add new raster layer and flood-fill with color of choice
Select none
Apply Eyecandy Glass with default settings
Select all, float, defloat
Selections, Expand by 3
Add new raster layer and flood-fill with white (#ffffff)
Select none
Adjust, Add/Remove Noise, Add Noise (Uniform checked, Noise 55%, Monochrome checked)
Move layer below original color wordart layer
Delete/Hide original wordart layer
Select White frame1 layer
Select all, float, defloat
Add new raster layer and flood-fill with color of choice
Select none
Adjust, Add/Remove Noise, Add Noise (Uniform checked, Noise 55%, Monochrome unchecked)
Delete/Hide original frame layer
Select White Frame 2 layer and repeat above steps
Select Pink Square 1 layer
Select all, float, defloat
Add new raster layer and flood fill with gradient of choice (Linear style, Angle 45, Repeat 2)
Paste close-up tube of choice on top of gradient and delete
Change closeup to Luminance (Legacy)
Apply Xero Bad Dream at default settings
Drop the opacity on close-ups down to about 75%
Apply dropshadow and merge down on top of gradient
Apply Effect, Texture Effects, Blinds (Width 2, Opactity 15, Horizontal and Light from left/top checked)
Hide/Delete original square layer
Select Pink Square 2 layer and repeat above steps
Select Black Circle 1 layer
Select all, float, defloat
Paste nq-paper 4
Select invert, delete, select none
Delete/Hide original circle layer
Select Black Circle 2 layer and repeat above steps
Select Pink Circle layer
Select all, float, defloat
Paste nq-paper 13
Select invert, delete, select none
Delete/Hide original circle layer
Select Black Circle Frame layer
Select all, float, defloat
Add new raster layer and flood fill with color of choice
Select none
Adjust, Add/Remove Noise, Add Noise (Uniform checked, Noise 55%, Monochrome unchecked)
Delete/Hide original frame layer
Select White Circle layer
Select all, float, defloat
Paste nq-paper 9
Select invert, delete, select none
Delete/Hide original circle layer
Select Thin Pink Frame 1 layer
Select all, float, defloat
Add new raster layer and flood-fill with color of choice
Select none
Delete/Hide original frame layer
Select Thin Pink Frame 2 layer and repeat above steps
Select Black Rect Frame 1 layer
Select all, float, defloat
Add new raster layer and flood-fill with color of choice
Select none
Adjust, Add/Remove Noise, Add Noise (Uniform checked, Noise 55%, Monochrome unchecked)
Delete/Hide original frame layer
Select invert, delete, select none
Select Black Rect Frame2, 3 and 4 layer and repeat above steps
Select Pink Rect 1 layer
Select all, float, defloat
Add new raster layer and flood-fill with gradient of choice Linear style, Angle 45, Repeat 2)
Paste close-up tube of choice on top of gradient and delete
Change closeup to Burn
Apply dropshadow and merge down on top of gradient
Delete/Hide original rectangle layer
Select Pink Rect2 layer and repeat above steps
Copy and paste tube of choice and position where desired
Apply Xero Radiance at setting of choice
Apply Lokas 3D Shadow at default settings
Select Element 37 - resize by 30%
Paste and position on top left-hand side
Select Element 31 - resize by 35%
Image, Free Rotate Right by 20%
Paste and position on top right-hand side
Select Element 57 - resize by 70%
Paste and position on the bottom
Select Element 19 - resize by 25%
Paste and position on bottom left behind wordart layers
Select New raster layer and flood fill with color or gradient of choice
Move layer to the bottom of the template
Apply M3 mask
Merge group and move to the bottom
Add any additional elements you like.
Add any dropshadows you like
Crop and resize as desired
Add copyright info, license number and name
You're done! Thanks for trying my tutorial!
Saturday, December 8, 2012
PERFECT GIFT

Supplies needed:
I am using the amazing art from Lix for this tutorial, which you can find here
Scrapkit: I am using an awesome kit from Niqui's Designs called "Emo Xmas" which you can get by going here
Template 140 from Millie which can be found here
Mask 28 from Kaci which you can find on the Misfits Blog here
Plugins used: Penta-Jeans, Eyecandy 4000 Glass, Eyecandy Gradient Glow, Xero-Radiance, Xero-Bad Dream, Lokas 3D Shadow
----------------------------
This tutorial is written for those who have working knowledge of PSPX2 (any version will do).
This tutorial was written by me on December 8, 2012. Please do not copy or paste on any other forum, website or blog provide link back to tut only. Please do not claim as your own. This tutorial is copyrighted to me. Any resemblance to any other tutorial is purely coincidental.
Ok - let's start and remember to save often.
Open the template and using your shortcut keys on your keyboard (SHIFT+D) duplicate the template as a new image. Close the original and delete the copywrite layer.
Select wordart 10 layer
Select all, float, defloat
Add new raster layer and flood-fill with color of choice
Select none
Apply Eyecandy Glass at default settings
Apply Eyecandy Gradient Glow at fat default settings (Width 3)
Delete/Hide original wordart layer
Select Wordart 9 layer and repeat above steps
Select Circle 8 layer
Select all, float, defloat
Add new raster layer and flood-fill with gradient of choice (Linear style, Angle 45, Repeat 2)
Paste close-up tubes of choice on top of gradient and delete
Change closeup to Hard Light
Apply Xero Bad Dream at default settings
Drop the opacity on close-ups down to about 75%
Apply dropshadow and merge down on top of gradient
Hide/Delete original circle layer
Select Circle 7 layer
Select all, float, defloat
Add new raster layer and flood-fill with color of choice
Select none
Apply Penta - Jeans with the following settings:

Select Rectangle 6 layer
Select all, float, defloat
Paste nq-paper 8
Select invert, delete, select none
Delete/Hide original rectangle layer
Select Rectangle 3 layer
Repeat above steps
Select Rectangle 5 layer
Select all, float, defloat
Paste nq-paper 2
Select invert, delete, select none
Delete/Hide original rectangle layer
Select Strip 4 layer
Select all, float, defloat
Paste nq-paper 15
Select invert, delete, select none
Apply Penta - Jeans with the same settings from above
Delete/Hide original strip layer
Select Strip 2 layer
Select all, float, defloat
Paste nq-paper 11
Select invert, delete, select none
Delete/Hide original strip layer
Select Rectangle 1 layer
Select all, float, defloat
Paste nq-paper 3
Select invert, delete, select none
Delete/Hide original rectangle layer
Copy and paste tube of choice and position where desired
Apply Xero Radiance at setting of choice
Apply Lokas 3D Shadow at default settings
Select nq-element 23 (tree) - resize by 45%
Paste and position on left side behind tube layer
Select nq-element 6 (train) - resize by 45%
Paste and position on the bottom right
Select nq-element 9 - resize by 30%
Paste and position on top left corner
Select New raster layer and flood fill with color or gradient of choice
Move layer to the bottom of the template
Apply Mask 28
Merge group and move to the bottom
Add any additional elements you like.
Add any dropshadows you like
Crop and resize as desired
Add copyright info, license number and name
You're done! Thanks for trying my tutorial!
Subscribe to:
Posts
(Atom)


