I CT For


Tuesday, February 24, 2015
HONEY BEAR

Supplies needed:
I am using the stunning artwork from Danny Lee for this tutorial which you can find here
I am using a beautiful kit from Kissing Kate called "Honey Bear-licious" which you can get by going here
Mask 35 from Moonbeams and Spiderwebs which you can find here
Plugins: Lokas 3D Shadow
----------------------------
This tutorial is written for those who have working knowledge of PSPX2 (any version will do).
This tutorial was written by me on February 24, 2015. Please do not copy or paste on any other forum, website or blog provide link back to tut only. Please do not claim as your own. This tutorial is copyrighted to me. Any resemblance to any other tutorial is purely coincidental.
Ok - let's start and remember to save often.
Open up a 750 x 650 blank canvas (we can resize it later)
Select Frame Element 1 and paste in the center of the canvas
Resize by 75%
Select your selections tool and select the center of the Frame (Add (Shift), RGB Value, Tolerance 25, Contiguous checked, Feather 0)
Select modify, expand by 5
Paste paper 2
Select invert, delete, select none
Move paper below frame
Select Element 61 - resize by 30%
Paste and position on top of the paper layer
Select Element 36 - resize by 50%
Paste and position on top of frame
Select Element 47 - resize by 50%
Paste and position on top of frame
Image duplicate and flip to bottom of frame
Select Element 12 - resize by 55%
Paste and position on right side
Select Element 45 - resize by 65%
Paste and position on bottom
Select Element 38 - resize by 55%
Paste and position on bottom
Paste tube of choice where desired
Apply Lokas 3D Shadow at default settings
Select Element 25 - resize by 30%
Paste and position on bottom right
Select Element 53 - resize by 15%
Paste and position on bottom right
Select Element 20 - resize by 40%
Paste and position on bottom right
Select Element 7 - resize by 25%
Paste and position on bottom right
Select Element 66 - resize by 18%
Paste and position bottom right
Select Element 3 - resize by 20%
Paste and position on bottom left
Select Element 19 - resize by 25%
Image Free Rotate Left by 15% and paste on bottom left
Select Element 1 - resize by 18%
Paste and position on bottom left
Select Element 23 - resize by 25%
Paste and position on bottom left
Select Element 37 - resize by 25%
Paste and position on top right
Paste paper 10 on canvas
Apply Mask 35 or mask of choice
Merge group and move to the bottom layer
Resize by 90%
Add any dropshadows you like
Sharpen any elements as needed
Crop and resize as desired
Add copyright info, license number and name
You're done! Thanks for trying my tutorial!

ENCHANTING MEADOW

Supplies needed:
I am using the stunning artwork from Graphfreaks for this tutorial which you can find here
I am using a beautiful kit from Scrappin Krazy Designs called "Enchanted Garden" which you can get by going here
Mask 22 from Moonbeams and Spiderwebs which you can find here
Plugins: Lokas 3D Shadow
----------------------------
This tutorial is written for those who have working knowledge of PSPX2 (any version will do).
This tutorial was written by me on February 24, 2015. Please do not copy or paste on any other forum, website or blog provide link back to tut only. Please do not claim as your own. This tutorial is copyrighted to me. Any resemblance to any other tutorial is purely coincidental.
Ok - let's start and remember to save often.
Open up a 750 x 650 blank canvas (we can resize it later)
Select Frame Element 17 and paste in the center of the canvas
Resize by 90%
Select your selections tool and select the center of the Frame (Add (Shift), RGB Value, Tolerance 25, Contiguous checked, Feather 0)
Select modify, expand by 5
Paste paper 16
Select invert, delete, select none
Move paper below frame
Select Element 21 - resize by 75%
Paste and position on top of the frame
Select Element 12 - resize by 55%
Paste and position on top of frame
Select Element 30 - resize by 30%
Paste and position on top left
Paste tube of choice where desired
Apply Lokas 3D Shadow at default settings
Select Element 62 - resize by 45%
Paste and position on bottom right
Select Element 29 - resize by 15%
Paste and position on right side on top of heart basket
Select Element 5 - resize by 25%
Paste and position on bottom right
Select Element 69 - resize by 25%
Paste and position on bottom right
Select Element 14 - resize by 30%
Paste and position on bottom right
Select Element 54 - resize by 30%
Paste and position bottom right
Select Element 26 - resize by 40%
Paste and position on bottom left below tube layer
Select Element 67 - resize by 45%
Paste and position on bottom left
Add new raster layer and flood-fill with color or gradient of choice
Apply Mask 22 or mask of choice
Merge group and move to the bottom layer
Resize by 90%
Add any dropshadows you like
Sharpen any elements as needed
Crop and resize as desired
Add copyright info, license number and name
You're done! Thanks for trying my tutorial!
Monday, February 23, 2015
ANGRY LEPRECHAUN

Supplies needed:
I am using the stunning artwork from Danny Lee for this tutorial which you can find here
I am using a wicked kit from Bibi's Collections called "Angry Leprechaun" which you can get by going here
Mask 288 from Trese which you can find here
Plugins: Lokas 3D Shadow
----------------------------
This tutorial is written for those who have working knowledge of PSPX2 (any version will do).
This tutorial was written by me on February 23, 2015. Please do not copy or paste on any other forum, website or blog provide link back to tut only. Please do not claim as your own. This tutorial is copyrighted to me. Any resemblance to any other tutorial is purely coincidental.
Ok - let's start and remember to save often.
Open up a 750 x 650 blank canvas (we can resize it later)
Select Frame Element 91 and paste in the center of the canvas
Resize by 90%
Select your selections tool and select the center of the Frame (Add (Shift), RGB Value, Tolerance 25, Contiguous checked, Feather 0)
Select modify, expand by 5
Paste paper 13
Select invert, delete, select none
Move paper below frame
Select Element 45 - resize by 25%
Paste and position on top left below frame
Select Element 114 - resize by 45%
Paste and position on right side above frame
Select Element 147 - resize by 55%
Paste and position on top left
Paste tube of choice where desired
Apply Lokas 3D Shadow at default settings
Select Element 132 - resize by 30%
Paste and position on bottom left
Select Element 96 - resize by 45%
Paste and position on bottom left below tube layer
Select Element 135 - resize by 25%
Paste and position on bottom left below tube
Select Element 173 - resize by 65%
Paste and position on bottom right
Select Element 140 - resize by 40%
Paste and position on bottom right
Select Element 32 - resize by 25%
Paste and position on bottom right
Select Element 9 - resize by 15%
Paste and position bottom right
Select Element 17 - resize by 10%
Paste and position on bottom right
Select Element 130 - resize by 30%
Paste and position on bottom
Select Element 36 - resize by 25%
Image Free Rotate Right by 15% and paste on top right
Add new raster layer and flood-fill with color or gradient of choice
Apply Mask 288 or mask of choice
Merge group and move to the bottom layer
Resize by 90%
Add any dropshadows you like
Sharpen any elements as needed
Crop and resize as desired
Add copyright info, license number and name
You're done! Thanks for trying my tutorial!
Saturday, February 21, 2015
GRIEVANCE

Supplies needed:
I am using the stunning artwork from Graphfreaks for this tutorial which you can find here
I am using a wicked kit from FwTags Creations called "Grievance" which you can get by going here
Mask 32 from Moonbeams and Spiderwebs which you can find here
Plugins: Lokas 3D Shadow
----------------------------
This tutorial is written for those who have working knowledge of PSPX2 (any version will do).
This tutorial was written by me on February 21, 2015. Please do not copy or paste on any other forum, website or blog provide link back to tut only. Please do not claim as your own. This tutorial is copyrighted to me. Any resemblance to any other tutorial is purely coincidental.
Ok - let's start and remember to save often.
Open up a 750 x 650 blank canvas (we can resize it later)
Select Frame Element 1 and paste in the center of the canvas
Resize by 60%
Select your selections tool and select the center of the Frame (Add (Shift), RGB Value, Tolerance 25, Contiguous checked, Feather 0)
Select modify, expand by 5
Paste paper 2
Select invert, delete, select none
Move paper below frame
Paste tube of choice where desired
Apply Lokas 3D Shadow at default settings
Select Element 21 - resize by 45%
Paste and position on bottom
Select Element 26 - resize by 45%
Paste and position on left side
Select Element 34 - resize by 22%
Paste and position on bottom left
Select Element 44 - resize by 10%
Paste and position on bottom left
Select Element 43 - resize by 12%
Paste and position on bottom left
Select Element 14 - resize by 15%
Paste and position on right side
Select Element 38 - resize by 15%
Image mirror and paste on bottom right
Select Element 55 - resize by 20%
Paste and position bottom right
Select Element 69 - resize by 15%
Paste and position on bottom
Select Element 7 - resize by 15%
Paste and position on bottom
Add new raster layer and flood-fill with color or gradient of choice
Apply Mask 32 or mask of choice
Merge group and move to the bottom layer
Add any dropshadows you like
Sharpen any elements as needed
Crop and resize as desired
Add copyright info, license number and name
You're done! Thanks for trying my tutorial!
Thursday, February 19, 2015
GIRLY GIRL

Supplies needed:
I am using the stunning artwork from Pandora Creations for this tutorial which you can find here
I am using a beautiful collab kit from Bibi's Collections called "Amore Amor" which you can get by going here
Plugins: Lokas 3D Shadow
----------------------------
This tutorial is written for those who have working knowledge of PSPX2 (any version will do).
This tutorial was written by me on February 19, 2015. Please do not copy or paste on any other forum, website or blog provide link back to tut only. Please do not claim as your own. This tutorial is copyrighted to me. Any resemblance to any other tutorial is purely coincidental.
Ok - let's start and remember to save often.
Open up a 750 x 650 blank canvas (we can resize it later)
Select Element 51 - resize by 45%
Paste and position on the center of the canvas
Select Element 57 - resize by 50%
Paste and position on canvas
Select Element 10 - resize by 45%
Paste and position on canvas
Select all, float, defloat
Paste close-up of choice on top of element
Select invert, delete, select none
Apply Xero - Bad Dream on default setting of choice
Drop opacity down to 60%
Select Frame Element 7 and paste in the center of the canvas
Resize by 65%
Select your selections tool and select the outside portion on the heart (Add (Shift), RGB Value, Tolerance 25, Contiguous checked, Feather 0)
Select modify, expand by 5
Paste paper 3
Select invert, delete, select none
Move paper below frame
Select Element 28 - resize by 50%
Image Free Rotate Left by 15% and paste on top left
Select Element 46 - resize by 25%
Paste and position on bottom right
Paste tube of choice where desired
Apply Lokas 3D Shadow at default settings
Select Element 24 - resize by 15%
Paste and position on bottom right
Select Element 45 - resize by 25%
Image Free Rotate Left by 15% and paste on bottom right
Select Element 58 - resize by 12%
Paste and position on bottom right
Select Element 70 - resize by 25%
Paste and position on bottom right
Select Element 2 - resize by 20%
Paste and position on bottom left
Select Element 55 - resize by 14%
Paste and position bottom left
Select Element 34 - resize by 20%
Image Free Rotate Left by 15% and paste on bottom left
Select Element 62 - resize by 25%
Paste and position on bottom left
Select Element 9 - resize by 20%
Paste and position on bottom left
Add any dropshadows you like
Sharpen any elements as needed
Crop and resize as desired
Add copyright info, license number and name
You're done! Thanks for trying my tutorial!
Wednesday, February 18, 2015
DAMON

Supplies needed:
I am using the stunning artwork from The Hunter for this tutorial which you can find here
I am using a beautiful kit from Bibi's Collections called "Vampire Diaries" which you can get by going here
Plugins: Lokas 3D Shadow
----------------------------
This tutorial is written for those who have working knowledge of PSPX2 (any version will do).
This tutorial was written by me on February 18, 2015. Please do not copy or paste on any other forum, website or blog provide link back to tut only. Please do not claim as your own. This tutorial is copyrighted to me. Any resemblance to any other tutorial is purely coincidental.
Ok - let's start and remember to save often.
Open up a 750 x 650 blank canvas (we can resize it later)
Select Element 99 - resize by 55%
Paste and position in the center of the canvas
Select Element 143 - resize by 45%
Paste and position on top of canvas
Select Element 67 - resize by 25%
Paste and position on top left
Select Element 37 - resize by 65%
Paste and position in the center of canvas where desired
Select Element 38 - resize by 70%
Paste and position in the center of the canvas
Select Element 59 - resize by 40%
Image mirror and paste on top left
Select Element 29 - resize by 30%
Adjust, Hue & Saturation and Colorize if desired with the following settings:

Paste and position on top center where desired
Select Element 117 - resize by 35%
Paste and position on bottom left
Select Element 112 - resize by 35%
Paste and position on bottom right
Paste tube of choice where desired
Apply Lokas 3D Shadow at default settings
Select Element 46 - resize by 45%
Paste and position on top right
Select Element 10 - resize by 12%
Paste and position on bottom right
Select Element 121 - resize by 15%
Paste and position on bottom right
Select Element 148 - resize by 25%
Paste and position on bottom right
Select Element 150 - resize by 12%
Paste and position on bottom right
Select Element 31 - resize by 15%
Paste and position on bottom right
Select Element 168 - resize by 15%
Paste and position on bottom right
Select Element 141 - resize by 20%
Paste and position on left side
Select Element 136 - resize by 20%
Paste and position on top of coffin element
Select Element 167 - resize by 25%
Image mirror and paste on bottom left
Select Element 170 - resize by 25%
Paste and position on bottom left
Select Element 9 - resize by 30%
Paste and position on bottom left
Select Element 12 - resize by 10%
Paste and position on bottom left
Select Element 7 - resize by 25%
Paste and position on bottom left
Select Element 130 - resize by 15%
Paste and position on bottom left
Paste paper 10 on canvas
Apply Mask 20 or mask of choice
Merge group and move to the bottom layer
Add any dropshadows you like
Sharpen any elements as needed
Crop and resize as desired
Add copyright info, license number and name
You're done! Thanks for trying my tutorial!
Monday, February 16, 2015
MYSTERE

Supplies needed:
I am using the stunning artwork from Graphfreaks for this tutorial which you can find here
I am using a beautiful kit from Kissing Kate called "Mystere" which you can get by going here
Mask 20 from Moonbeam and Spiderwebs which you can find here
Plugins: Lokas 3D Shadow, Eyecandy 4000 - Gradient Glow, Mura Meister - Copies
----------------------------
This tutorial is written for those who have working knowledge of PSPX2 (any version will do).
This tutorial was written by me on February 16, 2015. Please do not copy or paste on any other forum, website or blog provide link back to tut only. Please do not claim as your own. This tutorial is copyrighted to me. Any resemblance to any other tutorial is purely coincidental.
Ok - let's start and remember to save often.
Open up a 750 x 650 blank canvas (we can resize it later)
Select Frame Element 4 and paste in the center of the canvas
Resize by 80%
Select your selections tool and select the center of the Frame (Add (Shift), RGB Value, Tolerance 25, Contiguous checked, Feather 0)
Select modify, expand by 5
Paste paper 4
Select invert, delete, select none
Move paper below frame
Select Element 7 - resize by 30%
Paste and position on top of paper layer
Select Element 4 - resize by 20%
Paste and position in the center of the canvas
Apply Mura Meister - Copies on the following encircle settings:

Select Element 43 - resize by 45%
Paste and position on right side
Select Element 27 - resize by 20%
Paste and position on right side of frame
Duplicate flower element 2x and reposition copies where desired
Paste tube of choice where desired
Apply Lokas 3D Shadow at default settings
Select Element 67 - resize by 55%
Paste and position on top of frame
Apply Eyecandy Gradient Glow on fat default settings (Glow Width 3)
Select Element 59 - resize by 45%
Paste and position on left side, duplicate and mirror
Select Element 62 - resize by 20%
Image mirror and paste on bottom right
Select Element 65 - resize by 35%
Paste and position on bottom right
Select Element 58 - resize by 15%
Paste and position on bottom right
Select Element 33 - resize by 20%
Paste and position on bottom right
Select Element 13 - resize by 12%
Paste and position on bottom right
Select Element 68 - resize by 25%
Image Free Rotate Right by 15% and paste on bottom left
Select Element 51 - resize by 15%
Image mirror and paste on bottom left
Select Element 64 - resize by 22%
Paste and position on bottom left
Select Element 46 - resize by 25%
Paste and position on bottom left
Select Element 26 - resize by 10%
Paste and position on bottom left
Paste paper 10 on canvas
Apply Mask 20 or mask of choice
Merge group and move to the bottom layer
Add any dropshadows you like
Sharpen any elements as needed
Crop and resize as desired
Add copyright info, license number and name
You're done! Thanks for trying my tutorial!
DARK DESIRES

Supplies needed:
I am using the stunning artwork from Celinart Pinup for this tutorial which you can find here
I am using a wicked kit from Pink Paradox Productions called "Dark Desires" which you can get by going here
Mask M4 from Kylie which you can find on the Misfits Bloghere
Plugins: Lokas 3D Shadow, Eyecandy 4000 - Gradient Glow
----------------------------
This tutorial is written for those who have working knowledge of PSPX2 (any version will do).
This tutorial was written by me on February 16, 2015. Please do not copy or paste on any other forum, website or blog provide link back to tut only. Please do not claim as your own. This tutorial is copyrighted to me. Any resemblance to any other tutorial is purely coincidental.
Ok - let's start and remember to save often.
Open up a 750 x 650 blank canvas (we can resize it later)
Select Frame Element 4 and paste in the center of the canvas
Resize by 55%
Select your selections tool and select the center of the Frame (Add (Shift), RGB Value, Tolerance 25, Contiguous checked, Feather 0)
Select modify, expand by 5
Paste paper 38
Select invert, delete, select none
Move paper below frame
Select Element 127 - resize by 20%
Paste and position on top right above frame
Select Element 5 - resize by 22%
Paste and position on left side above frame
Select Element 102 - resize by 35%
Paste and position on right side of frame
Select Element 99 - resize by 35%
Paste and position on bottom right
Select Element 67 - resize by 15%
Paste and position on chair element
Select Element 1 - resize by 15%
Paste and position on right side where desired
Paste tube of choice where desired
Apply Lokas 3D Shadow at default settings
Select Element 63 - resize by 20%
Paste and position on bottom right
Select Element 54 - resize by 15%
Paste and position on bottom right
Select Element 4 - resize by 12%
Paste and position on bottom right
Select Element 55 - resize by 15%
Paste and position on bottom right
Select Element 124 - resize by 30%
Paste and position on bottom left
Image duplicate, mirror and reposition on bottom right where desired
Select Element 2 - resize by 25%
Paste and position on bottom left
Select Element 66 - resize by 15%
Image Free Rotate Left by 15% and paste on bottom left
Select Element 49 - resize by 15%
Image Free Rotate Left by 15% and paste on bottom left
Select Element 20 - resize by 15%
Paste and position on bottom left
Select Element 91 - resize by 20%
Paste and position on bottom
Select Element 59 - resize by 15%
Paste and position on bottom
Select Element 21 - resize by 15%
Image Free Rotate Left by 15% and paste on bottom
Select Element 151 - resize by 20%
Paste and position on bottom where desired
Apply Eyecandy Gradient Glow on fat default settings (Glow Width 3)
Add new raster layer and flood-fill with color or gradient of choice
Apply Mask M4 or mask of choice
Merge group and move to the bottom layer
Add any dropshadows you like
Sharpen any elements as needed
Crop and resize as desired
Add copyright info, license number and name
You're done! Thanks for trying my tutorial!
Sunday, February 15, 2015
ZOMBIE LOVE

Supplies needed:
I am using the stunning artwork from Freya Langford-Sidebottom for this tutorial which you can find here
I am using a wicked Collab kit from MMeliCrea Designz called "Zombie Valentine" which you can get by going here
Mask 112 from Trese which you can find here
Plugins: Lokas 3D Shadow
----------------------------
This tutorial is written for those who have working knowledge of PSPX2 (any version will do).
This tutorial was written by me on February 15, 2015. Please do not copy or paste on any other forum, website or blog provide link back to tut only. Please do not claim as your own. This tutorial is copyrighted to me. Any resemblance to any other tutorial is purely coincidental.
Ok - let's start and remember to save often.
Open up a 750 x 650 blank canvas (we can resize it later)
Select Frame Element 6 and paste in the center of the canvas
Resize by 80%
Select your selections tool and select the center of each square in the Frame (Add (Shift), RGB Value, Tolerance 25, Contiguous checked, Feather 0)
Select modify, expand by 5
Paste paper 5
Select invert, delete
Paste close-up tube on top right on paper and delete, select none
Change close-up to Luminance (Legacy) and apply dropshadow
Merge close-up down onto paper layer
Move paper below frame
Select Element 111 - resize by 25%
Paste and position on top left above frame
Select Element 26 - resize by 18%
Paste and position on right side above frame
Paste tube of choice where desired
Apply Lokas 3D Shadow at default settings
Select Element 29 - resize by 16%
Image Free Rotate Left by 15% and paste and on left side
Select Element 109 - resize by 30%
Paste and position on bottom left
Select Element 127 - resize by 15%
Paste and position on bottom left
Select Element 119 - resize by 20%
Paste and position on bottom left
Select Element 62 - resize by 20%
Paste and position on bottom left
Select Element 131 - resize by 15%
Paste and position on bottom left
Select Element 17 - resize by 25%
Image mirror and paste on bottom right
Select Element 66 - resize by 20%
Paste and position bottom right
Select Element 94 - resize by 25%
Paste and position on bottom right
Select Element 45 - resize by 15%
Paste and position on bottom right
Select Element 78 - resize by 25%
Image Free Rotate Left by 15% and paste on bottom right
Select Element 34 - resize by 15%
Paste and position on bottom
Select Element 121 - resize by 15%
Paste and position on bottom
Select Element 2 - resize by 15%
Paste and position on right side
Select Element 4 - resize by 20%
Paste and position on left side
Paste paper 3 on canvas
Apply Mask 112 or mask of choice
Merge group and move to the bottom layer
Add any dropshadows you like
Sharpen any elements as needed
Crop and resize as desired
Add copyright info, license number and name
You're done! Thanks for trying my tutorial!
SAD LOVE

Supplies needed:
I am using the beautiful artwork from Danny Lee for this tutorial which you can find here
I am using a gorgeous kit from Design by Joan called "Sad Love" which you can get by going here
Mask 43 from Chas which you can find on the Misfits Blog here
Plugins: Lokas 3D Shadow
----------------------------
This tutorial is written for those who have working knowledge of PSPX2 (any version will do).
This tutorial was written by me on February 15, 2015. Please do not copy or paste on any other forum, website or blog provide link back to tut only. Please do not claim as your own. This tutorial is copyrighted to me. Any resemblance to any other tutorial is purely coincidental.
Ok - let's start and remember to save often.
Open up a 750 x 650 blank canvas (we can resize it later)
Select Frame Element 30 and paste in the center of the canvas
Resize by 85%
Select your selections tool and select the center of the Frame (Add (Shift), RGB Value, Tolerance 25, Contiguous checked, Feather 0)
Select modify, expand by 5
Paste paper 3
Select invert, delete, select none
Move paper below frame
Select Element 35 - resize by 60%
Paste and position on right side of frame
Select Element 90 - resize by 20%
Paste and position on top right above frame
Select Element 92 - resize by 30%
Paste and position on left side
Select Element 103 - resize by 25%
Paste and position on right side above heart element
Select Element 1 - resize by 40%
Paste and position on bottom where desired
Paste tube of choice where desired
Apply Lokas 3D Shadow at default settings
Select Element 10 - resize by 30%
Paste and position on bottom right
Select Element 69 - resize by 25%
Paste and position on bottom right
Select Element 21 - resize by 25%
Paste and position on bottom right
Select Element 44 - resize by 25%
Paste and position on bottom right
Select Element 83 - resize by 15%
Paste and position on bottom
Select Element 111 - resize by 25%
Paste and position on bottom left
Select Element 76 - resize by 25%
Paste and position on bottom left
Select Element 82 - resize by 25%
Paste and position on bottom left
Select Element 77 - resize by 30%
Paste and position bottom left
Select Element 88 - resize by 15%
Image mirror and paste on bottom left
Select Element 28 - resize by 20%
Paste and position on bottom left
Add new raster layer and flood-fill with color of choice
Apply Mask 43 or mask of choice
Merge group and move to the bottom layer
Add any dropshadows you like
Sharpen any elements as needed
Crop and resize as desired
Add copyright info, license number and name
You're done! Thanks for trying my tutorial!
Saturday, February 14, 2015
LOVE STINKS

Supplies needed:
I am using the beautiful artwork from Wendy Gerber for this tutorial which you can find here
I am using a wicked kit from Freeks Creations called "Fuck Vday 2" which you can get by going here
Valentines Template from Amy & Leah which you can find here
Plugins: Lokas 3D Shadow, Penta - Jeans, Penta - Dot and Cross, Eyecandy 4000 - Glass, Eyecandy 4000 - HSB Noise
----------------------------
This tutorial is written for those who have working knowledge of PSPX2 (any version will do).
This tutorial was written by me on February 14, 2015. Please do not copy or paste on any other forum, website or blog provide link back to tut only. Please do not claim as your own. This tutorial is copyrighted to me. Any resemblance to any other tutorial is purely coincidental.
Ok - let's start and remember to save often.
Open the template and using your shortcut keys on your keyboard (SHIFT+D) duplicate the template as a new image. Close the original and delete the copywrite layer.
Adjust canvas to 750 x 600
Select Broken Heart Shape layer
Apply Eyecandy Glass on clear default settings
Select Rect 1 layer
Select all, float, defloat
Paste paper 5
Select invert, delete, select none
Delete/Hide original rect layer
Select Oval layer
Select all, float, defloat
Add new raster layer and flood-fill with color or gradient of choice (style, Angle 45, Repeat 0)
Add Close-up tube of choice and paste on top of gradient layer
Select invert, delete, select none
Apply Xero Bad Dream on default setting of choice
Change close-up to Luminace (Legacy)
Merge close-up down onto gradient layer
Delete/Hide original oval layer
Select Broken Glass Element - resize by 65%
Paste and position on top of oval/close-up
Select Square 1 layer
Apply Penta Jeans with the following settings:

Select Rect 2 layer
Apply Penta Dot and Cross with the following settings:

Select Square 2 layer
Select all, float, defloat
Add new raster layer and flood-fill with color of choice
Select none
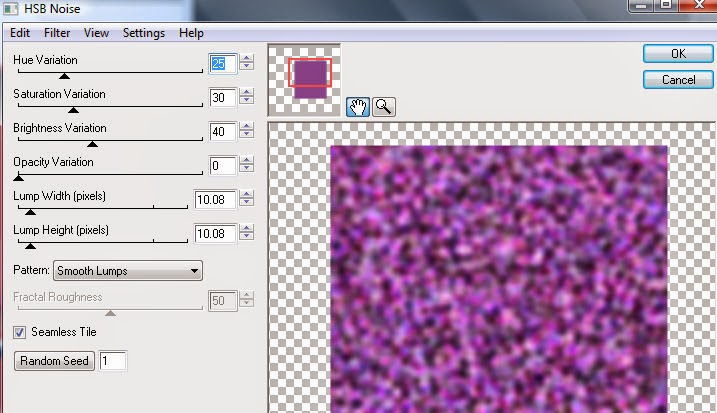
Apply Eyecandy HSB Noise on the following settings
Select Circle layer
Select all, float, defloat
Paste paper 2
Select invert, delete, select none
Delete/Hide original circle layer
Select Rect 3 layer
Select all, float, defloat
Add new raster layer and flood-fill with color of choice
Select none
Delete/hide original rect layer
Select Rect 4 layer
Select all, float, defloat
Add new raster layer and flood-fill with color of choice
Select none
Apply Penta Jeans with the same previous settings
Delete/Hide original rect layer
Copy and paste tube of choice and position where desired
Apply Lokas 3D Shadow at default settings
Select Skull & Rose Element - resize by 35%
Paste and position on top left
Select Voodoo Heart Element - resize by 25%
Paste and position on right side
Select Claws Element - resize by 20%
Paste and position on top of broken heart
Select Voodoo Doll Element - resize by 25%
Paste and position on bottom left
Select Brass Knuckles Element - resize by 25%
Paste and position on bottom left
Select Shoe Element - resize by 25%
Paste and position on bottom left
Select Splash 2 Element - paste and position on left side
Move to bottom layer - duplicate and mirror
Add any additional elements you like.
Add any dropshadows you like
Crop and resize as desired
Add copyright info, license number and name
You're done! Thanks for trying my tutorial!
Friday, February 13, 2015
JULIE LOVE

Supplies needed:
I am using the beautiful artwork from ViNina for this tutorial which you can find here
I am using a gorgeous kit from Bibi's Collections called "Julie Love" which you can get by going here
Mask M4 from Kylie which you can find on the Misfits Blog here
Plugins: Lokas 3D Shadow
----------------------------
This tutorial is written for those who have working knowledge of PSPX2 (any version will do).
This tutorial was written by me on February 13, 2015. Please do not copy or paste on any other forum, website or blog provide link back to tut only. Please do not claim as your own. This tutorial is copyrighted to me. Any resemblance to any other tutorial is purely coincidental.
Ok - let's start and remember to save often.
Open up a 750 x 650 blank canvas (we can resize it later)
Select Frame Element 20 and paste in the center of the canvas
Resize by 55%
Select your selections tool and select the center of the Frame
(Add (Shift), RGB Value, Tolerance 25, Contiguous checked,
Feather 0)
Select modify, expand by 5
Paste paper 1
Select invert, delete, select none
Move paper below frame
Select Element 94 - resize by 45%
Paste and position on top of paper where desired
Select Element 89 - resize by 25%
Paste and position on top right above frame
Select Element 108 - resize by 25%
Paste and position on top right
Select Element 28 - resize by 25%
Paste and position on right side where desired
Paste tube of choice where desired
Apply Lokas 3D Shadow at default settings
Select Element 2 - resize by 40%
Paste and position on bottom center
Select Element 93 - resize by 50%
Paste and position on top left
Select Element 62 - resize by 40%
Paste and position on left side
Select Element 22 - resize by 30%
Paste and position on bottom right
Select Element 23 - resize by 30%
Paste and position on bottom right
Select Element 1 - resize by 40%
Paste and position on bottom right
Select Element 72 - resize by 25%
Paste and position on bottom left
Select Element 84 - resize by 22%
Paste and position bottom left
Select Element 4 - resize by 35%
Image mirror and paste on bottom left
Select Element 8 - resize by 30%
Paste and position on bottom left
Select Element 78 - resize by 15%
Paste and position on bottom left
Select Element 9 - resize by 22%
Paste and position on bottom left
Select Element 18 - resize by 25%
Paste and position on bottom left
Select Element 75 - resize by 25%
Paste and position on bottom
Select Element 77 - resize by 20%
Paste and position on bottom
Select Element 56 - resize by 20%
Paste and position on bottom
Paste paper 6 on canvas
Apply Mask M4 or mask of choice
Merge group and move to the bottom layer
Add any dropshadows you like
Sharpen any elements as needed
Crop and resize as desired
Add copyright info, license number and name
You're done! Thanks for trying my tutorial!
Thursday, February 5, 2015
MIDNIGHT KISS

Supplies needed:
I am using the beautiful artwork from The Hunter for this tutorial which you can find here
I am using a stunning kit from FwTags Creation called "Encadenada" which you can get by going here
Mask 160 from Insatiable Dreams which you can find here
Plugins: Lokas 3D Shadow, Eyecandy Gradient Glow
----------------------------
This tutorial is written for those who have working knowledge of PSPX2 (any version will do).
This tutorial was written by me on February 5, 2015. Please do not copy or paste on any other forum, website or blog provide link back to tut only. Please do not claim as your own. This tutorial is copyrighted to me. Any resemblance to any other tutorial is purely coincidental.
Ok - let's start and remember to save often.
Open up a 750 x 650 blank canvas (we can resize it later)
Select Element 32 and paste in the center of the canvas
Resize by 65%
Select Element 35 - resize by 55%
Paste and position on right side below element 32
Select Element 20 - resize by 35%
Paste and position on top left
Apply Eyecandy Gradient Glow if desired (Glow Width 3)
Select Element 50 - resize by 20%
Paste and position on top where desired
Paste tube of choice where desired
Apply Lokas 3D Shadow at default settings
Select Element 2 - resize by 35%
Paste and position on bottom left
Select Element 46 - resize by 25%
Paste and position on bottom left side
Select Element 25 - resize by 10%
Paste and position on bottom left
Select Element 88 - resize by 15%
Paste and position on bottom left
Select Element 4 - resize by 15%
Paste and position on bottom left
Select Element 80 - resize by 15%
Paste and position on bottom
Select Element 90 - resize by 15%
Image Free Rotate Right by 15% and paste on bottom right
Select Element 34 - resize by 12%
Paste and position bottom right
Select Element 48 - resize by 25%
Paste and position on bottom right
Select Element 76 - resize by 15%
Paste and position on bottom right
Select Element 22 - resize by 15%
Paste and position on bottom right
Select Element 23 - resize by 15%
Paste and position on top right and move to the bottom layer
Paste paper 2 on canvas
Apply Mask 160 or mask of choice
Merge group and move to the bottom layer
Add any dropshadows you like
Sharpen any elements as needed
Crop and resize as desired
Add copyright info, license number and name
You're done! Thanks for trying my tutorial!
Wednesday, February 4, 2015
LUCKY CUPID

Supplies needed:
I am using the beautiful artwork from Celinart Pinup for this tutorial which you can find here
Scrapkit: I am using a stunning kit from Pink Paradox Productions called "Lucky Cupid" which you can get by going here
Heart Mask 1 from Kissing Kate which you can find here
Plugins: Lokas 3D Shadow
----------------------------
This tutorial is written for those who have working knowledge of PSPX2 (any version will do).
This tutorial was written by me on February 4, 2015. Please do not copy or paste on any other forum, website or blog provide link back to tut only. Please do not claim as your own. This tutorial is copyrighted to me. Any resemblance to any other tutorial is purely coincidental.
Ok - let's start and remember to save often.
Open up a 750 x 650 blank canvas (we can resize it later)
Select Frame Element 6 and paste in the center of the canvas
Resize by 60%
Select your selections tool and select the center of the Frame
(Add (Shift), RGB Value, Tolerance 25, Contiguous checked,
Feather 0)
Select modify, expand by 3
Paste paper 17
Select invert, delete, select none
Move paper below frame
Select Element 130 - resize by 35%
Paste and position on top of paper where desired
Select Element 125 - resize by 50%
Paste and position on left side above frame layer - erase any
excess bits on the bottom as desired
Select Element 61 - resize by 20%
Paste and position on top right
Select Element 6 - resize by 16%
Paste and position on right side
Paste tube of choice where desired
Apply Lokas 3D Shadow at default settings
Select Element 7 - resize by 25%
Paste and position on bottom left
Select Element 1 - resize by 20%
Paste and position on left side
Select Element 69 - resize by 15%
Paste and position on bottom left
Select Element 34 - resize by 15%
Paste and position on bottom left
Select Element 42 - resize by 20%
Paste and position on bottom left
Select Element 3 - resize by 15%
Paste and position on bottom left
Select Element 43 - resize by 15%
Paste and position on bottom left
Select Element 126 - resize by 15%
Paste and position bottom left
Select Element 57 - resize by 20%
Paste and position on right side
Select Element 118 - resize by 25%
Paste and position on bottom right
Select Element 36 - resize by 20%
Paste and position on bottom right
Select Element 13 - resize by 20%
Paste and position on bottom right
Select Element 128 - resize by 15%
Paste and position on bottom right
Select Element 16 - resize by 15%
Paste and position on bottom right
Select Element 18 - resize by 15%
Paste and position on bottom right
Select Element 58 - resize by 15%
Paste and position on bottom right
Paste paper 8 on canvas
Apply Mask M1 or mask of choice
Merge group and move to the bottom layer
Add any dropshadows you like
Sharpen any elements as needed
Crop and resize as desired
Add copyright info, license number and name
You're done! Thanks for trying my tutorial!
Subscribe to:
Posts
(Atom)


