I CT For


Tuesday, April 30, 2013
PUSSYCAT DREAMS

Supplies needed:
I am using the amazing art from Danny Lee for this tutorial, which you can find here
Scrapkit: I am using a stunning kit from Bibi's Collections called "Pussycat Dreams" which you can get by going here
Template from Reika Raifta which can be found here
Mask 13 from Gabee which you can find here
Plugins used: Mura Meister - Copies, Eyecandy 4000 - Glass, Xero-Radiance, Lokas 3D Shadow
----------------------------
This tutorial is written for those who have working knowledge of PSPX2 (any version will do).
This tutorial was written by me on April 29, 2013. Please do not copy or paste on any other forum, website or blog provide link back to tut only. Please do not claim as your own. This tutorial is copyrighted to me. Any resemblance to any other tutorial is purely coincidental.
Ok - let's start and remember to save often.
Open the template and using your shortcut keys on your keyboard (SHIFT+D) duplicate the template as a new image. Close the original and delete the copywrite layer.
Select Pawprint1 and Pawprint 2 layers
Apply Eyecandy - Glass at default settings to each
Select Layer1 Strip
Select all, float, defloat
Add new raster layer and flood-fill with color of choice
Select none
Apply Effects, Texture effects, weave (Gap size 2, Width 6, Opacity 5, Fill gaps checked, Change Gap Color to color of choice)
Delete/Hide original strip layer
Select Layer 2 Strip and repeat above steps
Select Layer3 Rectangle layer
Select all, float, defloat
Paste paper 18
Select invert, delete, select none
Delete/Hide original rectangle layer
Select Wordart layer and delete if desire
Select Round1 Circle layer
Select all, float, defloat
Paste paper 9
Select invert, delete, select none
Delete/Hide original circle layer
Select your text tool and type out your text of choice in the center of the circle
Go to layers, convert to raster layer.
Go to Mura Meister Copies and apply to your text using these Tile settings:

Select your Center Circle layer again
Select all, float, defloat
Reselect tile wordart - select invert, delete, select none
Select Shape1 Strip layer
Select all, float, defloat
Paste paper 5
Select invert, delete, select none
Delete/Hide original strip layer
Select Shape2 Strip layer and repeat above steps
Select Shape3 Strip layer
Select all, float, defloat
Paste paper 7
Select invert, delete, select none
Delete/Hide original strip layer
Select Shape4 strip layer and repeat above steps
Select Shape5 layer
Select all, float, defloat
Paste paper 1
Select invert, delete, select none
Effects, Texture Effects, Blinds (Width 3, Opactity 20, Horizontal and Light from left/top checked)
Delete/Hide original shape layer
Select Shape6 layer
Select all, float, defloat
Add new raster layer and flood-fill with color of choice
Select none
Adjust, Add/Remove Noise, Add Noise (Uniform checked, Noise 50%, Monochrome checked)
Delete/Hide original shape layer
Select Round3 layer
Select all, float, defloat
Paste paper 17
Select invert, delete, select none
Delete/Hide original circle layer
Select Round4 Circle layer
Select all, float, defloat
Add new raster layer and flood-fill with color of choice
Select none
Apply Eyecandy Glass on the Subtle Hump default setting
Delete/Hide original circle layer
Copy and paste tube of choice and position where desired
Apply Xero Radiance at setting of choice
Apply Lokas 3D Shadow at default settings
Select Element 45 - resize by 55%
Paste and position on right side
Select Element 50 - resize by 40%
Paste and position on left side
Select Element 52 - resize by 45%
Paste and position on bottom right side
Select Element 51 - resize by 55%
Paste and position on bottom right side
Select Element 43 - resize by 30%
Paste and position on bottom left side
Select Element 10 - resize by 85%
Paste and position on bottom left side below tube layer
Select Element 1 - resize by 30%
Paste and position on bottom left side
Select Element 65 - resize by 70%
Paste and position on bottom left side below kitty layer
Select Element 35 - resize by 30%
Image Free Rotate Left by 15% and paste on top left corner
Select New raster layer and flood fill with color or gradient of choice
Move layer to the bottom of the template
Apply Mask 13
Merge group and move to the bottom
Add any additional elements you like.
Add any dropshadows you like
Crop and resize as desired
Add copyright info, license number and name
You're done! Thanks for trying my tutorial!
Monday, April 29, 2013
CYBER GOTH

Supplies needed:
I am using the amazing art from Pin Oops for this tutorial, which you can find here
Scrapkit: I am using a stunning kit from Fabulous Designz called "Cyber Kandi" which you can get by going here
Collab Template 42 from Pooker and Denny which can be found here
Mask 125 from Designs by Vaybs which you can find here
Plugins used: Xero-Radiance, Xero - Bad Dream, Lokas 3D Shadow
----------------------------
This tutorial is written for those who have working knowledge of PSPX2 (any version will do).
This tutorial was written by me on April 29, 2013. Please do not copy or paste on any other forum, website or blog provide link back to tut only. Please do not claim as your own. This tutorial is copyrighted to me. Any resemblance to any other tutorial is purely coincidental.
Ok - let's start and remember to save often.
Open the template and using your shortcut keys on your keyboard (SHIFT+D) duplicate the template as a new image. Close the original and delete the copywrite layer.
Select White Rectangles layer
Select all, float, defloat
Add new raster layer and flood-fill with color of choice
Select none
Apply Effects, Texture effects, weave (Gap size 2, Width 6, Opacity 5, Fill gaps checked, Change Gap Color to color of choice)
Delete/Hide original rectangles layer
Select Black Rectangles layer
Select all, float, defloat
Paste paper 13
Select invert, delete, select none
Delete/Hide original rectangles layer
Select Lt. Pink Strips layer
Select all, float, defloat
Paste paper 14
Select invert, delete, select none
Delete/Hide original strips layer
Select Grey Rectangle layer
Select all, float, defloat
Paste paper 11
Select invert, delete, select none
Delete/Hide original rectangles layer
Select Lt. Grey Oval layer
Select all, float, defloat
Paste paper 7
Select invert, delete, select none
Delete/Hide original oval layer
Select White Oval layer and repeat above steps
Select Black Strip layer
Select all, float, defloat
Add new raster layer and flood-fill with color of choice
Select none
Effects, Texture Effects, Blinds (Width 4, Opactity 25, Horizontal and Light from left/top checked)
Delete/Hide original strip layer
Select Pink Circle layer
Select all, float, defloat
Paste paper 3
Select invert, delete, select none
Delete/Hide original circle layer
Select Lt. Pink Circles layer
Select all, float, defloat
Paste paper 2
Select invert, delete, select none
Delete/Hide original circles layer
Select White Strips layer
Select all, float, defloat
Paste paper 12
Select invert, delete, select none
Delete/Hide original strips layer
Select Lt. Grey Rectangles layer
Select all, float, defloat
Paste paper 4
Select invert, delete, select none
Delete/Hide original rectangles layer
Select Lt. Pink Rectangle layer
Select all, float, defloat
Paste paper 6
Select invert, delete, select none
Delete/Hide original rectangle layer
Select Grey Circles layer
Select all, float, defloat
Add new raster layer and flood-fill with gradient of choice (style, Angle 45, Repeat 2)
Paste close-up tubes of choice on top of gradient and delete
Select none
Change close-ups to Luminance (Legacy) and drop opacity down to 80%
Apply Xero Bad Dream at default settings or random setting of choice
Apply dropshadow and merge close-ups down on top of gradient layer
Effects, Texture Effects, Blinds (Width 3, Opactity 20, Horizontal and Light from left/top checked)
Delete/Hide original circles layer
Select Pink Circles layer
Select all, float, defloat
Paste paper 14
Select invert, delete, select none
Delete/Hide original circles layer
Copy and paste tube of choice and position where desired
Apply Xero Radiance at setting of choice
Apply Lokas 3D Shadow at default settings
Select Wordart1 Element - resize by 70%
Paste and position over cente circle behind tube layer
Select ToxicBottle Element - resize by 35%
Paste and position on the bottom right side
Select Ipod Element - resize by 24%
Paste and position on bottom right side
Select Emobear1 Element - resize by 30%
Paste and position on bottom left side
Select Cupcake1 Element - resize by 20%
Paste and position on bottom left side
Select Ringpop Element - resize by 30%
Paste and postion on bottom left side
Select Butterfly3 Element - resize by 30%
Image Free Rotate Right by 15%
Paste and position on top right
Select New raster layer and flood fill with color or gradient of choice
Move layer to the bottom of the template
Apply Mask 125
Merge group and move to the bottom
Add any additional elements you like.
Add any dropshadows you like
Crop and resize as desired
Add copyright info, license number and name
You're done! Thanks for trying my tutorial!
Sunday, April 28, 2013
STRAWBERRY DREAMS

Supplies needed:
I am using the amazing art from Duncan Long for this tutorial, which you can find here
Scrapkit: I am using a beautiful kit from Amy Marie called "Strawberry Dreams" which you can get by going here
Spring Template from Kristen which can be found here
Mask 112 from Trese which you can find here
Plugins used: Eyecandy 4000 - Glass, Xero-Porcelain, Xero - Bad Dream, Lokas 3D Shadow
----------------------------
This tutorial is written for those who have working knowledge of PSPX2 (any version will do).
This tutorial was written by me on April 28, 2013. Please do not copy or paste on any other forum, website or blog provide link back to tut only. Please do not claim as your own. This tutorial is copyrighted to me. Any resemblance to any other tutorial is purely coincidental.
Ok - let's start and remember to save often.
Open the template and using your shortcut keys on your keyboard (SHIFT+D) duplicate the template as a new image. Close the original and delete the copywrite layer.
Select Spring Wordart and delete
Select Flowers Raster 2 layer
Select all, float, defloat
Add new raster layer and flood-fill with color or gradient of choice
Select none
Apply Xero Fritillary with the following settings:

Apply Eyecandy Glass at default settings
Delete/Hide original flowers layer
Select Center Circle 1 layer
Select all, float, defloat
Paste paper 12
Select invert, delete, select none
Apply Eyecandy 5 Impact - Glass at default settings
Delete/Hide original circle layer
Select Squares Copy of Raster 1 layer
Select all, float, defloat
Add new raster layer and flood-fill with gradient of choice (style, Angle 45, Repeat 2)
Paste close-up tubes of choice on top of gradient and delete
Select none
Change close-ups to Luminance (Legacy) and drop opacity down to 75%
Apply Xero Bad Dream at default settings or random setting of choice
Apply dropshadow and merge close-ups down on top of gradient layer
Effects, Texture Effects, Blinds (Width 3, Opactity 15, Horizontal and Light from left/top checked)
Delete/Hide original squares layer
Select Square Raster 3 layer
Select all, float, defloat
Add new raster layer and flood-fill with color of choice
Select none
Apply Effects, Texture effects, weave (Gap size 3, Width 10, Opacity 5, Fill gaps checked, Change Gap Color to color of choice)
Delete/Hide original square layer
Select Square Copy of Raster 3 layer and repeat above steps
Select Square Raster 4 layer
Select all, float, defloat
Paste paper 5
Select invert, delete, select none
Delete/Hide original square layer
Select Copy of Square Raster 4 layer and repeat above steps
Select Square Raster 5 layer
Select all, float, defloat
Paste paper 1
Select invert, delete, select none
Delete/Hide original square layer
Select Copy of Square Raster 5 layer and repeat above steps
Select Rectangle Raster 5 layer
Select all, float, defloat
Paste paper 14
Select invert, delete, select none
Delete/Hide original rectangle layer
Select Copy of Rectangle Raster 5 layer and repeat above steps
Copy and paste tube of choice and position where desired
Apply Xero Porcelain at setting of choice
Apply Lokas 3D Shadow at default settings
Select Element 56 - resize by 65%
Paste and position on right side of center circle behind tube layer
Select Element 103 and paste on the bottom below tube layer
Select Element 48 - resize by 45%
Paste and position on bottom right side
Select Element 41 - resize by 40%
Image mirror and paste on bottom right side
Select Element 120 - resize by 50%
Paste and position on bottom right side
Select Element 104 - resize by 70%
Paste and position on top left side
Select Element 30 - resize by 80%
Paste and position on bottom left side
Select Element 107 - resize by 40%
Paste and position on bottom left side
Select Element 94 - resize by 50%
Paste and position on bottom left side
Select Element 3 - resize by 35%
Image mirror and paste on bottom left side
Select Element 42 - resize by 40%
Paste and position on bottom left side
Select Element 21 - resize by 25%
Paste and position on bottom left side
Select New raster layer and flood fill with color or gradient of choice
Move layer to the bottom of the template
Apply Mask 112
Merge group and move to the bottom
Add any additional elements you like.
Add any dropshadows you like
Crop and resize as desired
Add copyright info, license number and name
You're done! Thanks for trying my tutorial!
Saturday, April 27, 2013
PINK POISON

Supplies needed:
I am using the amazing art from Fumiko Barrows for this tutorial, which you can find here
Scrapkit: I am using a stunning kit from Irish Princess Designs called "Poison Betty" which you can get by going here
Punked Out in Pink Template from Creative Chicks which can be found here
Mask 7 from Reika Rafita which you can find here
Plugins used: Penta - Jeans, Eyecandy 4000 - Glass, Xero-Radiance, Xero-Bad Dream, Lokas 3D Shadow
----------------------------
This tutorial is written for those who have working knowledge of PSPX2 (any version will do).
This tutorial was written by me on April 27, 2013. Please do not copy or paste on any other forum, website or blog provide link back to tut only. Please do not claim as your own. This tutorial is copyrighted to me. Any resemblance to any other tutorial is purely coincidental.
Ok - let's start and remember to save often.
Open the template and using your shortcut keys on your keyboard (SHIFT+D) duplicate the template as a new image. Close the original and delete the copywrite layer.
Select "PINK" Raster 2 wordart
Select all, float, defloat
Add new raster layer and flood-fill with color or gradient of choice
Select none
Apply Eyecandy Glass at default settings
Delete/Hide original wordart layer
Select Square Frame 14 layer
Select all, float, defloat
Add new raster layer and flood-fill with color of choice
Select none
Adjust, Add/Remove Noise, Add Noise (Uniform checked, Noise 65%, Monochrome checked)
Delete/Hide original squares layer
Select Squares Back 13 layer
Select all, float, defloat
Add new raster layer and flood-fill with gradient of choice (style, Angle 45, Repeat 2)
Paste close-up tubes of choice on top of gradient and delete
Select none
Change close-ups to Luminance and drop opacity down to 75%
Apply Xero Bad Dream at default settings or random setting of choice
Apply dropshadow and merge close-ups down on top of gradient layer
Effects, Texture Effects, Blinds (Width 2, Opactity 20, Horizontal and Light from left/top checked)
Delete/Hide original squares layer
Select Circle 11 layer
Select all, float, defloat
Paste paper 1
Select invert, delete, select none
Delete/Hide original circle layer
Select Rectangles 9 layer
Select all, float, defloat
Add new raster layer and flood-fill with color of choice
Select none
Delete/Hide original rectangles layer
Select Rectangle 8 layer
Select all, float, defloat
Add new raster layer and flood-fill with gradient of choice (Style: Sunburst, Angle 0, Repeat 3)
Select none
Effects, Texture Effects, Blinds (Width 3, Opactity 20, Horizontal and Light from left/top checked)
Delete/Hide original rectangle layer
Select Rectangle 7 layer
Select all, float, defloat
Paste paper 10
Select invert, delete, select none
Delete/Hide original rectangle layer
Select Square 4 layer
Select your magic wand tool and select the edge of the square
Add new raster layer and flood-fill with color of choice
Select none and merge down
Select Square on the Right side and repeat above steps
Select Small Squares 5 layer
Add new raster layer and flood-fill color of choice
Reselect small squares layer
Select all, float, defloat
Go back and select color layer you just filled
Select invert, delete, select none
Delete/Hide original squares layer
Select Star 2 and 3 layers and apply Eyecandy Glass at default settings
Select Circles 1 layer
Select all, float, defloat
Add new raster layer and flood-fill with color of choice
Select none
Apply Penta - Jeans with the following settings:

Delete/Hide original circles layer
Copy and paste tube of choice and position where desired
Apply Xero Radiance at setting of choice
Apply Lokas 3D Shadow at default settings
Select Corset Element - resize by 50%
Image Free Rotate Right by 15%
Paste and position on bottom right side
Select PunkSkull Element - resize by 30%
Paste and position on bottom right side
Select Cupcake Element - resize by 25%
Paste and position on bottom right side
Select Cake Element - resize by 40%
Paste and position on bottom left side
Select Show Element - resize by 30%
Paste and position on bottom left side
Select SpikedHeart Element - resize by 30%
Image mirror and paste on bottom left side
Select Duck Element - resize by 20%
Paste and position on bottom left side
Select SkullRose Element - resize by 20%
Paste and position on left side
Duplicate, mirror and position copy on right side
Select New raster layer and flood fill with color or gradient of choice
Move layer to the bottom of the template
Apply Mask 7
Merge group and move to the bottom
Add any additional elements you like.
Add any dropshadows you like
Crop and resize as desired
Add copyright info, license number and name
You're done! Thanks for trying my tutorial!
Thursday, April 25, 2013
ROCKIN ANGEL

Supplies needed:
I am using the amazing art from Ismael Rac for this tutorial, which you can find here
Scrapkit: I am using a stunning kit from Scrappin Krazy Designs called "Rockin Angel" which you can get by going here
Template 244 from Millie which can be found here
Grunge 2 Mask from Tonya which you can find here
Plugins used: Alien Skin Eyecandy 5 Impact - Extrude, Xero-Radiance, Xero-Bad Dream, Lokas 3D Shadow
----------------------------
This tutorial is written for those who have working knowledge of PSPX2 (any version will do).
This tutorial was written by me on April 25, 2013. Please do not copy or paste on any other forum, website or blog provide link back to tut only. Please do not claim as your own. This tutorial is copyrighted to me. Any resemblance to any other tutorial is purely coincidental.
Ok - let's start and remember to save often.
Open the template and using your shortcut keys on your keyboard (SHIFT+D) duplicate the template as a new image. Close the original and delete the copywrite layer.
Select Wordart 10 layer and Strip 6 layer - move to bottom right if you desire
Select Wordart 10 and apply Eyecandy Glass at default settings
Apply Eyecandy Gradient Glow and at fat default settings (Glow Width 3)
Select Wordart 11 layer and repeat above steps
Select Strip 6 layer
Select all, float, defloat
Add new raster layer and flood-fill with color of choice
Select none
Apply Alien Skin Impact - Extrude with the following settings:

Delete/Hide original strip layer
Select Rectangle 9 layer
Select all, float, defloat
Paste paper 10
Select invert, delete, select none
Delete/Hide original rectangle layer
Select Rectangle 8 layer
Select all, float, defloat
Add new raster layer and flood-fill with color of choice
Select none
Adjust, Add/Remove Noise, Add Noise (Uniform checked, Noise 75%, Monochrome checked)
Delete/Hide original rectangle layer
Select Circle 5 layer
Select all, float, defloat
Paste paper 7
Select invert, delete, select none
Delete/Hide original circle layer
Select Square 3 layer
Select all, float, defloat
Paste paper 9
Select invert, delete, select none
Delete/Hide original square layer
Select Square 1 layer
Select all, float, defloat
Paste paper 13
Select invert, delete, select none
Delete/Hide original square layer
Select Square 2 layer and repeat above steps
Copy and paste tube of choice and position where desired
Apply Xero Radiance at setting of choice
Apply Lokas 3D Shadow at default settings
Select Element 7 - resize by 50%
Paste and position on bottom right side
Select Element 69 - resize by 97%
Paste and position on bottom left side below tube layer
Select Element 8 - resize by 35%
Paste and position on bottom left
Select Element 33 - image free rotate right by 20%
Paste and position on left side below tube layer
Select Element 44 - resize by 65%
Paste and postion on bottom left side below guitar element
Select Element 13 - resize by 40%
Image mirror and paste on bottom right side next to speaker element
Select Element 12 - resize by 25%
Image Free Rotate Right by 15% and paste on the bottom next to bear element
Select New raster layer and flood fill with color or gradient of choice
Move layer to the bottom of the template
Apply Grunge Mask
Merge group and move to the bottom
Add any additional elements you like.
Add any dropshadows you like
Crop and resize as desired
Add copyright info, license number and name
You're done! Thanks for trying my tutorial!
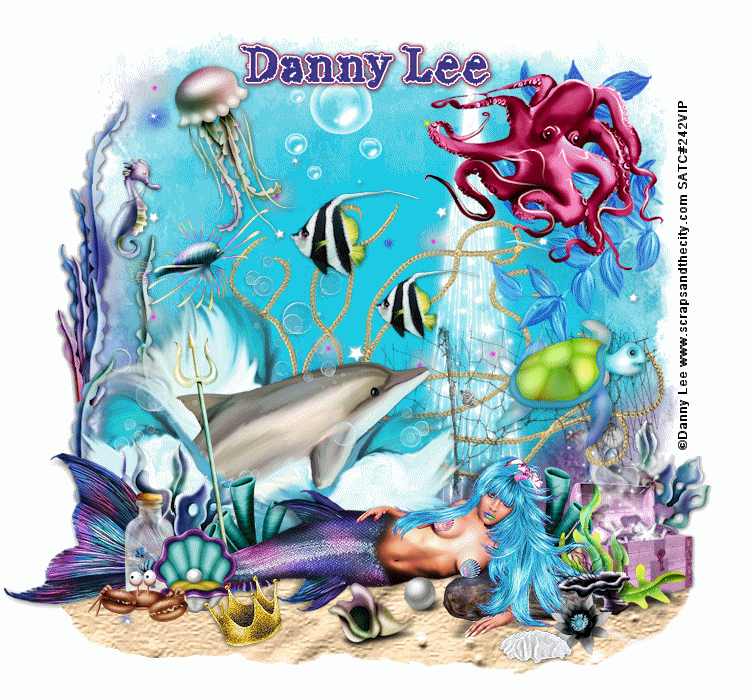
SEA MELODY

Supplies needed:
I am using the amazing art from Danny Lee for this tutorial, which you can find here
Scrapkit: I am a gorgeous kit from Bibi's Collections called "Sea Melody" which you can get by going here
Mask 4 from Butterfly Flutterby which you can find here
Sand pattern here
Water Textures here
Seadreams Font here
Plugins used: Xero-Radiance, Xero-Bad Dream, Lokas 3D Shadow
OPTIONAL FOR ANIMATION: JASC Animation Shop
----------------------------
This tutorial is written for those who have working knowledge of PSPX2 (any version will do).
This tutorial was written by me on April 25, 2013. Please do not copy or paste on any other forum, website or blog provide link back to tut only. Please do not claim as your own. This tutorial is copyrighted to me. Any resemblance to any other tutorial is purely coincidental.
Ok - let's start and remember to save often.
Open up a 750 x 700 blank canvas (we can resize it later)
Paste paper 11 on canvas
Apply Mask 4 and merge group
Select Element 122 - resize by 70%
Paste and position in the center towards the bottom
Select Element 68 - resize by 55%
Paste and position on bottom left side
Select Element 121 - resize by 65%
Image mirror and paste on top right corner
Drop opacity down to 80%
Select Element 59 - resize by 55%
Paste and position on top right corner
Select Element 105 - resize by 45%
Paste and position on top left corner
Select Element 71 - resize by 30%
Image mirror and paste where desired on canvas
Duplicate and resize by 80% and move copy where you desire
Select Element 58 - resize by 40%
Paste and position on bottom right
Select Element 73 - resize by 30%
Paste and position on bottom right side
Select Element 80 - resize by 45%
Image mirror and paste on bottom right side
Select Element 92 - resize by 75%
Image mirror and paste on left side
Select Element 99 - resize by 30%
Paste and position on bottom right above chest
Paste tube of choice on the bottom where desired
Apply Xero Radiance at setting of choice
Apply Lokas 3D Shadow at default settings
Select Element 85 and paste below tube layer
Select your Freehand Selections tool and draw an area around the bottom where you want your sand layer which should look something like this

Add new raster layer and flood-fill with the sand paper I supplied
Select none
Apply Water texture of choice
Select Element 5 - resize by 20%
Paste and position on bottom left side
Select Element 20 - resize by 80%
Paste and position on bottom left side below shell element
Select Element 104 - resize by 30%
Paste and position on bottom left side above shell element
Add any additional elements you like.
Add any dropshadows you like
Crop and resize as desired
Add copyright info, license number and name
~~~ ANIMATION - OPTIONAL STEP ~~~~
If you want to animate Merge all layers (flatten)
Open up Jasc Animation and paste as new animation
Effects, Insert Image Effect on Underwater with the following settings:

Select the first frame and delete
Now save as a .gif file and you're done!
Thanks for trying my tutorial!
Tuesday, April 23, 2013
CLASSIC BEAUTY

Supplies needed:
I am using the amazing art from Keith Garvey for this tutorial, which you can find here
Scrapkit: I am using a stunning kit from Annaica's Place called "Classic Beauty" which you can get by going here
Template 339 from Missy which can be found here
Mask by Cherie which you can find here
Mask 249 from Trese which you can find here
Plugins used: Eyecandy 4000 - Gradient Glow, Xero-Radiance, Xero-Bad Dream, Lokas 3D Shadow
----------------------------
This tutorial is written for those who have working knowledge of PSPX2 (any version will do).
This tutorial was written by me on April 23, 2013. Please do not copy or paste on any other forum, website or blog provide link back to tut only. Please do not claim as your own. This tutorial is copyrighted to me. Any resemblance to any other tutorial is purely coincidental.
Ok - let's start and remember to save often.
Open the template and using your shortcut keys on your keyboard (SHIFT+D) duplicate the template as a new image. Close the original and delete the copywrite layer.
Select Bottom Frame and Frame Background layers and delete
Paste Element 43 (film strip) on the bottom and resize by 65%
Select your magic wand tool and click in the center of each frame
Selections, Modify, Expand by 2
Add new raster layer and flood-fill with color or gradient of choice
Paste any close-up tubes where desired
Select invert, delete, select none
Change close-ups to Luminance (Legacy) and merge down on top of color/gradient layer
Move the layer below the frame
Select Stars2 layer
Select all, float, defloat
Add new raster layer and flood-fill with color of choice
Select none
Adjust, Add/Remove Noise, Add Noise (Uniform checked, Noise 55%, Monochrome checked)
Delete/Hide original stars layer
Select Square left layer
Select all, float, defloat
Paste close-up tube of choice on top
Select invert, delete, select none
Change tube to Luminance (Legacy)
Apply Xero Bad Dream at default settings or random setting of choice
Apply dropshadow and merge close-up down on top of square layer
Select Square Right layer and repeat above steps
Select Centre Circle 2 layer
Select all, float, defloat
Paste paper 7
Select invert, delete, select none
Delete/Hide original circle layer
Select Glittered Centre Circle 1 layer
Select all, float, defloat
Add new raster layer and flood-fill with color of choice
Select none
Adjust, Add/Remove Noise, Add Noise (Uniform checked, Noise 75%, Monochrome checked)
Delete/Hide original circle layer
Select Kinky wordart layer and delete
Select your text tool and type out wording of choice
Convert to raster layer and duplicate
Select the original wordart and Image Free Rotate Left by 90%
Apply Eyecandy Gradient Glow on medium default settings (glow width 3)
Select copy of words and this time Free Rotate Right by 90% and postion where you like
Apply Eyecandy Gradient Glow on medium default settings (glow width 3)
Select Rectangle layer
Select all, float, defloat
Add new raster layer and flood-fill with color of choice
Select none
Delete/Hide original rectangle layer
Select Circle Left layer
Select all, float, defloat
Paste paper 2
Select invert, delete, select none
Delete/Hide original circle layer
Select Circle Right layer and repeat above steps
Select Stars layer and delete if you desire
Select Square shape layer
Add new raster layer and flood-fill with color or gradient of choice
Apply Mask by Cherie and merge group - resize by 95%
Copy and paste tube of choice and position where desired
Apply Xero Radiance at setting of choice
Apply Lokas 3D Shadow at default settings
Select Element 7 - resize by 35%
Paste and position on bottom left side
Select Element 4 - resize by 30%
Image mirror and paste on bottom left side
Select Element 26 - resize by 20%
Paste and position on bottom left side
Select Element 8 - resize by 25%
Paste and position on bottom right side
Select Element 11 - resize by 35%
Paste and position on bottom right side
Select Element 9 - resize by 20%
Paste and position on bottom right side
Select Element 3 - resize by 30%
Image Free Rotate Left by 15% and paste on bottom right side below element 9
Select Element 1 - resize by 20%
Paste and position on the bottom below tube layer
Select New raster layer and flood fill with color or gradient of choice
Move layer to the bottom of the template
Apply Mask 249
Merge group and move to the bottom
Add any additional elements you like.
Add any dropshadows you like
Crop and resize as desired
Add copyright info, license number and name
You're done! Thanks for trying my tutorial!
Saturday, April 20, 2013
ROCKIN ROXY

Supplies needed:
I am using the amazing art from Diana Gali for this tutorial, which you can find here
Scrapkit: I am using a stunning kit from Disturbed Scraps called "Roxy Rocker" which you can get by going here
Template 192 from Toxic Desirez which can be found here
Mask 96 from Trese which you can find here
Plugins used: PhotoEffex - Scanlines, Xero-Radiance, Xero-Bad Dream, Lokas 3D Shadow
----------------------------
This tutorial is written for those who have working knowledge of PSPX2 (any version will do).
This tutorial was written by me on April 20, 2013. Please do not copy or paste on any other forum, website or blog provide link back to tut only. Please do not claim as your own. This tutorial is copyrighted to me. Any resemblance to any other tutorial is purely coincidental.
Ok - let's start and remember to save often.
Open the template and using your shortcut keys on your keyboard (SHIFT+D) duplicate the template as a new image. Close the original and delete the copywrite layer.
Select Stars Raster 10 layer
Select all, float, defloat
Add new raster layer and flood-fill with color or gradient of choice
Select none
Adjust, Add/Remove Noise, Add Noise (Uniform checked, Noise 40%, Monochrome checked)
Apply Eyecandy Glass at default settings
Delete/Hide original stars layer
Select Half Circle Raster 8 layer
Select all, float, defloat
Paste paper 9
Select invert, delete, select none
Apply PhotoEffex Scanlines with the following settings:

Delete/Hide original circle layer
Select Circle Raster 9 layer
Select all, float, defloat
Paste paper 17
Select invert, delete, select none
Delete/Hide original circle layer
Select Circle Raster 3 layer
Select all, float, defloat
Paste paper 1
Select invert, delete, select none
Delete/Hide original circle layer
Select Element 52 - resize by 55%
Paste and position on top of the center circle
Select Circle Copy of Raster 3 layer
Select all, float, defloat
Add new raster layer and flood-fill with color of choice
Select none
Adjust, Add/Remove Noise, Add Noise (Uniform checked, Noise 85%, Monochrome checked)
Delete/Hide original circle layer
Select Square Raster 2 layer
Select all, float, defloat
Add new raster layer and flood-fill with gradient of choice (style, Angle 45, Repeat 2)
Paste close-up tube of choice on top of gradient and delete
Change close-up to Luminance (Legacy)
Apply Xero Bad Dream at default settings or random setting of choice
Apply dropshadow and merge close-up down on top of gradient layer
Change close-up to Luminance and drop opacity down to 85%
Delete/Hide original square layer
Select Square Copy of Raster 2 layer and repeat above steps
Select Square Raster 4 layer
Select all, float, defloat
Paste paper 7
Select invert, delete, select none
Delete/Hide original square layer
Select Square Copy of Raster 4 layer and repeat above steps
Select Square Raster 5 layer
Select all, float, defloat
Paste paper 15
Select invert, delete, select none
Delete/Hide original square layer
Select Square Copy of Raster 5 layer and repeat above steps
Select Circle Raster 6 layer
Select all, float, defloat
Paste paper 8
Select invert, delete, select none
Delete/Hide original circle layer
Select Circle Copy of Raster 6 layer and repeat above steps
Select Rectangle Raster 7 layer
Select all, float, defloat
Paste paper 12
Select invert, delete
Select Element 105 - resize by 65%
Image mirror and flip and paste on top of paper layer and delete
Select none
Delete/Hide original rectangle layer
Select Rectangle Copy of Raster 7 layer and repeat above steps
Copy and paste tube of choice and position where desired
Apply Xero Radiance at setting of choice
Apply Lokas 3D Shadow at default settings
Select Element 60 - resize by 75%
Image Free Rotate Left by 20% and paste on bottom left
Select Element 59 - resize by 60%
Paste and position on bottom left
Select Element 100 - resize by 50%
Image Free Rotate Left by 20% and paste on bottom left side
Select Element 97 - resize by 35%
Paste and position on bottom right side
Select Element 96 - resize by 35%
Paste and position on bottom right side
Select Element 9 - resize by 70%
Paste and position on bottom right side
Select Element 102 - resize by 40%
Paste and position on bottom right side
Select Element 58 - resize by 45%
Paste and position on bottom right side below element 102
Select New raster layer and flood fill with color or gradient of choice
Move layer to the bottom of the template
Apply Mask 96
Merge group and move to the bottom
Add any additional elements you like.
Add any dropshadows you like
Crop and resize as desired
Add copyright info, license number and name
You're done! Thanks for trying my tutorial!
Friday, April 19, 2013
FEEL THE MUSIC

Supplies needed:
I am using the amazing art from Celineart Pinup for this tutorial, which you can find here
Scrapkit: I am using a stunning kit from Niqui's Designs called "Feeling The Music" which you can get by going here
Template 207 from Millie which can be found here
Mask 249 from Trese which you can find here
Plugins used: Penta - Color Dot, Xero-Radiance, Xero-Bad Dream, Lokas 3D Shadow
----------------------------
This tutorial is written for those who have working knowledge of PSPX2 (any version will do).
This tutorial was written by me on April 19, 2013. Please do not copy or paste on any other forum, website or blog provide link back to tut only. Please do not claim as your own. This tutorial is copyrighted to me. Any resemblance to any other tutorial is purely coincidental.
Ok - let's start and remember to save often.
Open the template and using your shortcut keys on your keyboard (SHIFT+D) duplicate the template as a new image. Close the original and delete the copywrite layer.
Select wordart layer 9
Select all, float, defloat
Add new raster layer and flood-fill with color or gradient of choice
Select none
Adjust, Add/Remove Noise, Add Noise (Uniform checked, Noise 40%, Monochrome checked)
Apply Eyecandy Glass at default settings
Apply Eyecandy Gradient Glow at fat default settings (Glow Width 3)
Delete/Hide original wordart layer
Select Wordart 10 layer
Add new raster layer and flood-fill with color of choice
Reselect "Crazy wordart"
Select all, float, defloat
Go back and select your color layer you just filled
Select invert, delete, select none
Apply Eyecandy Gradient Glow on Medium default settings
Delete/Hide original wordart layer
Select Rectangle 11 layer
Select all, float, defloat
Paste paper 12
Select invert, delete, select none
Apply Penta Color dot with the following settings:

Delete/Hide original rectangle layer
Select Rectangle 8 layer
Select all, float, defloat
Paste paper 4
Select invert, delete, select none
Delete/Hide original rectangle layer
Select Star 7 layer and delete
Select Square 6 layer
Select all, float, defloat
Paste paper 5
Select invert, delete
Paste close-up tube of choice on the left side and delete
Select none
Change close-up to Luminance and drop opacity down to 85%
Apply Xero Bad Dream at default settings
Apply dropshadows and merge down on top of paper layer
Delete/Hide original square layer
Select Square 4 layer
Select all, float, defloat
Paste paper 1
Select invert, delete, select none
Delete/Hide original square layer
Select Circle 3 layer
Select all, float, defloat
Paste paper 8
Select invert, delete, select none
Delete/Hide original circle layer
Select Square 2 layer
Select invert, delete, select none
Delete/Hide original square layer
Select Square 1 layer and repeat above steps
Copy and paste tube of choice and position where desired
Apply Xero Radiance at setting of choice
Apply Lokas 3D Shadow at default settings
Select Element 12 - resize by 50%
Paste and position on bottom left side
Select Element 31 - resize by 65%
Image Free Rotate Left by 15% and paste on left side
Select Element 30 - resize by 30%
Select your magic wand tool and click in the center box of the element (Add (Shift), RGB Value, Tolerance 10, Contiguous checked, Feather 0)
Selections, Modify and Expand by 5
Paste a paper and tube of choice on top of selection
Select invert, delete, select none
Image Free Rotate Left by 15% and paste on bottom left side
Select Element 18 - resize by 60%
Paste and position on the bottom behind tube layer
Select Element 19 - resize by 30%
Paste and position on the bottom right side
Select Element 37 - resize by 25%
Image mirror and paste on the bottom right side
Select Element 22 - resize by 30%
Paste and position on bottom right side
Select Element 40 - resize by 50%
Paste and position on right side
Select New raster layer and flood fill with color or gradient of choice
Move layer to the bottom of the template
Apply Mask 249
Merge group and move to the bottom
Add any additional elements you like.
Add any dropshadows you like
Crop and resize as desired
Add copyright info, license number and name
You're done! Thanks for trying my tutorial!
Tuesday, April 16, 2013
FEEL THE FUNK

Supplies needed:
I am using the amazing art from Diana Gali for this tutorial, which you can find here
Scrapkit: I am using a stunning kit from Disturbed Scraps called "Amanada in Gold" which you can get by going here
Template 211 from Millie which can be found here
Mask 247 from Trese which you can find here
Plugins used: Eyecandy 4000 - Glass, Eyecandy 4000 - Gradient Glow, Xero-Radiance, Xero-Bad Dream, Lokas 3D Shadow
----------------------------
This tutorial is written for those who have working knowledge of PSPX2 (any version will do).
This tutorial was written by me on April 16, 2013. Please do not copy or paste on any other forum, website or blog provide link back to tut only. Please do not claim as your own. This tutorial is copyrighted to me. Any resemblance to any other tutorial is purely coincidental.
Ok - let's start and remember to save often.
Open the template and using your shortcut keys on your keyboard (SHIFT+D) duplicate the template as a new image. Close the original and delete the copywrite layer.
Select wordart layers 12 and 13 and move down to the bottom if you desire
Select "Funk" layer 12 wordart
Select all, float, defloat
Add new raster layer and flood-fill with color or gradient of choice
Select none
Apply Eyecandy Glass at default settings
Apply Eyecandy Gradient Glow at default settings (Glow width 3)
Delete/Hide original wordart layer
Select Circle 11 layer
Select all, float, defloat
Paste paper 7
Select invert, delete, select none
Delete/Hide original circle layer
Select Element 82 - resize by 65%
Paste and position on top of circle layer
Select Strip 7 layer
Select all, float, defloat
Paste paper 14
Select invert, delete, select none
Delete/Hide original strip layer
Select Strip 6 layer and repeat above steps
Select Rectangle 5 layer
Select all, float, defloat
Paste paper 10
Select invert, delete, select none
Delete/Hide original rectangle laye
Select Rectangle 4 layer and repeat above steps
Select Rectangle 3 layer
Select all, float, defloat
Paste paper 4
Select invert, delete, select none
Delete/Hide original rectangle layer
Select Rectangle 2 layer and repeat above steps
Select Circle 1 layer
Select all, float, defloat
Paste Glitter 4 paper
Select invert, delete, select none
Delete/Hide original circle layer
Copy and paste tube of choice and position where desired
Apply Xero Radiance at setting of choice
Apply Lokas 3D Shadow at default settings
Select Element 14 - resize by 35%
Paste and position on top right side
Select Element 20 - resize by 60%
Image mirror and paste on bottom left side
Select Element 53 - resize by 55%
Paste and position on bottom left side
Select Element 64 - resize by 30%
Paste and position on bottom left side behind element 53
Select Element 42 - resize by 35%
Paste and position on bottom left side
Select Element 57 - resize by 65%
Paste and position on bottom right side
Select Element 41 - resize by 65%
Paste and position on bottom right side
Select Element 47 - resize by 55%
Paste and position on bottom right side
Select Element 39 - resize by 35%
Paste and position on bottom right side
Select New raster layer and flood fill with color or gradient of choice
Move layer to the bottom of the template
Apply Mask 247
Merge group and move to the bottom
Add any additional elements you like.
Add any dropshadows you like
Crop and resize as desired
Add copyright info, license number and name
You're done! Thanks for trying my tutorial!
MANON DESIREZ

Supplies needed:
I am using the amazing art from Marc Duval for this tutorial, which you can find here
Scrapkit: I am using a stunning kit from Fabulous Designz called "Manon Desirez" which you can get by going here
Collab Template 4 from Alisha and Deb which can be found on the Misfits Blog here
Mask 1 from Melissaz which you can find here
Plugins used: Eyecandy 4000 - Glass, Xero-Radiance, Xero-Bad Dream, Lokas 3D Shadow
----------------------------
This tutorial is written for those who have working knowledge of PSPX2 (any version will do).
This tutorial was written by me on April 16, 2013. Please do not copy or paste on any other forum, website or blog provide link back to tut only. Please do not claim as your own. This tutorial is copyrighted to me. Any resemblance to any other tutorial is purely coincidental.
Ok - let's start and remember to save often.
Open the template and using your shortcut keys on your keyboard (SHIFT+D) duplicate the template as a new image. Close the original and delete the copywrite layer.
Select Rectangle Raster 4 layer
Select all, float, defloat
Paste paper 2
Select invert, delete, select none
Delete/Hide original rectangle layer
Select Copy of Vector 1 frame layer
Select all, float, defloat
Add new raster layer and flood-fill with color of choice
Select none
Apply Eyecandy Glass at default settings
Delete/Hide original frame layer
Select Square Raster 8 layer
Select all, float, defloat
Add new raster layer and flood-fill with gradient colors of choice (Linear style, Angle 45, Repeat 2)
Paste close-up tube of choice on top of gradient and delete
Change closeups to Luminance (Legacy)
Apply Xero Bad Dream at default settings or random setting of choice
Apply dropshadow and merge down on top of gradient layer
Effects, Texture Effects, Blinds (Width 2, Opactity 20, Horizontal and Light from left/top checked)
Delete/Hide original square layer
Select Heart Raster 7 layer
Select all, float, defloat
Add new raster layer and flood-fill with color of choice
Select none
Apply Eyecandy Glass at default settings
Delete/Hide original heart layer
Select Heart Raster 6 layer
Select all, float, defloat
Add new raster layer and flood-fill with color of choice
Select none
Adjust Add/Remove Noise, Add Noise (Uniform checked, Noise 45%, Monochrome checked)
Apply Eyecandy Glass with same default settings
Delete/Hide original heart layer
Select Circle Frame Raster 1 layer
Select all, float, defloat
Add new raster layer and flood-fill with color of choice
Select none
Apply Eyecandy Glass at default settings
Delete/Hide original frame layer
Select Circle Frame Raster 3 layer and repeat above steps
Select Circle Raster 2 layer
Select all, float, defloat
Paste paper 1
Select invert, delete, select none
Delete/Hide original circle layer
Select Wordart2JEK Element - resize by 90%
Paste and position on top of center circle layer
Select Strip Copy of Raster 5 layer
Select all, float, defloat
Paste paper 11
Select invert, delete, select none
Delete/Hide original strip layer
Select Strip Copy of Raster 5 (2) layer and repeat above steps
Select Strip Copy of Raster 5 layer
Select all, float, defloat
Paste paper 6
Select invert, delete, select none
Delete/Hide original strip layer
Select Strip Raster 5 layer and repeat above steps
Select Square Copy of Raster 9 layer
Select all, float, defloat
Paste paper 10
Select invert, delete, select none
Delete/Hide original square layer
Select Square Raster 9 layer
Select all, float, defloat
Paste paper 7
Select invert, delete, select none
Delete/Hide original square layer
Copy and paste tube of choice and position where desired
Apply Xero Radiance at setting of choice
Apply Lokas 3D Shadow at default settings
Select Firepop Element - resize by 40%
Paste and position on right side
Select Corset Element - resize by 55%
Image Free Rotate Right by 15% and paste on bottom right side
Select Candy Element - resize by 40%
Paste and position on bottom right side
Select Cupcake 1 Element - resize by 45%
Paste and position on bottom right side
Select Sexyips Element - resize by 25%
Image Free Rotate Left by 15% and paste on bottom right side
Select HeartRingPop Element - resize by 40%
Paste and position on bottom right side
Select SpikedCollar Element - resize by 30%
Paste and position on bottom
Select Zombiedol Element - resize by 40%
Paste and position on left side
Select Pansy1 Element - resize by 40%
Paste and position on bottom left side
Select Zipperheel Element - resize by 50%
Paste and position on bottom left side
Select New raster layer and flood fill with color or gradient of choice
Move layer to the bottom of the template
Apply Mask 1
Merge group and move to the bottom
Add any additional elements you like.
Add any dropshadows you like
Crop and resize as desired
Add copyright info, license number and name
You're done! Thanks for trying my tutorial!
BOY MEETS GIRL

Supplies needed:
I am using the amazing art from Very Many for this tutorial, which you can find here
Scrapkit: I am using a beautiful kit from Amy Marie called "Boy Loves Girl" which you can get by going here
Template 237 from Denz which can be found here
Mask 112 from Trese which you can find here
Plugins used: Penta - Jeans, Eyecandy 4000 - Glass, Xero-Radiance, Xero-Bad Dream, Lokas 3D Shadow
----------------------------
This tutorial is written for those who have working knowledge of PSPX2 (any version will do).
This tutorial was written by me on April 16, 2013. Please do not copy or paste on any other forum, website or blog provide link back to tut only. Please do not claim as your own. This tutorial is copyrighted to me. Any resemblance to any other tutorial is purely coincidental.
Ok - let's start and remember to save often.
Open the template and using your shortcut keys on your keyboard (SHIFT+D) duplicate the template as a new image. Close the original and delete the copywrite layer.
Select Heart 1 layer
Select all, float, defloat
Add new raster layer and flood-fill with color of choice
Select none
Apply Eyecandy Glass at default settings
Delete/Hide original heart layer
Select White Circle layer
Select all, float, defloat
Add new raster layer and flood-fill with color of choice
Select none
Effects, Texture Effects, Weave (Gap size 3, Width 6, Opacity 5, Fill gaps checked)
Delete/Hide original circle layer
Select Brown Square 1 layer
Select all, float, defloat
Paste paper 12
Select invert, delete, select none
Delete/Hide original square layer
Select Brown Square 2 layer and repeat above steps
Select Circle 1 layer
Select all, float, defloat
Add new raster layer and flood-fill with gradient colors of choice (Linear style, Angle 45, Repeat 2)
Paste close-up tube of choice on top of gradient and delete
Change closeups to Hard Light
Apply Xero Bad Dream at default settings or random setting of choice
Apply dropshadow and merge down on top of gradient layer
Effects, Texture Effects, Blinds (Width 2, Opactity 25, Horizontal and Light from left/top checked)
Delete/Hide original circle layer
Select Circle 2 layer and repeat above steps
Select White bars layer
Select all, float, defloat
Add new raster layer and flood-fill with color of choice
Select none
Apply Penta Jeans with the following settings:

Delete/Hide original bars layer
Select Brown Bars layer
Select all, float, defloat
Paste paper 1
Select invert, delete, select none
Delete/Hide original bars layer
Select Gradient Rectangle layer
Select all, float, defloat
Add new raster layer and flood-fill with color or gradient of choice
Select none
Effects, Texture Effects, Blinds (Width 2, Opactity 25, Horizontal and Light from left/top checked)
Delete/Hide original rectangle layer
Select Gradient Rectangle 1 layer
Select all, float, defloat
Paste paper 5
Select invert, delete, select none
Delete/Hide original rectangle layer
Select Green Rectangle layer
Select all, float, defloat
Paste paper 12
Select invert, delete, select none
Delete/Hide original rectangle layer
Select White Rectangles Small layer
Select all, float, defloat
Paste paper 11
Select invert, delete, select none
Delete/Hide original rectangles layer
Select Small Circles Brown layer
Select all, float, defloat
Paste paper 15
Select invert, delete, select none
Delete/Hide original circles layer
Select Element 29 - resize by 35%
Paste and position on top of bottom left circle
Copy and paste tube of choice and position where desired
Apply Xero Radiance at setting of choice
Apply Lokas 3D Shadow at default settings
Select Element 37 - resize by 45%
Paste and position on top left
Select Element 61 - resize by 35%
Paste and position on top left behind element 37
Select Element 6 - resize by 65%
Image Free Rotate Left by 20% and paste on bottom left
Select Element 60 - resize by 40%
Image mirror and paste on bottom left side
Select Element 27 - resize by 20%
Paste and position on bottom left side
Select Element 63 - resize by 70%
Image Free Rotate Right by 20% and paste on right side
Select Element 48 - resize by 55%
Free Rotate Left by 15% and Image mirror
Paste and position on bottom right side
Select Element 28 - resize by 40%
Paste and position on bottom right below element 48
Select Element 22 - resize by 50%
Paste and position on bottom right side
Select New raster layer and flood fill with color or gradient of choice
Move layer to the bottom of the template
Apply Mask 112
Merge group and move to the bottom
Add any additional elements you like.
Add any dropshadows you like
Crop and resize as desired
Add copyright info, license number and name
You're done! Thanks for trying my tutorial!
Monday, April 15, 2013
ROCKIN LOVE

Supplies needed:
I am using the amazing art from Danny Lee for this tutorial, which you can find here
Scrapkit: I am using a stunning kit from Bibi's Collections called "Queen Amy" which you can get by going here
Template 196 from Millie which can be found here
Mask 22 from Gina Gems which you can find here
Plugins used: Eyecandy 4000 - Glass, Eyecandy 4000 Gradient Glow, Xero-Radiance, Xero-Bad Dream, Lokas 3D Shadow
----------------------------
This tutorial is written for those who have working knowledge of PSPX2 (any version will do).
This tutorial was written by me on April 15, 2013. Please do not copy or paste on any other forum, website or blog provide link back to tut only. Please do not claim as your own. This tutorial is copyrighted to me. Any resemblance to any other tutorial is purely coincidental.
Ok - let's start and remember to save often.
Open the template and using your shortcut keys on your keyboard (SHIFT+D) duplicate the template as a new image. Close the original and delete the copywrite layer.
Select "Rockin Love" Wordart 9 layer
Select all, float, defloat
Add new raster layer and flood-fill with color or gradient of choice
Select none
Apply Eyecandy Glass at default settings
Apply Eyecandy Gradient Glow on fat default settings (glow width 3)
Delete/Hide original wordart layer
Select Circle 8 layer
Select all, float, defloat
Add new raster layer and flood-fill with gradient colors of choice (Linear style, Angle 45, Repeat 2)
Paste close-up tube of choice on top of gradient and delete
Change closeups to Hard Light
Apply Xero Bad Dream at default settings or random setting of choice
Apply dropshadow and merge down on top of gradient layer
Effects, Texture Effects, Blinds (Width 2, Opactity 25, Horizontal and Light from left/top checked)
Delete/Hide original circle layer
Select Circle 7 layer
Adjust Add/Remove Noise, Add Noise (Uniform checked, Noise 100%, Monochrome checked)
Select Rectangle 6 layer
Select all, float, defloat
Paste paper 3
Select invert, delete, select none
Delete/Hide original rectangle layer
Select Rectangle 5 layer
Select all, float, defloat
Paste paper 2
Select invert, delete, select none
Delete/Hide original rectangle layer
Select Circle 4 layer
Select all, float, defloat
Paste paper 5
Select invert, delete, select none
Delete/Hide original circle layer
Select Rectangle 3 layer
Select all, float, defloat
Paste paper 3
Select invert, delete, select none
Delete/Hide original rectangle layer
Select Square 1 layer
Select all, float, defloat
Paste paper 9
Select invert, delete, select none
Delete/Hide original square layer
Select Square 2 layer and repeat above steps
Copy and paste tube of choice and position where desired
Apply Xero Radiance at setting of choice
Apply Lokas 3D Shadow at default settings
Select Element 3 and paste on the bottom below wordart layer
Select Paper 1 Element and paste on the bottom and move to bottom layer
Select Element 118 - resize by 55%
Paste and position on top circle layer
Select Element 53 - resize by 75%
Paste and position on top left corner
Select Element 98 - resize by 40%
Paste and position on bottom left side
Image duplicate and mirror
Select Element 1 - resize by 65%
Image Free Rotate Left by 20%
Paste and position on bottom left
Select New raster layer and flood fill with color or gradient of choice
Move layer to the bottom of the template
Apply Mask 22
Merge group and move to the bottom
Add any additional elements you like.
Add any dropshadows you like
Crop and resize as desired
Add copyright info, license number and name
You're done! Thanks for trying my tutorial!
Friday, April 12, 2013
DARK FAIRY

Supplies needed:
I am using the amazing art from Myka Jelina for this tutorial, which you can find here
Scrapkit: I am using a stunning kit from Amy Marie called "Dark Fairy" which you can get by going here
Template 165 from Pooker which can be found here
Mask 22 from Moonbeams and Spiderwebs which you can find here
Plugins used: Xero-Radiance, Xero-Bad Dream, Lokas 3D Shadow
----------------------------
This tutorial is written for those who have working knowledge of PSPX2 (any version will do).
This tutorial was written by me on April 12, 2013. Please do not copy or paste on any other forum, website or blog provide link back to tut only. Please do not claim as your own. This tutorial is copyrighted to me. Any resemblance to any other tutorial is purely coincidental.
Ok - let's start and remember to save often.
Open the template and using your shortcut keys on your keyboard (SHIFT+D) duplicate the template as a new image. Close the original and delete the copywrite layer.
Adjust Canvas Size by 825 x 700 (you can resize later)
Select Lt Pink Circle
Select all, float, defloat
Add new raster layer and flood-fill with color of choice
Select none
Apply Effects, Texture effects, weave (Gap size 2, Width 7, Opacity 5, Fill gaps checked, Change Gap Color to color of choice)
Delete/Hide original circle layer
Select Pink Dotted Circle
Add new raster layer and flood-fill with color of choice
Reselect your dotted circle
Select all, float, defloat
Go back to your layer you just filled
Select invert, delete, select none
Delete/Hide original dotted circle layer
Select White Circle layer
Select all, float, defloat
Paste paper 2
Select invert, delete, select none
Delete/Hide original circle layer
Select Lt. Blue Circle layer
Select all, float, defloat
Paste paper 16
Select invert, delete, select none
Delete/Hide original circle layer
Select Lt. Pink Circle 2 layer
Select all, float, defloat
Add new raster layer and flood-fill with color of choice
Select none
Effects, Texture Effects, Blinds (Width 2, Opactity 20, Horizontal and Light from left/top checked)
Delete/Hide original circle layer
Select Pink Shapes layer
Select all, float defloat
Paste paper 8
Select invert, delete, select none
Delete/Hide original shapes layer
Select Blue Circles layer
Select all, float, defloat
Add new raster layer and flood-fill with gradient colors of choice (Linear style, Angle 45, Repeat 2)
Paste close-up tubes of choice on top of gradient and delete
Change closeups to Luminance (Legacy)
Apply Xero Bad Dream at default settings or random setting of choice
Drop opacity on close-up down to 70%
Apply dropshadow and merge down on top of gradient layer
Delete/Hide original circles layer
Select Lt. Pink Rectangles layer
Select all, float, defloat
Paste paper PPA
Select invert, delete, select none
Delete/Hide original rectangles layer
Select Lt. Blue Rectangles layer
Select all, float, defloat
Paste paper 3
Select invert, delete, select none
Delete/Hide original rectangles layer
Select Blue Rectangles layer
Select all, float, defloat
Paste paper 12
Select invert, delete, select none
Delete/Hide original rectangles layer
Select Pink Dotted Outlines layer and repeat steps that we used for Dotted Circles
Copy and paste tube of choice and position where desired
Apply Xero Radiance at setting of choice
Apply Lokas 3D Shadow at default settings
Select Element 36 - resize by 55%
Image Free Rotate Right by 15% and paste on top right
Select Element 39 and paste on the bottom below tube layer
Select Element 94 and paste on right hand side
Select Element 95 - resize by 80%
Paste and position on right side above element 94
Select Element 5 - resize by 40%
Paste and position on bottom right side
Select Element 56 - resize by 50%
Paste and position on bottom right side
Select Element 77 - resize by 50%
Image mirror and paste on bottom left side below tube layer
Select Element 90 - resize by 60%
Paste and position on bottom left side
Select Element 19 - resize by 27%
Paste and position on bottom left side
Select New raster layer and flood fill with color or gradient of choice
Move layer to the bottom of the template
Apply Mask 22
Merge group and move to the bottom
Add any additional elements you like.
Add any dropshadows you like
Crop and resize as desired
Add copyright info, license number and name
You're done! Thanks for trying my tutorial!
Thursday, April 11, 2013
ROCKATUDE

Supplies needed:
I am using the amazing artwork from Diana Gali for this tutorial, which you can find here
Scrapkit: I am using an amazing kit from Skyscraps Designs called "Rock On" which you can get by going here
Template 161 from Pooker which can be found here
Mask 191 from Insatiable Dreams which you can find here
Plugins used: Xero-Radiance, Xero-Bad Dream, Lokas 3D Shadow
----------------------------
This tutorial is written for those who have working knowledge of PSPX2 (any version will do).
This tutorial was written by me on April 11, 2013. Please do not copy or paste on any other forum, website or blog provide link back to tut only. Please do not claim as your own. This tutorial is copyrighted to me. Any resemblance to any other tutorial is purely coincidental.
Ok - let's start and remember to save often.
Open the template and using your shortcut keys on your keyboard (SHIFT+D) duplicate the template as a new image. Close the original and delete the copywrite layer.
Select Lt. Pink Half Circle
Select all, float, defloat
Add new raster layer and flood-fill with color of choice
Select none
Effects, Texture Effects, Blinds (Width 3, Opactity 25, Horizontal and Light from left/top checked)
Delete/Hide original circle layer
Select Pink Circle 1 layer
Select all, float, defloat
Paste paper 1
Select invert, delete, select none
Delete/Hide original circle layer
Select White Circle 1 layer
Select all, float, defloat
Paste paper 4
Select invert, delete
Select Element 63 (broken glass) and paste where desired on top of paper layer and delete
Select none
Delete/Hide original circle layer
Select White Circle 2 layer and repeat above steps
Select Lt. Blue Rectangle 1 layer
Select all, float, defloat
Add new raster layer and flood-fill with gradient of choice (Linear style, Angle 45, Repeat 2)
Paste close-up tube of choice on top of gradient and delete
Change closeups to Luminance (Legacy)
Apply Xero Bad Dream at default settings or random setting of choice
Apply dropshadow and merge down on top of gradient layer
Delete/Hide original rectangle layer
Select Lt. Blue Rectangle2 layer and repeat above steps
Select Blue Rectangle 1 layer
Select all, float, defloat
Add new raster layer and flood-fill with color of choice
Select none
Apply Effects, Texture effects, weave (Gap size 3, Width 7, Opacity 5, Fill gaps checked, Change Gap Color to color of choice)
Delete/Hide original rectangle layer
Select Blue Rectangle 2 layer and repeat above steps
Select Pink Circle 2 layer
Select all, float, defloat
Paste paper 5
Select invert, delete, select none
Delete/Hide original circle layer
Select Pink Circle 3 layer and repeat above steps
Select Blue Rectangle layer
Select all, float, defloat
Paste paper 2
Select invert, delete, select none
Delete/Hide original rectangle layer
Select Lt. Pink Rectangle 1 layer
Select all, float, defloat
Paste paper 3
Select invert, delete, select none
Delete/Hide original rectangle layer
Select Lt. Pink Rectangle 2 layer and repeat above steps
Copy and paste tube of choice and position where desired
Apply Xero Radiance at setting of choice
Apply Lokas 3D Shadow at default settings
Select Element 62 - resize by 45%
Paste and position on top right behind rectangle layer
Select Element 44 - resize by 80%
Paste and position on top right behind element 62
Select Element 13 - resize by 65%
Image Free Rotate Left by 20% and paste on bottom right side
Select Element 22 - resize by 35%
Paste and position on bottom right side
Select Element 26 - resize by 30%
Paste and position on bottom in front of tube layer
Select Element 66 - resize by 35%
Paste and position on bottom left side
Select Element 12 - resize by 40%
Paste and position on bottom left side
Select Element 4 - resize by 40%
Paste and position on bottom left side
Select Element 45 - resize by 80%
Paste and position on top left side and move to the bottom layer
Select Element 48 paste and position at the top - move to the bottom layer
Select New raster layer and flood fill with color or gradient of choice
Move layer to the bottom of the template
Apply Mask 191
Merge group and move to the bottom
Add any additional elements you like.
Add any dropshadows you like
Crop and resize as desired
Add copyright info, license number and name
You're done! Thanks for trying my tutorial!
Subscribe to:
Comments
(Atom)


