Labels
- Alikas Scraps
- All Dolled Up Store
- Amy Marie
- Annaica
- Arthur Crowe
- Babycakes Scraps
- Barbara Jensen
- Bibi's Collections
- Black Widow Creationz
- Blu Moon
- Bonnies Creations
- Bookwork Dezines
- Broken Sky Dezine
- Carita Creationz
- Carpe Diem Designs
- CDO
- Celinart Pinup
- Celine
- Chacha Creationz
- Charmed Designs
- Cherry Blossom Designs
- Chili Designz
- Cluster Frame
- Creative Misfits
- Creative Scraps by Crys
- Curious Creative Dreams
- Danny Lee
- Derzi
- Designs by Ali
- Designs by Joan
- Designs by Ketura
- Designs By Norella
- Designs by Vi
- Diana Gali
- Diry Art Designs
- Disturbed Scraps
- Dreaming With Bella
- Eclipse Creations
- Elegancefly
- Extras
- Fabulous Designz
- Forum Set
- Foxy's Designz
- Freek's Creation
- FTU
- FwTags
- Goldwasser
- Gothic Inspirations
- Gothic Raven Designs
- Graphfreaks
- Hania's Designs
- Happy Pumpkin Studios
- Horseplay's Pasture Designs
- indie-Zine
- Irish Princess Designs
- Ishika Chowdhury
- Kaci McVay
- Kajenna
- katharine
- Katherine
- Khloe Zoey
- Killer Kitty
- Kissing Kate
- KiwiFirestorm
- Kiya Designs
- Kizzed by Kelz
- KZ Designz
- Lady Mishka
- Lil Mz Brainstorm
- Maiden of Darkness
- Mariel Designs
- MellieBeans
- Michelle's Myths
- Midnight Shadow
- Misticheskya
- MistyLynn's Creations
- MMeliCrea Designz
- Moon Vixen Designs
- NaSionainne
- Ninaste
- Niqui Designs
- Pandora
- Picsfordesign
- Pink Paradox Productions
- Radyga Designs
- Redefined Designs
- Rissa's Designs
- Schnegge
- ScottishButterfly Creations
- Scrappin Krazy Designs
- Scrappin With Lil Ol Me
- Scraps and the City
- Scraps Dimensions
- Scraps From The Heart
- Scraps N Company
- Scraps with Attitude
- Shining Star Art
- Skyscraps
- Sleek N Sassy Designs
- Sophisticat Simone
- Souldesigner
- Soxsational Scraps
- Spazz
- Starlite and Soul
- Stella Felice
- Tammy Welt
- Tasha's Playground
- The PSP Project
- Thrifty Scraps by Gina
- Tiny Turtle Designs
- Upyourart
- Verymany
- Wendy Gerber
- Whisper In the Wind
- Wick3d Creationz
- Wicked Diabla
- Yude's Kreationz
Blog Archive
-
▼
2013
(235)
-
▼
December
(19)
- BELIEVE IN MIRACLES
- NEW YEARS WISH
- BELIEVE IN CHRISTMAS
- NAUGHTY CHRISTMAS
- WAITING FOR CHRISTMAS
- REDEEMING DECEMBER
- LET'S GET FROSTY
- MISTLETOE MAGIC
- WINTER FROST
- SEXY CRAZINESS
- COUNTRY GIRL
- BLACK ROSE
- NORTHERN EXPOSURE
- PUNKY CHRISTMAS
- MOUSE HOUSE
- MERRY CHRISTMAS
- WINTER GIRL
- FABULOUS DURING THE HOLIDAYS
- SNOW WHISPERS
-
▼
December
(19)
Monday, December 30, 2013
BELIEVE IN MIRACLES
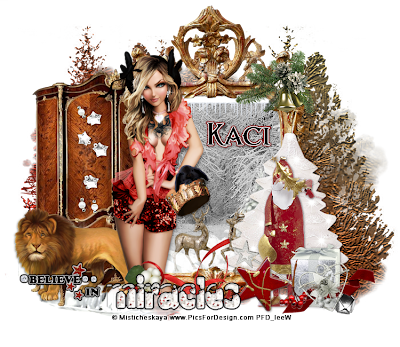
Supplies needed:
I am using the amazing art from Misticheskaya for for this tutorial, which you can find here
Scrapkit: I am using a beautiful kit from Scrappin Krazy Designs called "Narnia Christmas" which you can get by going here
Winter Mask 11 from Dee which you can find here
Plugins used: Eyecandy 4000 - Gradient Glow, Xero-Radiance, Lokas 3D Shadow
----------------------------
This tutorial is written for those who have working knowledge of PSPX2 (any version will do).
This tutorial was written by me on December 30, 2013. Please do not copy or paste on any other forum, website or blog provide link back to tut only. Please do not claim as your own. This tutorial is copyrighted to me. Any resemblance to any other tutorial is purely coincidental.
Ok - let's start and remember to save often.
Open up a 750 x 650 blank canvas (we can resize it later)
Select Frame Element 5 and paste in the center of the canvas
Reposition frame up about 1/2 inch from the top
Select your magic wand tool and click in the center of the Frame (Add (Shift), RGB Value, Tolerance 25, Contiguous checked, Feather 0)
Selections, Modify, Expand by 5
Paste paper 6
Select invert, delete, select none
Move paper layer below frame
Select Element 79 - resize by 55%
Image mirror and paste on bottom above paper layer
Paste tube of choice where desired
Apply Xero Radiance at setting of choice
Apply Lokas 3D Shadow at default settings
Select Element 3 - resize by 80%
Paste and position on left side below tube layer
Select Element 2 - resize by 40%
Paste and position on bottom left
Select Element 24 - resize by 80%
Paste and position on bottom right
Select Element 71 - resize by 70%
Paste and position on bottom right
Select Element 23 - resize by 30%
Paste and position on bottom right
Select Element 46 - resize by 30%
Paste and position on bottom right
Select Element 80 - resize by 50%
Paste and position on the bottom
Select Wordart Element 68 - resize by 65%
Paste and position on bottom left
Apply Eyecandy Gradient Glow on fat default settings (Glow width 3)
Add new raster layer and flood-fill with color or gradient of choice
Apply Mask 11
Merge group and move to bottom layer
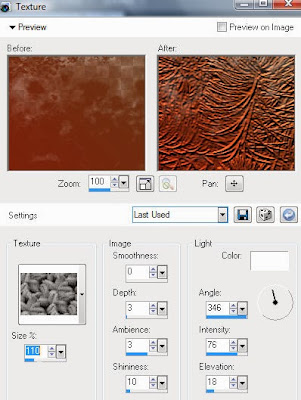
Effects, Texture Effects, Texture on the following Blue Spruce settings:
Add any additional elements you like.
Add any dropshadows you like
Sharpen any elements as needed
Crop and resize as desired
Add copyright info, license number and name
You're done! Thanks for trying my tutorial!
Labels:Scrappin Krazy Designs | 0
comments
NEW YEARS WISH
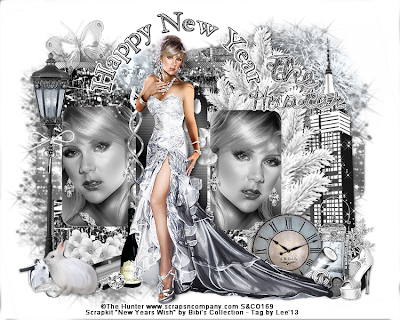
Supplies needed:
I am using the amazing artwork from The Hunter for this tutorial which you can find here
Scrapkit: I am using a beautiful matching kit from Bibi's Collections called "New Year Wish" which you can get by going here
Template 459 from Millie which can be found here
Mask 16 from Gina Gems which you can find here
New Years Wish Alphas by Designz by Sue which you can get here
Plugins used: Eyecandy 4000 Gradient Glow, Alien Skin Xenofex 2 - Constellation, Xero - Radiance, Xero - Bad Dream, Lokas 3D Shadow
----------------------------
This tutorial is written for those who have working knowledge of PSPX2 (any version will do).
This tutorial was written by me on December 30, 2013. Please do not copy or paste on any other forum, website or blog provide link back to tut only. Please do not claim as your own. This tutorial is copyrighted to me. Any resemblance to any other tutorial is purely coincidental.
Ok - let's start and remember to save often.
Open the template and using your shortcut keys on your keyboard (SHIFT+D) duplicate the template as a new image. Close the original and delete the copywrite layer.
Adjust canvas size by 750x650
Select Rectangle 7 layer
Select all, float, defloat
Add new raster layer and flood-fill with gradient or color of choice (Linear style, Angle 45, Repeat 2)
Paste close-up tube of choice on top of gradient and delete
Select none
Apply Xero Bad Dream at setting of choice
Change close-up tube to Luminance (Legacy)
Drop opacity down to 85%
Apply dropshadow and merge tube down on top of gradient layer
Delete/Hide original rectangle layer
Select Rectangle 5 layer and repeat above steps
Select Rectangle 6 layer
Select all, float, defloat
Add new raster layer and flood-fill with gradient or color of choice (Linear style, Angle 45, Repeat 2)
Select none
Effect, Texture Effects, Blinds (Width 2, Opacity 15, Horizontal and Light from left/top checked)
Delete/Hide original rectangle layer
Select Strip 4 layer
Select all, float, defloat
Paste paper 6
Select invert, delete, select none
Delete/Hide original strip layer
Select Square 3 layer
Select all, float, defloat
Paste paper 3
Select invert, delete, select none
Delete/Hide original square layer
Select Square 2 layer
Select all, float, defloat
Add new raster layer and flood-fill with gradient of choice
Select none
Delete/Hide orginal square layer
Select Circle 1 layer
Select all, float, defloat
Paste paper 2
Select invert, delete, select none
Delete/Hide original circle layer
Copy and paste tube of choice and position where desired
Apply Xero Radiance at setting of choice
Apply Lokas 3D Shadow at default settings
Select Element 38 - resize by 30%
Paste and position on left side
Select Element 4 - resize by 25%
Paste and position on bottom left
Select Element 24 - resize by 15%
Paste and position on bottom left
Select Element 44 - resize by 30%
Paste and position on bottom left
Select Element 78 - resize by 30%
Paste and position on bottom left
Select Element 83 - resize by 30%
Paste and position on bottom left
Select Element 28 - resize by 25%
Paste and position on bottom left
Select Element 22 - resize by 75%
Paste and position on right side
Select Element 99 - resize by 65%
Paste and position on right side
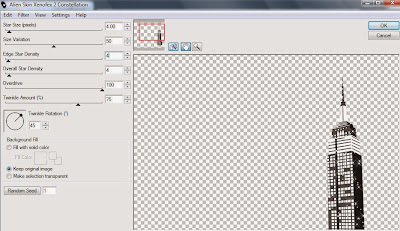
Apply Alien Skin Constellation with the following settings if desired:
Select Element 37 - resize by 15%
Paste and position on bottom right
Select Element 79 - resize by 12%
Paste and position on bottom right
Select Element 135 - resize by 8%
Paste and position on bottom right
Select Element 36 - resize by 15%
Paste and position on bottom right
Select Element 170 and paste on top where desired
Apply Eyecandy Gradient Glow on fat default settings (Glow width 3)
Select new raster layer and flood fill with color or gradient of choice
Move layer to the bottom of the template
Apply Mask 16
Merge group and move to the bottom
Add any additional elements you like.
Add any dropshadows you like
Crop and resize as desired
Add copyright info, license number and name
You're done! Thanks for trying my tutorial!
Labels:Bibi's Collections,Scraps N Company | 0
comments
Wednesday, December 25, 2013
BELIEVE IN CHRISTMAS
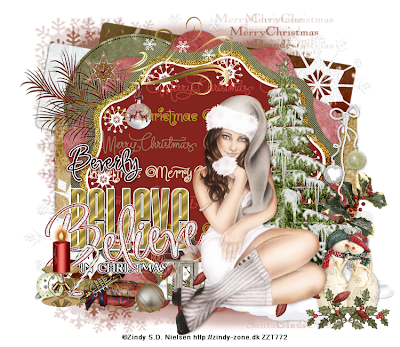
Supplies needed:
I am using the amazing artwork from Zindy S.D. Nielsen for this tutorial which you can find here
Scrapkit: I am using a beautiful kit from Horseplay's Pasture Designs called "Making Memories" which you can get by going here
Christmas Template 4 from Dee which can be found here
Mask 5 from Designs by Vaybs which you can find here
Plugins used: Penta - Jeans, Eyecandy 4000 Gradient Glow, Eyecandy 4000 - Glass, Xero - Radiance, Lokas 3D Shadow
----------------------------
This tutorial is written for those who have working knowledge of PSPX2 (any version will do).
This tutorial was written by me on December 25, 2013. Please do not copy or paste on any other forum, website or blog provide link back to tut only. Please do not claim as your own. This tutorial is copyrighted to me. Any resemblance to any other tutorial is purely coincidental.
Ok - let's start and remember to save often.
Open the template and using your shortcut keys on your keyboard (SHIFT+D) duplicate the template as a new image. Close the original and delete the copywrite layer.
Adjust canvas size by 750x650
Select Cursive Believe White Wordart layer
Adjust, Add/Remove Noise, Add Noise (Uniform checked, Noise 75%, Monochrome checked)
Apply Gradient Glow on fat default settings (Glow Width 3)
Delete/Hide original wordart layer
Select "In Christmas White" Wordart layer
Apply Gradient Glow on fat default settings (Glow Width 3)
Delete/Hide original wordart layer
Select "Block Believe Green" Wordart layer
Select all, float, defloat
Add new raster layer and flood-fill with color of choice
Select none
Effects, Texture Effects, Sculpture texture of choice on the following settings:
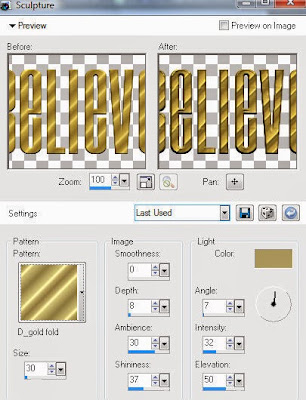
Delete/Hide original wordart layer
Select Red Center Shape layer
Select all, float, defloat
Paste paper 2
Select invert, delete, select none
Delete/Hide original shape layer
Select Dark Green center Shape layer
Select all, float, defloat
Paste paper 4
Select invert, delete, select none
Adjust, Add/Remove Noise, Add Noise (Uniform checked, Noise 65%, Monochrome checked)
Delete/Hide original shape layer
Select Light Green Center Shape layer
Select all, float, defloat
Paste paper 14
Select invert, delete, select none
Apply Penta - Jeans with the following settings:
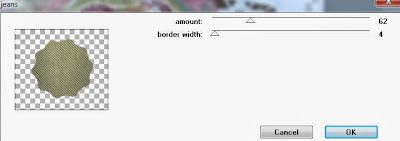
Delete/Hide original shape layer
Select Brown Center Shape layer
Select all, float, defloat
Paste paper 16
Select invert, delete, select none
Delete/Hide original shape layer
Select Top White Circle layer
Select all, float, defloat
Paste paper 5
Select invert, delete, select none
Delete/Hide original square layer
Select Bottom White Circle layer and repeat above steps
Select Dark Green Strip layer
Select all, float, defloat
Paste paper 6
Select invert, delete, select none
Delete/Hide original strip layer
Select Bottom Red Strip layer
Select all, float, defloat
Paste paper 8
Select invert, delete, select none
Delete/Hide original strip layer
Select Top Red Strip layer and repeat above steps
Select Light Green Square layer
Select all, float, defloat
Paste paper 18
Select invert, delete, select none
Delete/Hide original square layer
Copy and paste tube of choice and position where desired
Apply Xero Radiance at setting of choice
Apply Lokas 3D Shadow at default settings
Select Element 31 - resize by 85%
Paste and position on right side below tube layer
Select Element 15 - resize by 35%
Paste and position on bottom right
Select Element 48 - resize by 40%
Paste and position on bottom right
Select Element 37 - resize by 40%
Paste and position on top right
Select Element 25 - resize by 65%
Paste and position on top left
Select Element 40 - resize by 45%
Image mirror and paste on top left
Select Element 53 - resize by 45%
Paste and position on bottom left
Select Element 44 - resize by 35%
Paste and position on bottom left
Select Element 34 - resize by 20%
Image mirror and paste on bottom left
Select Element 35 - resize by 20%
Paste and position on bottom
Select new raster layer and flood fill with color or gradient of choice
Move layer to the bottom of the template
Apply Mask 5
Merge group and move to the bottom
Add any additional elements you like.
Add any dropshadows you like
Crop and resize as desired
Add copyright info, license number and name
You're done! Thanks for trying my tutorial!
Labels:Horseplay's Pasture Designs | 0
comments
Monday, December 23, 2013
NAUGHTY CHRISTMAS
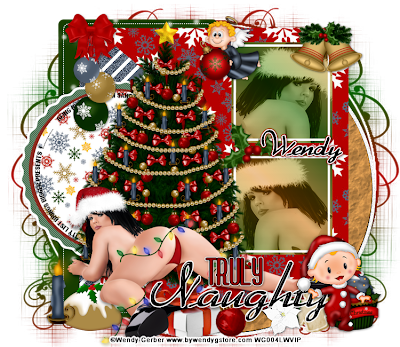
Supplies needed:
I am using the amazing artwork from Wendy Gerber for this tutorial which you can find here
Scrapkit: I am using a beautiful kit from Mistylynn's Creations called "Happy Christmas" which you can get by going here
Christmas Template 3 from Dee which can be found here
Mask 13 from Gabeez which you can find here
Plugins used: Penta - Jeans, Eyecandy 4000 Gradient Glow, Eyecandy 4000 - Glass, Xero - Radiance, Xero - Bad Dream, Lokas 3D Shadow
----------------------------
This tutorial is written for those who have working knowledge of PSPX2 (any version will do).
This tutorial was written by me on December 23, 2013. Please do not copy or paste on any other forum, website or blog provide link back to tut only. Please do not claim as your own. This tutorial is copyrighted to me. Any resemblance to any other tutorial is purely coincidental.
Ok - let's start and remember to save often.
Open the template and using your shortcut keys on your keyboard (SHIFT+D) duplicate the template as a new image. Close the original and delete the copywrite layer.
Adjust canvas size by 750x650
Select Truly Wordart layer
Add new raster layer and flood-fill with color of choice
Reselect wordart layer - Select all, float, defloat
Go back and select color layer you just filled
Select invert, delete, select none
Apply Gradient Glow on fat default settings (Glow Width 3)
Delete/Hide original wordart layer
Select Naughty Wordart layer
Apply Eyecandy Glass on default settings
Delete/Hide original wordart layer
Select Dark Green Shape layer
Select all, float, defloat
Add new raster layer and flood-fill with color of choice
Select none
Apply Penta - Jeans with the following settings:
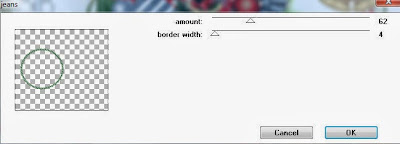
Delete/Hide original shape layer
Select Small White Circle layer
Select all, float, defloat
Paste paper 1
Select invert, delete, select none
Delete/Hide original circle layer
Select Penta Jeans Effect Arrow layer
Select your magic wand and select the red portions of the shape
Add new raster layer and flood-fill with color of choice
Select none
Adjust, Add/Remove Noise, Add Noise (Uniform checked, Noise 65%, Monochrome checked)
Select Small Dark Green Squares layer
Select all, float, defloat
Add new raster layer and flood-fill with gradient or color of choice (Linear style, Angle 45, Repeat 2)
Paste close-up tubes of choice on top of gradient and delete
Select none
Apply Xero Bad Dream at setting of choice
Change close-up tube to Luminance (Legacy)
Drop opacity down to 65%
Apply dropshadow and merge tubes down on top of gradient layer
Effect, Texture Effects, Blinds (Width 2, Opacity 15, Horizontal and Light from left/top checked)
Delete/Hide original squares layer
Select Light Green Square layer
Select all, float, defloat
Paste paper 9
Select invert, delete, select none
Delete/Hide original square layer
Select Dark Green Strip layer
Select all, float, defloat
Paste paper 5
Select invert, delete, select none
Delete/Hide original strip layer
Select Large Red Circle layer
Select all, float, defloat
Add new raster layer and flood-fill with color of choice
Select none
Effects, Texture Effects, Sculpture with the following settings:
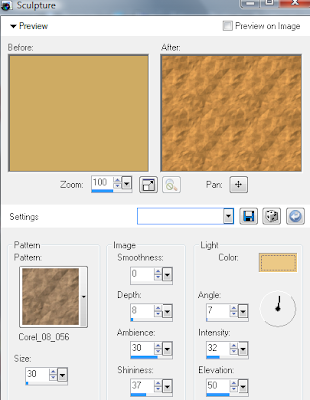
Delete/Hide original Circle layer
Copy and paste tube of choice and position where desired
Apply Xero Radiance at setting of choice
Apply Lokas 3D Shadow at default settings
Select Element 17 and paste on left side below tube layer
Select Element 37 - resize by 55%
Paste and position on top left
Select Element 35 - resize by 45%
Paste and position on top right
Select Element 32 - resize by 30%
Paste and position on bottom right
Select Element 24 - resize by 45%
Paste and position on bottom right
Select Element 23 - resize by 20%
Paste and position on bottom right
Select Element 47- resize by 45%
Paste and position on bottom below wordart
Select Element 16 - resize by 65%
Paste and position on bottom
Image Free Rotate Left by 15%
Select Element 60 - resize by 60%
Paste and position on bottom left
Select Element 15 - resize by 65%
Paste and position on bottom left
Select new raster layer and flood fill with color or gradient of choice
Move layer to the bottom of the template
Apply Mask 13
Merge group and move to the bottom
Add any additional elements you like.
Add any dropshadows you like
Crop and resize as desired
Add copyright info, license number and name
You're done! Thanks for trying my tutorial!
Labels:MistyLynn's Creations,Wendy Gerber | 0
comments
WAITING FOR CHRISTMAS
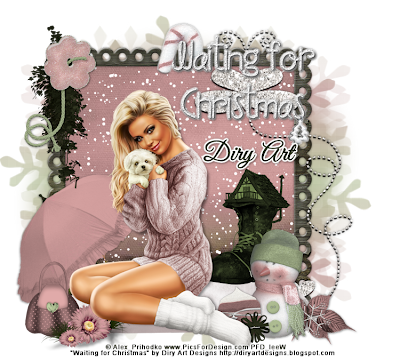
Supplies needed:
I am using the amazing art from Alex_Prihodko for for this tutorial, which you can find here
Scrapkit: I am using a beautiful kit from Diry Art Designs called "Waiting for Christmas" which you can get by going here
Masks 6 from Designs by Vaybs which you can find here
Plugins used: Vanderlee - Snowflakes, Penta - Color dot, Xero-Radiance, Lokas 3D Shadow
----------------------------
This tutorial is written for those who have working knowledge of PSPX2 (any version will do).
This tutorial was written by me on December 23, 2013. Please do not copy or paste on any other forum, website or blog provide link back to tut only. Please do not claim as your own. This tutorial is copyrighted to me. Any resemblance to any other tutorial is purely coincidental.
Ok - let's start and remember to save often.
Open up a 750 x 650 blank canvas (we can resize it later)
Select Frame Element 52 and paste in the center of the canvas
Resize by 60%
Select your magic wand tool and click in the center of the Frame (Add (Shift), RGB Value, Tolerance 25, Contiguous checked, Feather 0)
Selections, Modify, Expand by 3
Paste paper 10
Select invert, delete, select none
Move paper layer below frame
Add new raster layer and apply Vanderlee Snowflakes with the following settings:
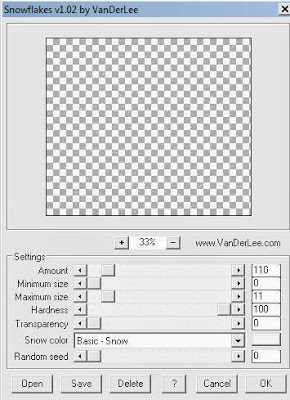
Select paper layer
Select all, float, defloat
Reselect snow layer and delete, select none
Select Element 22 - resize by 50%
Paste and position on bottom of frame
Select Element 34 - resize by 50%
Paste and position on bottom left
Paste tube of choice where desired
Apply Xero Radiance at setting of choice
Apply Lokas 3D Shadow at default settings
Select Wordart Element 55 - resize by 45%
Paste and position on top right
Select Element 7 - resize by 45%
Paste and position on top left
Select Element 47 - resize by 30%
Paste and position on top left
Select Element 4 - resize by 30%
Paste and position on bottom right
Select Element 10 - resize by 30%
Paste and position on bottom right
Select Element 1 - resize by 35%
Paste and position on bottom right
Select Element 24 - resize by 20%
Paste and position on bottom right
Select Element 27 - resize by 10%
Paste and position on bottom right
Select Element 32 - resize by 25%
Paste and position on bottom left
Select Element 9 - resize by 30%
Paste and position on bottom left
Add new raster layer and flood-fill with color or gradient of choice
Apply Mask 6
Merge group and move to bottom layer
Apply Penta - Color dot with the following settings if desired:
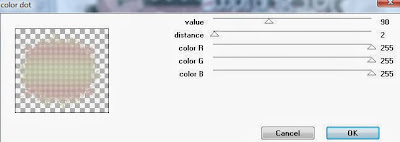
Add any additional elements you like.
Add any dropshadows you like
Sharpen any elements as needed
Crop and resize as desired
Add copyright info, license number and name
You're done! Thanks for trying my tutorial!
Labels:Diry Art Designs | 0
comments
REDEEMING DECEMBER
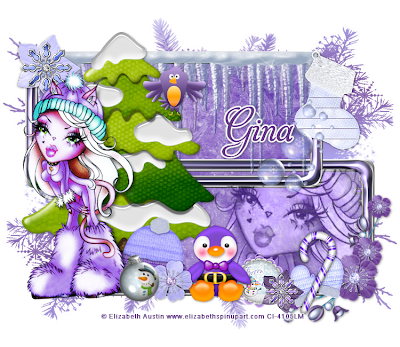
Supplies needed:
I am using the amazing art from Elizabeth Austin for for this tutorial, which you can find here
Scrapkit: I am using a beautiful kit from Thrifty Scraps by Gina called "Redeeming December" which you can get by going here
Masks 4 from Dee which you can find here
Plugins used: Xero-Radiance, Lokas 3D Shadow
----------------------------
This tutorial is written for those who have working knowledge of PSPX2 (any version will do).
This tutorial was written by me on December 23, 2013. Please do not copy or paste on any other forum, website or blog provide link back to tut only. Please do not claim as your own. This tutorial is copyrighted to me. Any resemblance to any other tutorial is purely coincidental.
Ok - let's start and remember to save often.
Open up a 750 x 650 blank canvas (we can resize it later)
Select Frame Element 3 and paste in the center of the canvas
Resize by 30%
Select your magic wand tool and click in the center of the Frame (Add (Shift), RGB Value, Tolerance 25, Contiguous checked, Feather 0)
Selections, Modify, Expand by 4
Paste paper 10
Select invert, delete,
Paste a close-up tube of choice on the top of paper where desired and delete, select none
Change close-up to Luminance (Legacy)
Apply Bad Dream on default settings of choice
Drop opacity down to 55%
Apply dropshadow and merge tube down on top of paper layer
Move paper/tube layer below frame
Select Ice Element - resize by 15%
Paste and position on top of frame
Paste tube of choice where desired
Apply Xero Radiance at setting of choice
Apply Lokas 3D Shadow at default settings
Select Tree 02 Element - resize by 15%
Paste and position on left side below tube layer
Select Branch02 Element - resize by 15%
Image mirror and paste on bottom right
Select Journal 03 Element - resize by 20%
Paste and position on top right
Select Mittens Element - resize by 8%
Paste and position on bottom right
Select Candycane01 Element - resize by 14%
Paste and position on bottom right
Image Free Rotate Right by 15%
Select Flower07 Element - resize by 10%
Paste and position on bottom right
Select Ornament01 Element - resize by 10%
Paste and position on bottom
Select Penguin02 Element - resize by 12%
Paste and position on bottom
Select Cap01 Element - resize by 8%
Paste and position on bottom
Select Flower04 Element - resize by 10%
Paste and position on bottom
Select Ornament03 Element - resize by 10%
Paste and position on bottom
Image Free Rotate Left by 15%
Select Flower08 Element - resize by 15%
Paste and position on top left
Add new raster layer and flood-fill with color or gradient of choice
Apply Mask 4
Merge group and move to bottom layer
Image duplicate, mirror and flip
Add any additional elements you like.
Add any dropshadows you like
Sharpen any elements as needed
Crop and resize as desired
Add copyright info, license number and name
You're done! Thanks for trying my tutorial!
Labels:Thrifty Scraps by Gina | 0
comments
Sunday, December 22, 2013
LET'S GET FROSTY
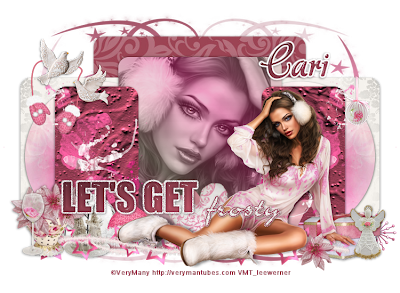
Supplies needed:
I am using the amazing artwork from VeryMany for this tutorial which you can find here
Scrapkit: I am using a beautiful kit from Black Widow Creationz called "Kailee" which you can get by going here
Template 456 from Millie which can be found here
Mask 433 from Vix which you can find here
Water textures here
Plugins used: Eyecandy 4000 - Glass, Xero - Radiance, Xero - Bad Dream, Lokas 3D Shadow
----------------------------
This tutorial is written for those who have working knowledge of PSPX2 (any version will do).
This tutorial was written by me on December 22, 2013. Please do not copy or paste on any other forum, website or blog provide link back to tut only. Please do not claim as your own. This tutorial is copyrighted to me. Any resemblance to any other tutorial is purely coincidental.
Ok - let's start and remember to save often.
Open the template and using your shortcut keys on your keyboard (SHIFT+D) duplicate the template as a new image. Close the original and delete the copywrite layer.
Adjust canvas size by 750x550
Select Wordart 10 layer
Select all, float, defloat
Add new raster layer and flood-fill with color of choice
Select none
Adjust, Add/Remove Noise, Add Noise (Uniform checked, Noise 75%, Monochrome checked)
Apply Gradient Glow on fat default settings (Glow Width 3)
Delete/Hide original wordart layer
Select Wordart 9 layer
Select all, float, defloat
Add new raster layer and flood-fill with color of choice
Select none
Apply Eyecandy Glass on default settings
Apply Eyecandy Gradient Glow on fat default settings (Glow Width 3)
Delete/Hide original wordart layer
Select Rectangle 8 layer
Select all, float, defloat
Add new raster layer and flood-fill with color of choice
Select none
Apply Effects, Texture Effects, Water Texture with the following settings:
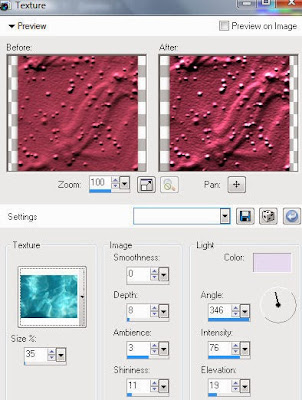
Delete/Hide original rectangle layer
Select Rectangle 7 layer and repeat above steps
Select Element 32 - resize by 65%
Paste and position on top of rectangle 7 layer
Image duplicate and mirror
Select Square 6 layer
Select all, float, defloat
Add new raster layer and flood-fill with gradient or color of choice (Linear style, Angle 45, Repeat 2)
Paste close-up tube of choice on top of gradient and delete
Select none
Apply Xero Bad Dream at setting of choice
Change close-up tube to Luminance (Legacy)
Drop opactiy down to 75%
Apply dropshadow and merge tube down on top of gradient layer
Effect, Texture Effects, Blinds (Width 2, Opacity 15, Horizontal and Light from left/top checked)
Delete/Hide original circle layer
Select Circle 5 layer
Select all, float, defloat
Paste paper 3
Select invert, delete, select none
Delete/Hide original circle layer
Select Circle 4 layer and repeat above steps
Select Square 3 layer
Select all, float, defloat
Paste paper 8
Select invert, delete, select none
Delete/Hide original square layer
Select Square 4 layer and repeat above steps
Select Square 1 layer
Select all, float, defloat
Paste paper 10
Select invert, delete, select none
Delete/Hide original square layer
Copy and paste tube of choice and position where desired
Apply Xero Radiance at setting of choice
Apply Lokas 3D Shadow at default settings
Select Element 1 - resize by 65%
Paste and position on bottom below tube layer
Select Element 36 - resize by 50%
Paste and position on bottom below tube layer
Image Free Rotate Left by 15%
Select Element 37 - resize by 35%
Paste and position on bottom right
Select Element 11 - resize by 30%
Paste and position on bottom right
Select Element 19 - resize by 20%
Paste and position on bottom right
Select Element 20 - resize by 40%
Paste and position on bottom left
Select Element 347 - resize by 20%
Paste and position on bottom left
Select Element 17 - resizze by 35%
Paste and position on bottom left
Select Element 16 - resize by 35%
Paste and position on top left
Select Element 5 - resize by 45%
Paste and position on top left
Select new raster layer and flood fill with color or gradient of choice
Move layer to the bottom of the template
Apply Mask 433
Merge group and move to the bottom
Add any additional elements you like.
Add any dropshadows you like
Crop and resize as desired
Add copyright info, license number and name
You're done! Thanks for trying my tutorial!
Labels:Black Widow Creationz | 0
comments
MISTLETOE MAGIC
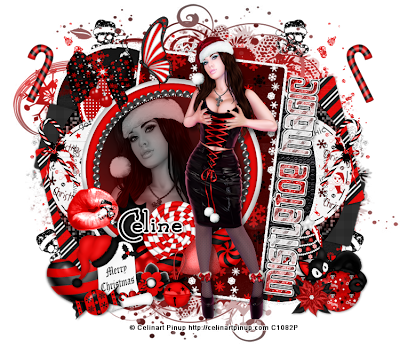
Supplies needed:
I am using the amazing artwork from Celinart Pinup for this tutorial which you can find here
Scrapkit: I am using a stunning kit from Toxic Desirez called "Gothic Christmas" which you can get by going here
Template 9 from Dee which can be found here
Winter Mask 3 from Dee which you can find here
Plugins used: Penta - Color dot, Eyecandy - Gradient Glow, Eyecandy 4000 - Glass, Xero - Radiance, Xero - Bad Dream, Lokas 3D Shadow
----------------------------
This tutorial is written for those who have working knowledge of PSPX2 (any version will do).
This tutorial was written by me on December 22, 2013. Please do not copy or paste on any other forum, website or blog provide link back to tut only. Please do not claim as your own. This tutorial is copyrighted to me. Any resemblance to any other tutorial is purely coincidental.
Ok - let's start and remember to save often.
Open the template and using your shortcut keys on your keyboard (SHIFT+D) duplicate the template as a new image. Close the original and delete the copywrite layer.
Select Wordart Green layer
Select all, float, defloat
Add new raster layer and flood-fill with color or gradient of choice
Select none
Adjust, Add/Remove Noise, Add Noise (Uniform checked, Noise 65%, Monochrome checked)
Apply Eyecandy Glass on default settings
Delete/Hide original wordart layer
Select Wordart White layer and apply Gradient Glow on fat default settings if desired
Select Center Brown Circle layer
Select all, float, defloat
Add new raster layer and flood-fill with gradient or color of choice (Linear style, Angle 45, Repeat 2)
Paste close-up tubes of choice on top of gradient and delete
Select none
Apply Xero Bad Dream at setting of choice
Change close-up tube to Luminance (Legacy)
Drop opactiy down to 65%
Apply dropshadow and merge tube down on top of gradient layer
Effect, Texture Effects, Blinds (Width 2, Opacity 15, Horizontal and Light from left/top checked)
Delete/Hide original circle layer
Select Frame 1 Element - resize by 55%
Paste and position over circle layer
Select Red Rectangle layer
Select all, float, defloat
Paste paper 22
Select invert, delete, select none
Delete/Hide original rectangle layer
Select Center Dark Green Circle layer
Select all, float, defloat
Paste paper 1
Select invert, delete, select none
Apply Effects, Texture Effects, Texture with the following Mosaic texture settings:
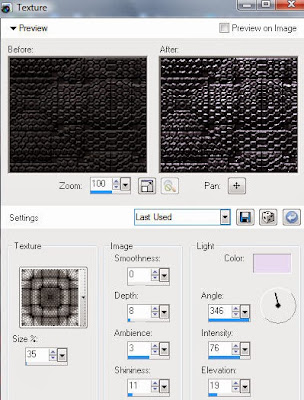
Delete/Hide original circle layer
Select Right White Circle layer
Select all, float, defloat
Paste paper 10
Select invert, delete, select none
Delete/Hide original circle layer
Select Left White Circle layer and repeat above steps
Select Bottom Red Circle layer
Select all, float, defloat
Add new raster layer and flood-fill with color of choice
Select none
Apply Effects, Texture Effects, Weave (Gap size 2, Width 4, Opacity 5, Fill gaps checked, change Gap and Weave color to one of choice)
Delete/Hide original circle layer
Select Top Red Circle layer and repeat above steps
Select Light Green Oval layer
Select all, float, defloat
Add new raster layer and flood-fill with gradient of choice
Select none
Apply Xero - Fritillary with the following settings:
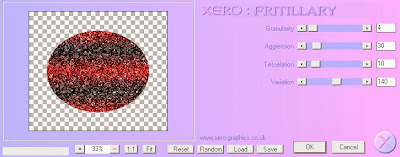
Delete/Hide original oval layer
Select Brown Strip layer
Select all, float, defloat
Paste paper 26
Select invert, delete, select none
Delete/Hide original strip layer
Select Dark Green Strip layer
Select all, float, defloat
Add new raster layer and flood-fill with color of choice
Select none
Apply Penta - color dot with the following settings:
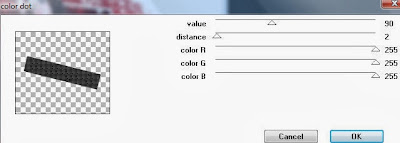
Delete/Hide original strip layer
Select Brown Circles layer
Select all, float, defloat
Paste paper 16
Select invert, delete, select none
Delete/Hide original circles layer
Copy and paste tube of choice and position where desired
Apply Xero Radiance at setting of choice
Apply Lokas 3D Shadow at default settings
Select Cat & Bauble Element - resize by 22%
Paste and position on bottom right
Select Poinsettia Element - resize by 15%
Paste and position on bottom right
Select Heart Element - resize by 25%
Paste and position on bottom left
Image Free Rotate left by 15%
Select Scroll Element - resize by 25%
Paste and position on bottom left
Select Candy 3 Element - resize by 20%
Paste and position on bottom left
Image Free Rotate left by 15%
Select Flower 1 Element - resize by 20%
Paste and position on bottom left
Select Jingle Bell Element - resize by 20%
Paste and position on bottom
Select Bow 1 Element - resize by 25%
Paste and position on top left
Select Candy Cane Element - resize by 20%
Paste and position on right side
Image, duplicate and mirror
Select Lips Element - resize by 32%
Paste and position on left side
Image Free Rotate Left by 15%
Select Splatter Element and position where desired on left side
Image, duplicate mirror and merge down
Move layer down to the bottom
Select new raster layer and flood fill with color or gradient of choice
Move layer to the bottom of the template
Apply Mask 3
Merge group and move to the bottom
Add any additional elements you like.
Add any dropshadows you like
Crop and resize as desired
Add copyright info, license number and name
You're done! Thanks for trying my tutorial!
Labels:Celine | 0
comments
Saturday, December 21, 2013
WINTER FROST
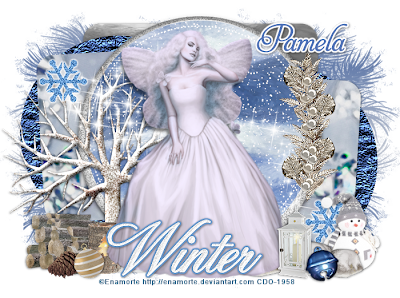
Supplies needed:
I am using the amazing artwork from Enamorte for this tutorial which you can find here
Scrapkit: I am using a beautiful kit from Redefined Designs called "Winter Frost" which you can get by going here
Template 458 from Millie which can be found here
Winter Mask 12 from Dee which you can find here
Plugins used: Eyecandy 4000 - Glass, Eyecandy 4000 - Gradient Glow, Vanderlee - Snowflakes, Xero - Radiance, Lokas 3D Shadow
----------------------------
This tutorial is written for those who have working knowledge of PSPX2 (any version will do).
This tutorial was written by me on December 21, 2013. Please do not copy or paste on any other forum, website or blog provide link back to tut only. Please do not claim as your own. This tutorial is copyrighted to me. Any resemblance to any other tutorial is purely coincidental.
Ok - let's start and remember to save often.
Open the template and using your shortcut keys on your keyboard (SHIFT+D) duplicate the template as a new image. Close the original and delete the copywrite layer.
Select Snowflake 11 layer
Select all, float, defloat
Add new raster layer and flood-fill with color of choice
Select none
Adjust, Add/Remove Noise, Add Noise (Uniform checked, Noise 65%, Monochrome checked)
Delete/Hide original snowflake layer
Select Snowflake 12 layer and repeat above steps
Select Wordart layers 9 and 10 and delete if desired
Select Circle 7 layer
Select all, float, defloat
Paste paper 7
Select invert, delete, select none
Add new raster layer and apply Vanderlee Snowflakes with the following settings:
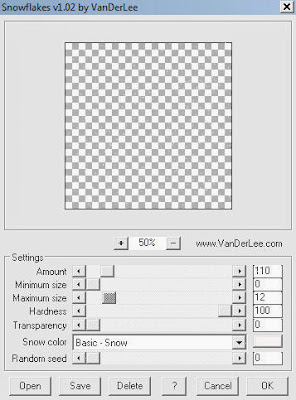
Reselect paper layer
Select all, float, defloat
Go back to snowflake layer and delete, select none
Delete/Hide original circle layer
Select Rectangle 5 layer
Select all, float, defloat
Paste paper 9
Select invert, delete, select none
Delete/Hide original rectangle layer
Select Rectangle 4 layer and repeat above steps
Select Circle 3 layer
Select all, float, defloat
Add new raster layer and flood-fill with color of choice
Select none
Apply Effects, Texture Effects, Texture with the following Blue Spruce texture:
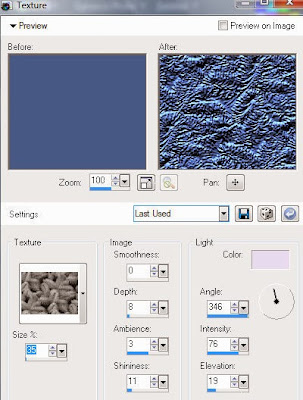
Delete/Hide original rectangle layer
Select Circle 2 layer and repeat above steps
Select Rectangle 1 layer
Select all, float, defloat
Paste paper 6
Select invert, delete, select none
Delete/Hide original rectangle layer
Copy and paste tube of choice and position where desired
Apply Xero Radiance at setting of choice
Apply Lokas 3D Shadow at default settings
Select Tree2 Element - resize by 55%
Paste and position on left side below tube layer
Select Cluster 2 layer - resize by 25%
Image mirror and paste on right side
Select Logs Element - resize by 30%
Paste and position on bottom left
Select Candle Element - resize by 10%
Paste and position on bottom left
Select Ornament Element - resize by 10%
Paste and position on bottom left
Image Free Rotate Left by 15%
Select Pinecone Element - resize by 10%
Paste and position on bottom left
Select Snowman Element - resize by 25%
Paste and position on bottom right
Select Rocks Element - resize by 35%
Paste and position on bottom right
Select Bell Element - resize by 10%
Paste and position on bottom right
Image Free Rotate Left by 15%
Select Lantern Element - resize by 25%
Paste and position on bottom right
Select Winter WA Element - resize by 45%
Paste and position on bottom
Apply Eyecandy Gradient Glow on fat default settings (Glow Width 3)
Select new raster layer and flood fill with color or gradient of choice
Move layer to the bottom of the template
Apply Mask 12
Merge group and move to the bottom
Add any additional elements you like.
Add any dropshadows you like
Crop and resize as desired
Add copyright info, license number and name
You're done! Thanks for trying my tutorial!
Labels:Redefined Designs | 0
comments
Friday, December 20, 2013
SEXY CRAZINESS
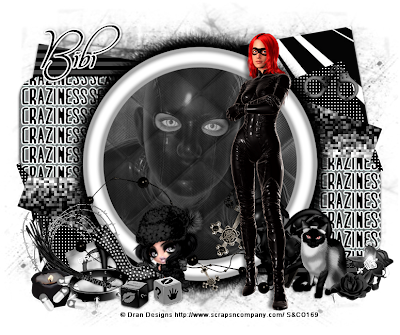
Supplies needed:
I am using the amazing artwork from Dran Design for this tutorial which you can find here
Scrapkit: I am using a stunning matching kit from Bibi's Collections called "Sexy Craziness" which you can get by going here
Template 190 from Kristen which can be found here
Mask 112 from Trese which you can find here
Plugins used: VM Extravaganza - Transmission, Xero - Fritillary, Xero-Radiance, Xero - Bad Dream, Lokas 3D Shadow
----------------------------
This tutorial is written for those who have working knowledge of PSPX2 (any version will do).
This tutorial was written by me on December 20, 2013. Please do not copy or paste on any other forum, website or blog provide link back to tut only. Please do not claim as your own. This tutorial is copyrighted to me. Any resemblance to any other tutorial is purely coincidental.
Ok - let's start and remember to save often.
Open the template and using your shortcut keys on your keyboard (SHIFT+D) duplicate the template as a new image. Close the original and delete the copywrite layer.
Select Circle Raster 2 layer
Select all, float, defloat
Paste paper 5
Select invert, delete
Paste close-up tube of choice on top of paper layer and delete
Select none
Apply Xero Bad Dream at setting of choice to close-up
Change close-up tube to Luminance (Legacy)
Drop opacity down to 60%
Apply dropshadow and merge tube down on top of paper layer
Delete/Hide original circle layer
Select Frame Element 63 - resize by 90%
Paste and position on top of circle layer
Select Copy of Raster 1 layer
Select all, float, defloat
Paste paper 1
Select invert, delete, select none
Delete/hide original rectangle layer
Select Copy(2) of Raster 1 layer and repeat above steps
Select Square Copy of Raster 3 layer
Select all, float, defloat
Add new raster layer and flood-fill with gradient of choice
Select none
Apply Xero Fritillary with the following settings:
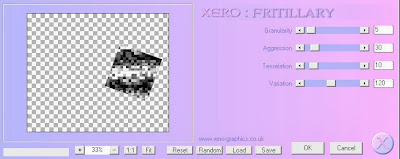
Delete/Hide original square layer
Select Square Raster 3 layer and repeat above steps
Select Rectangle Copy of Raster 6 layer
Select all, float, defloat
Add new raster layer and flood-fill with color of choice
Select none
Apply VM Transmission with the following settings:
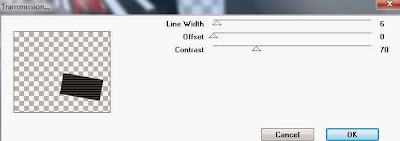
Delete/Hide original rectangle layer
Select Rectangle Raster 6 layer and repeat above steps
Select Square Copy of Raster 5 layer
Select all, float, defloat
Add new raster layer and flood-fill with color of choice
Select none
Apply Effects, Texture Effects, Weave (Gap size 2, Width 4, Opacity 5, Fill gaps checked, change Gap and Weave color to one of choice)
Delete/Hide original square layer
Select Square Raster 5 layer and repeat above steps
Select Rectangle Copy of Raster 7 layer
Select all, float, defloat
Paste paper 6
Select invert, delete, select none
Delete/Hide original rectangle layer
Select Rectangle Raster 7 layer and repeat above steps
Copy and paste tube of choice and position where desired
Apply Xero Radiance at setting of choice
Apply Lokas 3D Shadow at default settings
Select Element 23 - resize by 30%
Paste and position on bottom right
Select Element 48 - resize by 20%
Paste and position on bottom right
Select Element 60 - resize by 25%
Paste and position on bottom right
Select Element 10 - resize by 25%
Paste and position on bottom right
Select Element 58 - resize by 30%
Paste and position on bottom left
Select Element 32 - resize by 80%
Select Element 41 - resize by 30%
Paste and position on bottom left
Paste and position on bottom left
Select Element 11 - resize by 35%
Paste and position on bottom left
Select Element 7 - resize by 35%
Paste and position on bottom left
Select element 40 - resize by 35%
Paste and position on bottom left
Select Element 14 - resize by 20%
Paste and position on bottom left
Select Element 61 - resize by 35%
Paste and position on bottom left
Select new raster layer and flood fill with color or gradient of choice
Move layer to the bottom of the template
Apply Mask 112
Merge group and move to the bottom
Add any additional elements you like.
Add any dropshadows you like
Crop and resize as desired
Add copyright info, license number and name
You're done! Thanks for trying my tutorial!
Labels:Bibi's Collections,Scraps N Company | 0
comments
COUNTRY GIRL
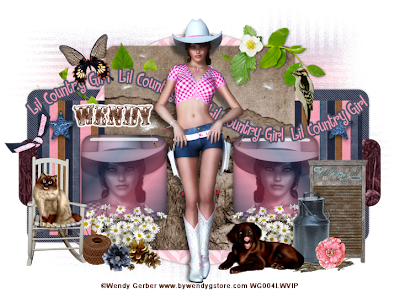
Supplies needed:
I am using the amazing artwork from Wendy Gerber for this tutorial which you can find here
Scrapkit: I am using a beautiful kit from Scrappin Krazy Designs called "Country Girl" which you can get by going here
Template 442 from Millie which can be found here
Mask 81 from Weescotslass which you can find here
Plugins used: Alien Skin Eyecandy 5 - Impact - Glass, Penta - Jeans, Eyecandy 4000 - Gradient Glow, Xero-Radiance, Xero - Bad Dream, Lokas 3D Shadow
----------------------------
This tutorial is written for those who have working knowledge of PSPX2 (any version will do).
This tutorial was written by me on December 20, 2013. Please do not copy or paste on any other forum, website or blog provide link back to tut only. Please do not claim as your own. This tutorial is copyrighted to me. Any resemblance to any other tutorial is purely coincidental.
Ok - let's start and remember to save often.
Open the template and using your shortcut keys on your keyboard (SHIFT+D) duplicate the template as a new image. Close the original and delete the copywrite layer.
Select Star 9 layer
Select all, float, defloat
Add new raster layer and flood-fill with color of choice
Select none
Adjust, Add/Remove Noise, Add Noise (Uniform checked, Noise 70%, Monochrome checked)
Apply Eyecandy Glass on default settings
Delete/Hide original star layer
Select Star 10 layer and repeat above steps
Select Square 8 layer
Select all, float, defloat
Add new raster layer and flood-fill with gradient or color of choice (Linear style, Angle 45, Repeat 2)
Paste close-up tube of choice on top of gradient and delete
Select none
Apply Xero Bad Dream at setting of choice
Change close-up tube to Luminance (Legacy)
Drop opacity down to 70%
Apply dropshadow and merge tube down on top of gradient layer
Effect, Texture Effects, Blinds (Width 2, Opactity 15, Horizontal and Light from left/top checked)
Apply Eyecandy Glass on the clear default setting
Delete/Hide original square layer
Select Square 7 layer and repeat above steps
Select Rectangle 6 layer
Select all, float, defloat
Paste paper 5
Select invert, delete, select none
Delete/hide original rectangle layer
Select Rectangle 5 layer
Select all, float, defloat
Paste paper 18
Select invert, delete, select none
Delete/Hide original rectangle layer
Select Rectangle 4 layer and repeat above steps
Select Strip 3 layer
Select all, float, defloat
Paste paper 6
Select invert, delete, select none
Delete/Hide original strip layer
Select Circle 2 layer
Select all, float, defloat
Paste paper 1
Select invert, delete, select none
Delete/Hide original circle layer
Select Rectangle 1 layer
Select all, float, defloat
Paste paper 13
Select invert, delete, select none
Apply Penta - Jeans with the following settings:
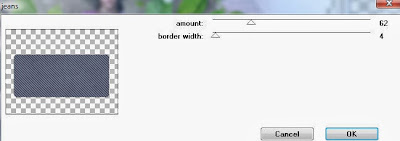
Delete/Hide original rectangle layer
Copy and paste tube of choice and position where desired
Apply Xero Radiance at setting of choice
Apply Lokas 3D Shadow at default settings
Select Element 1 and paste where desired below tube layer
Select Element 75 - resize by 55%
Image mirror and paste on top right
Select Element 18 - resize by 55%
Paste and position on bottom right
Select Element 24 - resize by 35%
Paste and position on bottom right
Select Element 34 - resize by 20%
Paste and position on bottom right
Select Element 57 - resize by 40%
Paste and position on bottom right
Image duplicate and mirror
Select Element 88 - resize by 40%
Paste and position on bottom right
Select Element 29 - resize by 50%
Paste and position on bottom left
Select Element 85 - resize by 25%
Paste and position on left side
Select Element 36 - resize by 25%
Paste and position on bottom left
Select Element 23 - resize by 18%
Paste and position on bottom left
Select Element 70 - resize by 20%
Paste and position on bottom left
Select Element 51 - resize by 35%
Paste and position on top left
Image Free Rotate Left by 15%
Select new raster layer and flood fill with color or gradient of choice
Move layer to the bottom of the template
Apply Mask 81
Merge group and move to the bottom
Add any additional elements you like.
Add any dropshadows you like
Crop and resize as desired
Add copyright info, license number and name
You're done! Thanks for trying my tutorial!
Labels:Scrappin Krazy Designs,Wendy Gerber | 0
comments
Thursday, December 19, 2013
BLACK ROSE
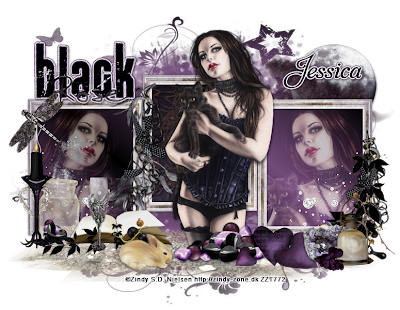
Supplies needed:
I am using the amazing art from Zindy S.D. Nielsen for for this tutorial, which you can find here
Scrapkit: I am using a stunning kit from Gothic Inspirations called "Black Rose" which you can get by going here
Mask 363 from Vix which you can find here
Plugins used: Eyecandy 4000 - Gradient Glow, Xero-Radiance, Xero-Bad Dream, Lokas 3D Shadow
----------------------------
This tutorial is written for those who have working knowledge of PSPX2 (any version will do).
This tutorial was written by me on December 19, 2013. Please do not copy or paste on any other forum, website or blog provide link back to tut only. Please do not claim as your own. This tutorial is copyrighted to me. Any resemblance to any other tutorial is purely coincidental.
Ok - let's start and remember to save often.
Open up a 775 x 600 blank canvas (we can resize it later)
Select Frame Element 5 and paste in the center of the canvas
Resize by 70%
Select your magic wand tool and click in the center square of the Frame (Add (Shift), RGB Value, Tolerance 25, Contiguous checked, Feather 0)
Selections, Modify, Expand by 5
Paste paper 6
Select invert, delete, select none
Move paper layer down below frame layer
Reselect your magic wand tool and click in the left and right squares of the Frame (Add (Shift), RGB Value, Tolerance 25, Contiguous checked, Feather 0)
Selections, Modity, Expand by 5
Add new raster layer and flood-fill with gradient of choice (Linear style, Angle 45, Repeat 2)
Paste a close-up tubed of choice on the top of the gradient layers where desired and delete, select none
Change close-ups to Screen
Drop opactiy down to 65% for both
Apply Bad Dream on default settings of choice to close-ups
Apply dropshadow and merge tubes down on top of gradient layer
Effect, Texture Effects, Blinds (Width 2, Opactity 15, Horizontal and Light from left/top checked)
Move gradient/tube layer below frame
Paste tube of choice where desired
Apply Xero Radiance at setting of choice
Apply Lokas 3D Shadow at default settings
Select Ground Element - resize by 80%
Paste and position on bottom and move below frame layer
Select Cluster Element - resize by 40%
Image mirror and paste on bottom right
Select Lantern Element - resize by 25%
Paste and position on bottom right
Select RockAmethyst Element - resize by 35%
Paste and position on bottom right
Select Hearts Element - resize by 25%
Paste and position on bottom right
Select Pebbles Element - resize by 50%
Paste and position on bottom
Select Dragonfly Element - resize by 20%
Image mirror and paste on top left
Select Candle Element - resize by 35%
Paste and position on bottom left
Select BottledMagic Element - resize by 30%
Paste and position on bottom left
Select BookwLeaves Element - resize by 30%
Paste and position on bottom left
Select Glass Element - resize by 25%
Paste and position on bottom left
Select Rabbit Element - resize by 25%
Paste and position on bottom
Select Moon Element - resize by 30%
Paste and position on top right
Select Effect Element - resize by 40%
Image mirror and paste on top right above moon
Free Rotate Left by 25%
Select WA3 Element - resize by 45%
Paste and position on top left
Apply Eyecandy Gradient Glow on fat default settings (Glow Width 3)
Add new raster layer and flood-fill with gradient of choice
Apply Mask 363
Merge group and move to bottom layer
Add any additional elements you like.
Add any dropshadows you like
Sharpen any elements as needed
Crop and resize as desired
Add copyright info, license number and name
You're done! Thanks for trying my tutorial!
Labels:Gothic Inspirations | 1 comments
Saturday, December 14, 2013
NORTHERN EXPOSURE
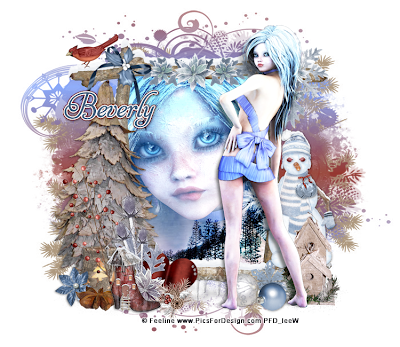
Supplies needed:
I am using the amazing art from Feeline for for this tutorial, which you can find here
Scrapkit: I am using a beautiful kit from HorsePlays Pasture Designs called "Northern Exposure" which you can get by going here
Masks 2 and 3 from Dee which you can find here
Plugins used: Xero-Radiance, Xero-Bad Dream, Lokas 3D Shadow
----------------------------
This tutorial is written for those who have working knowledge of PSPX2 (any version will do).
This tutorial was written by me on December 14, 2013. Please do not copy or paste on any other forum, website or blog provide link back to tut only. Please do not claim as your own. This tutorial is copyrighted to me. Any resemblance to any other tutorial is purely coincidental.
Ok - let's start and remember to save often.
Open up a 750 x 650 blank canvas (we can resize it later)
Select Frame Element 11 and paste in the center of the canvas
Resize by 88%
Select your magic wand tool and click in the center of the Frame (Add (Shift), RGB Value, Tolerance 25, Contiguous checked, Feather 0)
Selections, Modify, Expand by 5
Paste paper 16
Select invert, delete,
Paste a close-up tube of choice on the top of paper where desired and delete, select none
Change close-up to Overlay
Apply Bad Dream on default settings of choice
Apply dropshadow and merge tube down on top of paper layer
Move paper/tube layer below frame
Paste tube of choice where desired
Apply Xero Radiance at setting of choice
Apply Lokas 3D Shadow at default settings
Select Element 18 - resize by 75%
Paste and position on left side
Select Element 10 - resize by 50%
Paste and position on the top center of the frame
Select Element 41 - resize by 55%
Paste and position on top left
Select Element 77 - resize by 25%
Paste and position on top left
Select Element 45 - resize by 25%
Paste and position on bottom left
Select Element 23 - resize by 25%
Paste and position on bottom left
Select Element 2 - resize by 25%
Paste and position on bottom left
Select Element 5 - resize by 50%
Paste and position on bottom left
Select Element 64 - resize by 65%
Image Free Rotate Right by 15% and paste on bottom left
Select Element 53 - resize by 25%
Paste and position on bottom left
Select Element 30 - resize by 20%
Paste and position on bottom left
Select Element 1 - resize by 65%
Paste and position on right side
Select Element 24 - resize by 45%
Paste and position on bottom right
Select Element 19 - resize by 20%
Paste and position on bottom right
Add new raster layer and flood-fill with color of choice
Apply Mask 2
Merge group and move to bottom layer
Add new raster layer and flood-fill with color or gradient of choice
Move to bottom layer
Apply Mask 3 and merge group
Add any additional elements you like.
Add any dropshadows you like
Sharpen any elements as needed
Crop and resize as desired
Add copyright info, license number and name
You're done! Thanks for trying my tutorial!
Labels:Horseplay's Pasture Designs | 0
comments
PUNKY CHRISTMAS
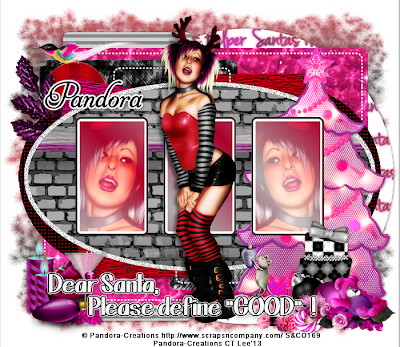
Supplies needed:
I am using the amazing artwork from Pandora Creations for this tutorial which you can find here
Scrapkit: I am using a beautiful matching kit from Bibi's Collections called "Santa's Helper" which you can get by going here
Christmas Template 5 from Dee which can be found here
DMask 612 which you can find here
Plugins used: Eyecandy 4000 - Gradient Glow, Xero-Radiance, Xero - Bad Dream, Lokas 3D Shadow
----------------------------
This tutorial is written for those who have working knowledge of PSPX2 (any version will do).
This tutorial was written by me on December 14, 2013. Please do not copy or paste on any other forum, website or blog provide link back to tut only. Please do not claim as your own. This tutorial is copyrighted to me. Any resemblance to any other tutorial is purely coincidental.
Ok - let's start and remember to save often.
Open the template and using your shortcut keys on your keyboard (SHIFT+D) duplicate the template as a new image. Close the original and delete the copywrite layer.
Select Wordart layer
Apply Gradient Glow on fat default settings (Glow Width 3)
Select 2 Green Rectangles layer
Select all, float, defloat
Add new raster layer and flood-fill with gradient or color of choice (Linear style, Angle 45, Repeat 2)
Paste close-up tubes of choice on top of gradient and delete
Select none
Apply Xero Bad Dream at setting of choice
Change close-up tubes to Screen
Apply dropshadow and merge tube down on top of gradient layer
Delete/Hide original rectangles layer
Select Red Oval layer
Select all, float, defloat
Paste paper 6
Select invert, delete, select none
Delete/hide original oval layer
Select Element 13 - resize by 45%
Paste and position on right side above oval layer
Select Green Rectangle layer
Select all, float, defloat
Paste paper 2
Select invert, delete, select none
Delete/Hide original rectangle layer
Select Bottom Light Green Square layer
Select all, float, defloat
Add new raster and flood-fill with color of choice
Select none
Effects, Texture Effects, Textures and apply Canvas Fine Texture with the following settings:
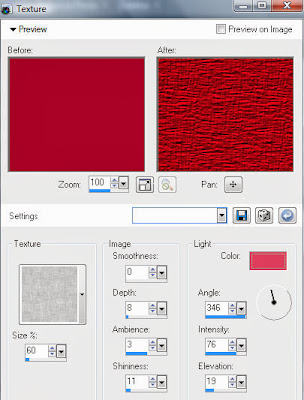
Delete/Hide original square layer
Select Top Light Green Square and repeat above steps
Select Top White Circle layer
Apply Effects, Texture Effect, Sculpture with the following plaid pattern settings:
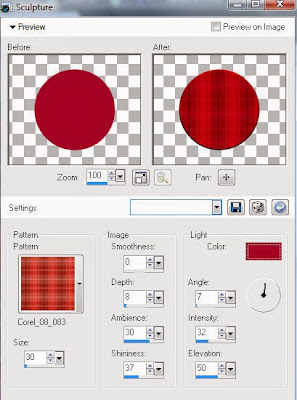
Select Bottom White Circle layer and repeat above steps
Select Middle Dark Green Circle layer
Select all, float, defloat
Add new raster layer and flood-fill with color of choice
Select none
Effects, Texture Effects, Weave (Gap size 2, Width 4, Opacity 5, Fill gaps checked, Change Gap Color to color of choice)
Delete/Hide original circles layer
Select Bottom Brown Rectangle layer
Select all, float, defloat
Paste paper 3
Select invert, delete, select none
Delete/Hide original rectangle layer
Select Top Brown Rectangle layer and repeat above steps
Select Bottom Red Rectangle layer
Select all, float, defloat
Paste paper 4
Select invert, delete, select none
Delete/Hide original rectangle layer
Select Top Red Rectangle layer and repeat above steps
Select Dark Green Rectangle layer
Select all, float, defloat
Add new raster layer and flood-fill with color of choice
Select none
Apply VM Extravaganza - Transmission with the following settings:
Delete/Hide original rectangle layer
Select Light Green Circle layer
Select all, float, defloat
Paste paper 7
Select invert, delete, select none
Delete/Hide original circle layer
Copy and paste tube of choice and position where desired
Apply Xero Radiance at setting of choice
Apply Lokas 3D Shadow at default settings
Select Element 24 - resize by 45%
Paste and position on bottom right
Select Element 18 - resize by 40%
Paste and position on bottom right
Select Element 35 - resize by 30%
Paste and position on bottom right
Select Element 72 - resize by 40%
Paste and position on bottom right
Select Element 22 - resize by 40%
Paste and position on bottom left
Select Element 40 - resize by 40%
Paste and position on bottom left
Select Element 5 - resize by 30%
Paste and position on bottom left
Select Element 51 - resize by 40%
Paste and position on bottom left
Select Element 37 - resize by 40%
Image mirror and paste on top left
Select new raster layer and flood fill with color or gradient of choice
Move layer to the bottom of the template
Apply Mask 612
Merge group and move to the bottom
Add any additional elements you like.
Add any dropshadows you like
Crop and resize as desired
Add copyright info, license number and name
You're done! Thanks for trying my tutorial!
Friday, December 13, 2013
MOUSE HOUSE
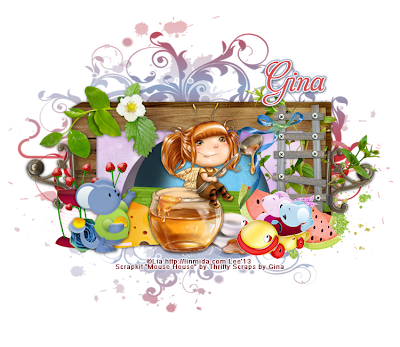
Supplies needed:
I am using the artwork from Lia for for this tutorial, which you can find here
Scrapkit: I am using a beautiful kit from Thrify Scrap by Gina called "Mouse House" which you can get by going here
Floral Mask 8 which you can find here. I'm not sure who created this mask so if you know please let me know so I can give proper credits.
Plugins used: Xero-Radiance, Xero-Bad Dream, Lokas 3D Shadow
----------------------------
This tutorial is written for those who have working knowledge of PSPX2 (any version will do).
This tutorial was written by me on December 13, 2013. Please do not copy or paste on any other forum, website or blog provide link back to tut only. Please do not claim as your own. This tutorial is copyrighted to me. Any resemblance to any other tutorial is purely coincidental.
Ok - let's start and remember to save often.
Open up a 750 x 650 blank canvas (we can resize it later)
Select Frame Element 5 and paste in the center of the canvas
Resize by 30%
Select your magic wand tool and click in the center of the Frame (Add (Shift), RGB Value, Tolerance 25, Contiguous checked, Feather 0)
Selections, Modify, Expand by 5
Paste paper 2
Select invert, delete, select none
Move paper layer below frame
Paste tube of choice where desired
Apply Xero Radiance at setting of choice
Apply Lokas 3D Shadow at default settings
Select Ladder Element - resize by 15%
Paste and position on right side
Select Green01 Element - resize by 20%
Paste and position on right side below ladder element
Select Green02 Element - resize by 20%
Paste and position on top left
Select Watermelon01 Element - resize by 15%
Paste and position on bottom right
Select Mouse01 Element - resize by 12%
Paste and position on bottom right
Select Bowls Element - resize by 10%
Paste and position on bottom right
Select Spool Element - resize by 20%
Paste and position on bottom left
Select Strawberries Element - resize by 15%
Paste and position on bottom left
Select Flower02 Element - resize by 10%
Paste and position on bottom left
Select Mouse07 Element - resize by 18%
Paste and position on bottom left
Select Cheese Element - resize by 15%
Paste and position on bottom left
Add new raster layer and flood-fill with color or gradient of choice
Move to bottom layer
Apply Mask 53 and merge group
Add any additional elements you like.
Add any dropshadows you like
Sharpen any elements as needed
Crop and resize as desired
Add copyright info, license number and name
You're done! Thanks for trying my tutorial!
Labels:Thrifty Scraps by Gina | 0
comments
Monday, December 9, 2013
MERRY CHRISTMAS
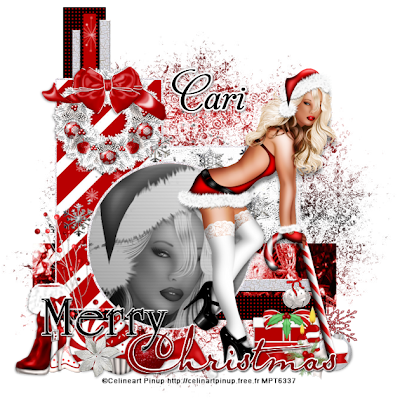
Supplies needed:
I am using the amazing artwork from Celinart Pinup for this tutorial which you find soon here
Scrapkit: I am using a beautiful kit from Black Widow Creationz called "Miss Santa" which you can get by going here
Christmas Template 1 from Cakes which can be found here
Winter Mask 9 from Dee which you can find here
Pattern for Sculpture Effect Pattern here
Plugins used: Eyecandy 4000 - Glass, Xero-Radiance, Xero - Bad Dream, Lokas 3D Shadow
----------------------------
This tutorial is written for those who have working knowledge of PSPX2 (any version will do).
This tutorial was written by me on December 9, 2013. Please do not copy or paste on any other forum, website or blog provide link back to tut only. Please do not claim as your own. This tutorial is copyrighted to me. Any resemblance to any other tutorial is purely coincidental.
Ok - let's start and remember to save often.
Open the template and using your shortcut keys on your keyboard (SHIFT+D) duplicate the template as a new image. Close the original and delete the copywrite layer.
Select Merry Wordart layer
Select all, float, defloat
Add new raster layer and flood-fill with color of choice
Select none
Apply Eyecandy Glass on default settings
Delete/Hide original wordart layer
Select Circle 10 layer
Select all, float, defloat
Add new raster layer and flood-fill with gradient or color of choice (Linear style, Angle 45, Repeat 2)
Paste close-up tube of choice on top of gradient and delete
Select none
Apply Xero Bad Dream at setting of choice
Drop opacity down to 65% on tube
Apply dropshadow and merge tube down on top of gradient layer
Effect, Texture Effects, Blinds (Width 2, Opactity 15, Horizontal and Light from left/top checked)
Delete/Hide original circle layer
Select Rectangle 9 layer
Select all, float, defloat
Paste paper 9
Select invert, delete, select none
Delete/hide original rectangle layer
Select Strip 8 layer
Select all, float, defloat
Add new raster layer and flood-fill with color of choice
Select none
Apply Effects, Texture Effects, Weave (Gap size 2, Width 4, Opacity 5, Fill gaps checked, change Gap and Weave color to one of choice)
Delete/Hide original strip layer
Select Strip 7 layer
Effect, Texture Effects, Sculpture with the following settings:
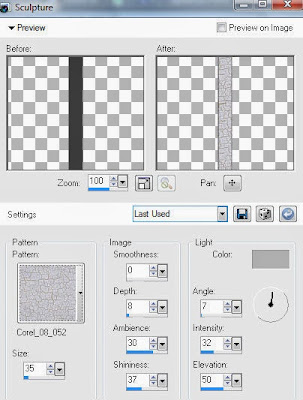
Delete/Hide original strip layer
Select Strips 5 and 3 layers and repeat same steps
Select Rectangle 6 layer
Select all, float, defloat
Paste paper 5
Select invert, delete, select none
Delete/Hide original rectangle layer
Select Strip 4 layer
Select all, float, defloat
Paste paper 6
Select invert, delete, select none
Delete/Hide original strip layer
Select Square 2 layer
Select all, float, defloat
Paste paper 2
Select invert, delete, select none
Delete/Hide original square layer
Select Rectangle 1 layer and repeat same steps that we used for Rectangle 8 layer
Copy and paste tube of choice and position where desired
Apply Xero Radiance at setting of choice
Apply Lokas 3D Shadow at default settings
Select Element 26 - resize by 45%
Paste and position on top left
Select Element 2 - resize by 40%
Paste and position on bottom left
Select Element 35 - resize by 25%
Paste and position on bottom left
Select Element 43 - resize by 35%
Paste and position on bottom left
Select Element 19 - resize by 40%
Paste and position on bottom left
Select Element 28 - resize by 30%
Paste and position on bottom left
Select Element 8 - resize by 40%
Image Free Rotate Left by 15% and paste on bottom left
Select Element 39 - resize by 40%
Paste and position on bottom right
Select Element 1 - resize by 30%
Paste and position on bottom right
Select new raster layer and flood fill with color or gradient of choice
Move layer to the bottom of the template
Apply Mask 9
Merge group and move to the bottom
Add any additional elements you like.
Add any dropshadows you like
Crop and resize as desired
Add copyright info, license number and name
You're done! Thanks for trying my tutorial!
Labels:Black Widow Creationz | 0
comments
Subscribe to:
Comments
(Atom)


