Labels
- Alikas Scraps
- All Dolled Up Store
- Amy Marie
- Annaica
- Arthur Crowe
- Babycakes Scraps
- Barbara Jensen
- Bibi's Collections
- Black Widow Creationz
- Blu Moon
- Bonnies Creations
- Bookwork Dezines
- Broken Sky Dezine
- Carita Creationz
- Carpe Diem Designs
- CDO
- Celinart Pinup
- Celine
- Chacha Creationz
- Charmed Designs
- Cherry Blossom Designs
- Chili Designz
- Cluster Frame
- Creative Misfits
- Creative Scraps by Crys
- Curious Creative Dreams
- Danny Lee
- Derzi
- Designs by Ali
- Designs by Joan
- Designs by Ketura
- Designs By Norella
- Designs by Vi
- Diana Gali
- Diry Art Designs
- Disturbed Scraps
- Dreaming With Bella
- Eclipse Creations
- Elegancefly
- Extras
- Fabulous Designz
- Forum Set
- Foxy's Designz
- Freek's Creation
- FTU
- FwTags
- Goldwasser
- Gothic Inspirations
- Gothic Raven Designs
- Graphfreaks
- Hania's Designs
- Happy Pumpkin Studios
- Horseplay's Pasture Designs
- indie-Zine
- Irish Princess Designs
- Ishika Chowdhury
- Kaci McVay
- Kajenna
- katharine
- Katherine
- Khloe Zoey
- Killer Kitty
- Kissing Kate
- KiwiFirestorm
- Kiya Designs
- Kizzed by Kelz
- KZ Designz
- Lady Mishka
- Lil Mz Brainstorm
- Maiden of Darkness
- Mariel Designs
- MellieBeans
- Michelle's Myths
- Midnight Shadow
- Misticheskya
- MistyLynn's Creations
- MMeliCrea Designz
- Moon Vixen Designs
- NaSionainne
- Ninaste
- Niqui Designs
- Pandora
- Picsfordesign
- Pink Paradox Productions
- Radyga Designs
- Redefined Designs
- Rissa's Designs
- Schnegge
- ScottishButterfly Creations
- Scrappin Krazy Designs
- Scrappin With Lil Ol Me
- Scraps and the City
- Scraps Dimensions
- Scraps From The Heart
- Scraps N Company
- Scraps with Attitude
- Shining Star Art
- Skyscraps
- Sleek N Sassy Designs
- Sophisticat Simone
- Souldesigner
- Soxsational Scraps
- Spazz
- Starlite and Soul
- Stella Felice
- Tammy Welt
- Tasha's Playground
- The PSP Project
- Thrifty Scraps by Gina
- Tiny Turtle Designs
- Upyourart
- Verymany
- Wendy Gerber
- Whisper In the Wind
- Wick3d Creationz
- Wicked Diabla
- Yude's Kreationz
Blog Archive
-
▼
2014
(276)
-
▼
June
(24)
- DON'T CRY
- PUNK ROCK PRINCESS
- EMO PIRATE
- VAMPIRE ROMANTIQUE
- PATRIOTIC
- REMAIN SILENT
- SEXY MERMAID
- BLISS
- SCARLET
- LADY OF DARKNESS
- GOTHIC PUNK
- BUBBLEGUM GOTH
- STEAMLOVER
- EMO SUMMER
- RED PEACE
- ROCK GURL
- DARKSIDE
- PIRATES AHOY
- STEAMPUNK CABARET
- BOUND BY BLOOD
- BLESSED BE
- CELEBRATE SPRING
- BEAUTIFUL FAIRYLAND
- DARK CHOCOLATE
-
▼
June
(24)
Sunday, June 29, 2014
DON'T CRY
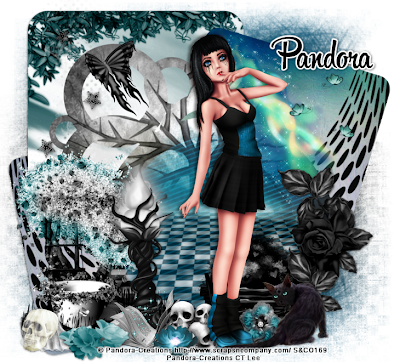
Supplies needed:
I am using the amazing artwork from Pandora Creations for this tutorial which you can find here
Scrapkit: I am using a stunning kit from Bibi's Collections called "Dead Fairy" which you can get by going here
Template 81 from Drama Bomb Designs which you can find here
Mask 5 from Zuzzanna which you can find here
Plugins used: Xero - Radiance, Lokas 3D Shadow
----------------------------
This tutorial is written for those who have working knowledge of PSPX2 (any version will do).
This tutorial was written by me on June 29, 2014. Please do not copy or paste on any other forum, website or blog provide link back to tut only. Please do not claim as your own. This tutorial is copyrighted to me. Any resemblance to any other tutorial is purely coincidental.
Ok - let's start and remember to save often.
Open the template and using your shortcut keys on your keyboard (SHIFT+D) duplicate the template as a new image. Close the original and delete the copywrite layer.
Adjust canvas by 750 x 550
Select Circle 7 layer
Select all, float, defloat
Add new raster layer and flood-fill with color of choice
Select none
Change layer to Screen and drop opacity down to 75%
Delete/Hide original circle layer
Select Shape 6 layer
Select all, float, defloat
Paste paper 2
Select invert, delete, select none
Delete/Hide original shape layer
Select Square 4 layer
Select all, float, defloat
Paste paper 3
Select invert, delete, select none
Delete/Hide original square layer
Select Square 3 layer
Select all, float, defloat
Paste paper 6
Select invert, delete, select none
Delete/Hide original square layer
Select Square 1 layer
Select all, float, defloat
Paste paper 3
Select invert, delete, select none
Delete/Hide original square layer
Copy and paste tube of choice and position where desired
Apply Xero Radiance at setting of choice
Apply Lokas 3D Shadow at default settings
Select Element 17 - resize by 60%
Paste and position on top right where desired
Select Element 80 - resize by 80%
Paste and position on top left
Select Element 47 - resize by 50%
Paste and position on bottom right
Select Element 44 - resize by 65%
Paste and position on bottom right
Select Element 19 - resize by 75%
Paste and positon on bottom right
Select Element 34 - resize by 30%
Paste and positon on bottom right
Select Element 20 - resize by 40%
Image mirror and paste on bottom left
Select Element 24 - resize by 50%
Paste and position on bottom left
Select Element 29 - resize by 45%
Paste and position on bottom left
Select Element 48 - paste and position on bottom left
Select Element 86 - resize by 50%
Paste and position on bottom left
Select Element 46 - resize by 25%
Paste and position on bottom left
Select Element 52 - resize by 45%
Paste and position on bottom
Select new raster layer and flood fill with color or gradient of choice
Apply Mask 5 or mask of choice
Merge group and move to the bottom layer
Add any additional elements you like.
Add any dropshadows you like
Crop and resize as desired
Add copyright info, license number and name
You're done! Thanks for trying my tutorial!
Tuesday, June 24, 2014
PUNK ROCK PRINCESS
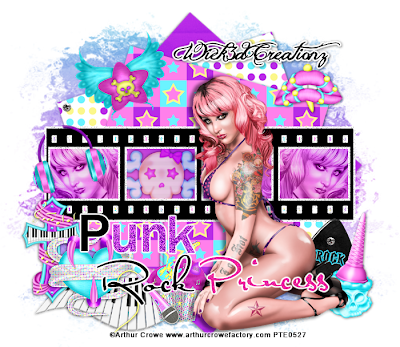
Supplies needed:
I am using the amazing artwork from Arthur Crowe for this tutorial which you can find here
Scrapkit: I am using a stunning kit from Wick3d Creationz called "Rockafella Skank" which you can get by going here
Template 11 from Stylicious Twinky which you can find here
Mask 37 from Yezman which you can find here
Plugins used: Xero - Radiance, Xero - Bad Dream, Lokas 3D Shadow
----------------------------
This tutorial is written for those who have working knowledge of PSPX2 (any version will do).
This tutorial was written by me on June 24, 2014. Please do not copy or paste on any other forum, website or blog provide link back to tut only. Please do not claim as your own. This tutorial is copyrighted to me. Any resemblance to any other tutorial is purely coincidental.
Ok - let's start and remember to save often.
Open the template and using your shortcut keys on your keyboard (SHIFT+D) duplicate the template as a new image. Close the original and delete the copywrite layer.
Select "Punk" wordart layer
Add new raster layer and flood-fill with color of choice
Select none
Adjust, Add/Remove Noise, Add Noise (Uniform checked, Noise 75%, Monochrome checked)
Select Strip Back Raster 4 layer
Select all, float, defloat
Add new raster layer and flood-fill with gradient of choice (style, Angle 45, Repeat 2)
Paste close-up tubes of choice on top of gradient and delete
Change tubes to Luminance (Legacy)
Apply Xero Bad Dream at default settings or random setting of choice
Drop opacity down on tube to 85%
Apply dropshadow and merge close-up down on top of gradient layer
Effect, Texture Effects, Blinds (Width 2, Opactity 15, Horizontal and Light from left/top checked)
Delete/Hide original squares layer
Select Square Raster 3 layer
Select all, float, defloat
Paste paper 4
Select invert, delete, select none
Delete/Hide original square layer
Select Square Raster 2 layer
Select all, float, defloat
Paste paper 2
Select invert, delete, select none
Delete/Hide original square layer
Select Square Raster 1 layer
Select all, float, defloat
Paste paper 10
Select invert, delete, select none
Delete/Hide original square layer
Copy and paste tube of choice and position where desired
Apply Xero Radiance at setting of choice
Apply Lokas 3D Shadow at default settings
Select Element 18 - resize by 50%
Image Free Rotate Left by 15% and paste on top left
Select Element 23 - resize by 30%
Paste and position on top right
Select Element 6 - resize by 30%
Paste and position on bottom left
Select Element 20 - paste and position on bottom left
Select Element 7 - resize by 40%
Paste and position on bottom left
Select Element 16 - resize by 30%
Paste and position on bottom left
Select Element 12 - resize by 30%
Paste and position on bottom left
Select Element 5 - resize by 40%
Paste and position on bottom right
Select Element 21 - resize by 25%
Paste and position on bottom right
Select new raster layer and flood fill with color or gradient of choice
Apply Mask 37 or mask of choice
Merge group and move to the bottom layer
Resize by 110%
Add any additional elements you like.
Add any dropshadows you like
Crop and resize as desired
Add copyright info, license number and name
You're done! Thanks for trying my tutorial!
Labels:Wick3d Creationz | 0
comments
Sunday, June 22, 2014
EMO PIRATE
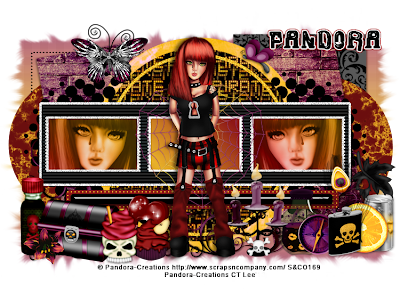
Supplies needed:
I am using the amazing artwork from Pandora Creations for this tutorial which you can find here
Scrapkit: I am using a stunning matching kit from Bibi's Collections called "Emo Pirate" which you can get by going here
Template 504 from Missy which you can find here
Mask 252 from Weescotlass which you can find here
Plugins used: VM Transmission, Eyecandy 4000 - Marble, Eyecandy 4000 - Glass, Xero - Radiance, Xero - Bad Dream, Lokas 3D Shadow
----------------------------
This tutorial is written for those who have working knowledge of PSPX2 (any version will do).
This tutorial was written by me on June 22, 2014. Please do not copy or paste on any other forum, website or blog provide link back to tut only. Please do not claim as your own. This tutorial is copyrighted to me. Any resemblance to any other tutorial is purely coincidental.
Ok - let's start and remember to save often.
Open the template and using your shortcut keys on your keyboard (SHIFT+D) duplicate the template as a new image. Close the original and delete the copywrite layer.
Select strip Raster 7 layer
Apply Eyecandy Glass on default settings
Select Strip Raster 6 layer
Select all, float, defloat
Add new raster layer and flood-fill with color of choice
Select none
Apply Effects, Texture Effects, Weave (Gap size 2, Width 5, Opacity 10, Fill gaps checked, change Gap and Weave color to one of choice)
Delete/Hide original strip layer
Select Frame layer
Select your magic wand and select the black portions of the frame
Apply VM Transmission with the following settings:
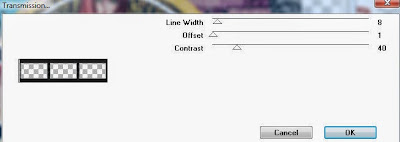
Select Squares Raster 2 layer
Select all, float, defloat
Add new raster layer and flood-fill with gradient of choice (style, Angle 45, Repeat 2)
Paste close-up tubes of choice on top of gradient and delete
Change tubes to Luminance (Legacy)
Apply Xero Bad Dream at default settings or random setting of choice
Drop opacity down on tube to 85%
Apply dropshadow and merge close-up down on top of gradient layer
Effect, Texture Effects, Blinds (Width 2, Opactity 15, Horizontal and Light from left/top checked)
Delete/Hide original squares layer
Select Circle Frame Raster 4 layer
Select all, float, defloat
Add new raster layer and flood-fill with color of choice
Select none
Adjust, Add/Remove Noise, Add Noise (Uniform checked, Noise 65%, Monochrome checked)
Delete/Hide original circle frame
Select Circle Raster 3 layer
Select all, float, defloat
Paste paper 7
Select invert, delete, select none
Delete/Hide original circle layer
Select Circle Vector 1 layer
Select all, float, defloat
Paste paper 5
Select invert, delete, select none
Delete/Hide original circle layer
Select Rectangle 5 layer
Select all, float, defloat
Paste paper 1
Select invert, delete, select none
Delete/Hide original rectangle layer
Select Rectangle Copy of Raster 5 and repeat above steps
Select Circle Raster 8 layer
Apply Eyecandy marble with the following settings:
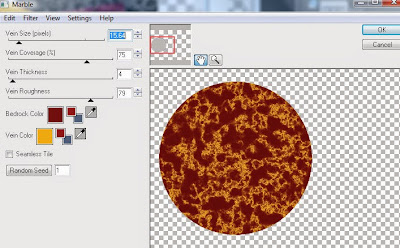
Select Circle Copy of Raster 8 and repeat above steps
Select Square Raster 10 layer
Select all, float, defloat
Paste paper 6
Select invert, delete, select none
Delete/Hide original square layer
Select Square Copy of Raster 10 and repeat above steps
Select Element 16 - resize by 70%
Paste and position on bottom
Copy and paste tube of choice and position where desired
Apply Xero Radiance at setting of choice
Apply Lokas 3D Shadow at default settings
Select Element 64 - resize by 30%
Paste and position in the center of the frame below tube layer
Select Element 11 - resize by 20%
Paste and position on top left
Select Element 73 - resize by 50%
Paste and position on bottom left
Select Element 62 - resize by 35%
Paste and position on bottom left
Select Element 6 - resize by 50%
Paste and position on bottom left
Select Element 13 - resize by 25%
Paste and position on bottom left
Select Element 4 - resize by 65%
Paste and position on bottom left
Select Element 32 - resize by 25%
Image mirror and paste on bottom left
Select Element 33 - resize by 25%
Paste and position on bottom right
Select Element 75 - resize by 50%
Paste and position on bottom left
Select Element 21 - resize by 45%
Image mirror and paste on bottom right
Select Element 10 - resize by 35%
Paste and position on bottom right
Select Element 9 - resize by 35%
Paste and position on bottom right
Select Element 43 - resize by 65%
Paste and position on bottom right
Select Element 26 - resize by 40%
Paste and position on bottom right
Select new raster layer and flood fill with color or gradient of choice
Apply Mask 252 or mask of choice
Merge group and move to the bottom layer
Add any additional elements you like.
Add any dropshadows you like
Crop and resize as desired
Add copyright info, license number and name
You're done! Thanks for trying my tutorial!
Thursday, June 19, 2014
VAMPIRE ROMANTIQUE
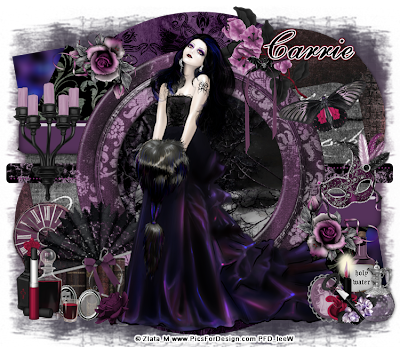
Supplies needed:
I am using the amazing artwork from Zlata_M for this tutorial which you can find here
Scrapkit: I am using a stunning kit from Pink Paradox Productions called "Vampire Romantique" which you can get by going here
Template 205 from Toxic Desirez which you can find here
Mask 170 from Insatiable Dreams which you can find here
Plugins used: Eyecandy 4000 - Glass, Eyecandy 4000 - Marble, Eyecandy 4000 - HSB Noise, Xero - Radiance, Lokas 3D Shadow
----------------------------
This tutorial is written for those who have working knowledge of PSPX2 (any version will do).
This tutorial was written by me on June 19, 2014. Please do not copy or paste on any other forum, website or blog provide link back to tut only. Please do not claim as your own. This tutorial is copyrighted to me. Any resemblance to any other tutorial is purely coincidental.
Ok - let's start and remember to save often.
Open the template and using your shortcut keys on your keyboard (SHIFT+D) duplicate the template as a new image. Close the original and delete the copywrite layer.
Select Circle Copy of Raster 1 layer
Select all, float, defloat
Paste paper 8
Select invert, delete, select none
Delete/Hide original circle layer
Select Frame Element 12 - resize by
Paste and position on top of circle layer
Select Strip Raster 5 layer
Select all, float, defloat
Add new raster layer and flood-fill with color of choice
Select none
Apply Eyecandy Glass on default settings
Delete/Hide original strip layer
Select Strip Copy of Raster 5 and repeat above steps
Select Strip Raster 10 layer
Apply Eyecandy Marble with the following settings:
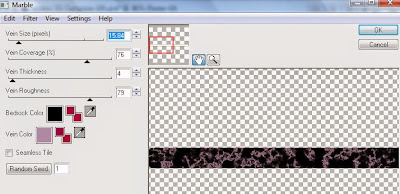
Select Rectangle Raster 2 layer
Select all, float, defloat
Paste paper 2
Select invert, delete, select none
Delete/Hide original rectangle layer
Select Circle Raster 7 layer
Select all, float, defloat
Paste paper 18
Select invert, delete, select none
Delete/Hide original circle layer
Select Circle Copy of Raster 7 and repeat above steps
Select Square Raster 6 layer
Select all, float, defloat
Paste paper 22
Select invert, delete, select none
Delete/Hide original square layer
Select Square Copy of Raster 6 and repeat above steps
Select Rectangle Raster 9 layer
Select all, float, defloat
Add new raster layer and flood-fill with color of choice
Select none
Apply Eyecandy HSB Noise with the following settings:
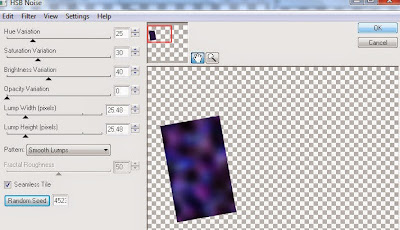
Delete/Hide original rectangle layer
Select Rectangle Copy of Raster 9 and repeat above steps
Select Circle Raster 8
Select all, float, defloat
Paste paper 7
Select invert, delete, select none
Delete/Hide original circle layer
Copy and paste tube of choice and position where desired
Apply Xero Radiance at setting of choice
Apply Lokas 3D Shadow at default settings
Select Element 127 - resize by 18%
Paste and position on bottom right
Image duplicate, mirror and flip - reposition on top left where desired
Select Element 125 - resize by 20%
Paste and position on top right
Select Element 7 - resize by 30%
Paste and position on top right
Select Element 53 - resize by 30%
Paste and position on top left where desired
Select Element 25 - resize by 20%
Image Free Rotate Left by 15% and paste on right side where desired
Select Element 36 - resize by 25%
Paste and position on bottom right
Select Element 44 - resize by 18%
Paste and position on bottom right
Select Element 55 - resize by 20%
Paste and position on bottom right
Select Element 51 - resize by 15%
Image Free Rotate Left by 15% and paste on bottom right
Select Element 61 - resize by 20%
Paste and position on bottom right
Select Element 67 - resize by 16%
Paste and position on bottom left
Select Element 37 - resize by 20%
Paste and position on bottom left
Select Element 49 - resize by 20%
Paste and position on bottom left
Select Element 34 - resize by 20%
Paste and position on bottom left
Select Element 59 - resize by 22%
Paste and position on bottom left
Select Element 81 - resize by 12%
Paste and position on bottom left
Select Element 28 - resize by 30%
Image Free Rotate Left by 15% and paste on bottom left
Select Element 122 - resize by 10%
Paste and position on bottom left
Select new raster layer and flood fill with color or gradient of choice
Move layer to the bottom of the template
Apply Mask 21 or mask of choice
Merge group and move to the bottom layer
Add any additional elements you like.
Add any dropshadows you like
Crop and resize as desired
Add copyright info, license number and name
You're done! Thanks for trying my tutorial!
Labels:Pink Paradox Productions | 0
comments
Wednesday, June 18, 2014
PATRIOTIC
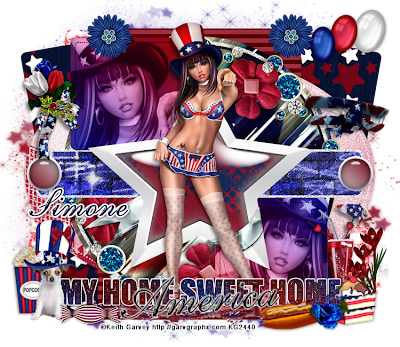
Supplies needed:
I am using the amazing artwork from Keith Garvey for this tutorial which you can find here
Scrapkit: I am using a stunning kit from Sophisticat Simone called "Patriotic" which you can get by going here
July 4th Template 3 from Dee which you can find here
Mask 25 from Witchysheart which you can find on the Misfits Blog here
Silver Texture of choice
Plugins used: VM Transmission, Eyecandy 4000 - Glass, Eyecandy 4000 - Marble, Xero - Radiance, Xero - Bad Dream, Lokas 3D Shadow
----------------------------
This tutorial is written for those who have working knowledge of PSPX2 (any version will do).
This tutorial was written by me on June 18, 2014. Please do not copy or paste on any other forum, website or blog provide link back to tut only. Please do not claim as your own. This tutorial is copyrighted to me. Any resemblance to any other tutorial is purely coincidental.
Ok - let's start and remember to save often.
Open the template and using your shortcut keys on your keyboard (SHIFT+D) duplicate the template as a new image. Close the original and delete the copywrite layer.
Select "America" wordart layer
Apply Eyecandy Gradient Glow on Medium default settings (Glow Width 3)
Select "My Home" wordart blue layer
Select all, float, defloat
Add new raster layer and flood-fill with color or gradient of choice
Select none
Apply Eyecandy Glass on default settings
Delete/Hide original wordart layer
Select Right Ribbon Gradient layer
Effects, Texture Effects, Sculpture with the following settings:
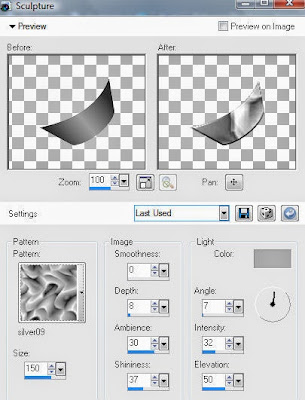
Select Left Ribbon Gradient layer and repeat above step
Select Center Star Gradient layer
Select all, float, defloat
Paste paper 6
Select invert, delete, select none
Delete/Hide original star layer
Select Center Red Circles layer
Select all, float, defloat
Add new raster layer and flood-fill with color or gradient of choice
Select none
Apply Eyecandy Glass on default settings
Delete/Hide original circles layer
Select Top White Square layer
Select all, float, defloat
Add new raster layer and flood-fill with gradient of choice (style, Angle 45, Repeat 2)
Paste close-up tube of choice on top of gradient and delete
Change tube to Luminance (Legacy)
Apply Xero Bad Dream at default settings or random setting of choice
Drop opacity down on tube to 75%
Apply dropshadow and merge close-up down on top of gradient layer
Effect, Texture Effects, Blinds (Width 2, Opactity 15, Horizontal and Light from left/top checked)
Delete/Hide original square layer
Select Bottom White Square layer and repeat above steps
Select Center Blue Strip layer
Select all, float, defloat
Paste paper 5
Select invert, delete, select none
Delete/Hide original strip layer
Select Light Blue Circle layer
Select all, float, defloat
Paste paper 13
Select invert, delete, select none
Delete/Hide original circle layer
Select Element 39 - Paste and position on top of circle layer
Select Center Blue Oval layer
Select all, float, defloat
Paste paper 3
Select invert, delete, select none
Delete/Hide original oval layer
Select Center Blue Rectangle layer
Select all, float, defloat
Add new raster layer and flood-fill with color of choice
Select none
Apply VM Transmission with the following settings:
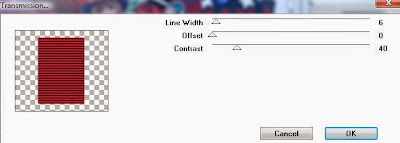
Delete/Hide original rectangle layer
Select Right Red Strip layer
Select all, float, defloat
Paste paper 11
Select invert, delete, select none
Delete/Hide original strip layer
Select Left Red Strip layer and repeat above steps
Select Right White Strip layer
Apply Eyecandy Marble with the following settings:
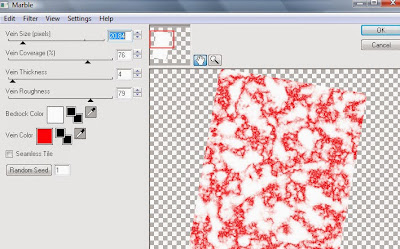
Select Left White Strip layer and repeat above
Copy and paste tube of choice and position where desired
Apply Xero Radiance at setting of choice
Apply Lokas 3D Shadow at default settings
Select Element 5 - resize by 45%
Paste and position on top right
Select Element 19 - resize by 40%
Paste and position on top right
Select Element 30 - resize by 40%
Paste and position on bottom right
Select Element 12 - resize by 65%
Paste and position on bottom right
Select Element 14 - resize by 25%
Paste and position on bottom right
Select Element 46 - resize by 25%
Paste and position on bottom right
Select Element 17 - resize by 40%
Paste and position on bottom right
Select Element 40 - resize by 40%
Paste and position on top left
Image duplicate and mirror
Select Element 38 - resize by 30%
Paste and position on top left
Select Element 9 - resize by 55%
Paste and position on bottom left
Select Element 15 - resize by 45%
Paste and position on bottom left
Select Element 8 - resize by 45%
Paste and position on bottom left
Select new raster layer and flood fill with color or gradient of choice
Move layer to the bottom of the template
Apply Mask 21 or mask of choice
Merge group and move to the bottom layer
Add any additional elements you like.
Add any dropshadows you like
Crop and resize as desired
Add copyright info, license number and name
You're done! Thanks for trying my tutorial!
Labels:Sophisticat Simone | 0
comments
Tuesday, June 17, 2014
REMAIN SILENT
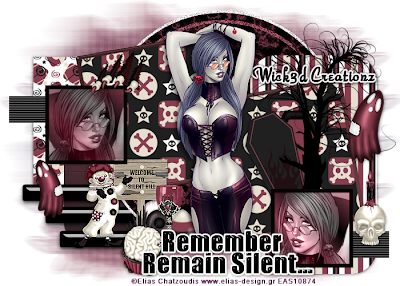
Supplies needed:
I am using the amazing artwork from Elias Chatzoudis for this tutorial which you can find here
Scrapkit: I am using a stunning kit from Wick3d Creationz called "Silent Hill" which you can get by going here
Template 448 from Missy which you can find here
Mask 260 from Weescotlass which you can find here
Plugins used: VM Transmission, Eyecandy 4000 - Glass, Eyecandy 4000 - Marble, Xero - Radiance, Xero - Bad Dream, Lokas 3D Shadow
----------------------------
This tutorial is written for those who have working knowledge of PSPX2 (any version will do).
This tutorial was written by me on June 17, 2014. Please do not copy or paste on any other forum, website or blog provide link back to tut only. Please do not claim as your own. This tutorial is copyrighted to me. Any resemblance to any other tutorial is purely coincidental.
Ok - let's start and remember to save often.
Open the template and using your shortcut keys on your keyboard (SHIFT+D) duplicate the template as a new image. Close the original and delete the copywrite layer.
Adjust canvas by 700 x 500
Select Frame 2 layer
Select all, float, defloat
Add new raster layer and flood-fill with color of choice
Select none
Apply Eyecandy Glass on default settings
Delete/Hide original frame layer
Select Frame 3 layer and repeat above steps
Select Frame Back 3 layer
Select all, float, defloat
Add new raster layer and flood-fill with gradient of choice (style, Angle 45, Repeat 2)
Paste close-up tube of choice on top of gradient and delete
Change tube to Luminance (Legacy)
Apply Xero Bad Dream at default settings or random setting of choice
Drop opacity down on tube to 70%
Apply dropshadow and merge close-up down on top of gradient layer
Effect, Texture Effects, Blinds (Width 2, Opactity 15, Horizontal and Light from left/top checked)
Delete/Hide original frame back layer
Select Frame Back 2 layer and repeat above steps
Select Thin Rectangle 1 layer
Apply VM Transmission with the following settings:
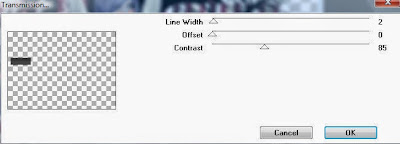
Select Thin Rectangle 2 layer and repeat above steps
Select Frame layer
Select all, float, defloat
Add new raster layer and flood-fill with color of choice
Select none
Apply Eyecandy Glass on default settings
Delete/Hide original frame layer
Select Frame Back layer
Select all, float, defloat
Paste paper 6
Select invert, delete, select none
Delete/Hide original Frame back layer
Select Rounded Edge Rect layer
Select all, float, defloat
Paste paper 5
Select invert, delete, select none
Delete/Hide original rectangle layer
Select Circle Frame layer
Select all, float, defloat
Add new raster layer and flood-fill with color of choice
Select none
Adjust, Add/Remove Noise, Add Noise (Uniform checked, Noise 65%, Monochrome checked)
Delete/Hide original circle layer
Select Circle layer
Apply Eyecandy Marble with the following settings:
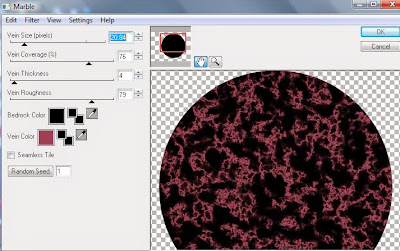
Select Circle Back layer
Adjust, Add/Remove Noise, Add Noise (Uniform checked, Noise 100%, Monochrome checked)
Select Thin Rectangle 3 layer
Apply Eyecandy Glass on default settings
Select Thin Rectangles 4 and 5 and repeat above step
Select Rounded Edge Rect2 layer
Select all, float, defloat
Paste paper 10
Select invert, delete, select none
Delete/Hide original rect layer
Select Square layer
Select all, float, defloat
Paste paper 4
Select invert, delete, select none
Delete/Hide original square layer
Copy and paste tube of choice and position where desired
Apply Xero Radiance at setting of choice
Apply Lokas 3D Shadow at default settings
Select Element 11 - resize by 50%
Paste and position on bottom left
Select Element 12 - resize by 30%
Paste and position on bottom left
Select Element 10 - resize by 15%
Paste and position on bottom left
Select Element 9 - resize by 22%
Paste and position on bottom left
Select Element 13 - resize by 20%
Paste and position on bottom left
Select Element 32 - resize by 25%
Paste and position on top left
Select Element 21 - resize by 60%
Paste and position on right side
Select Element 23 - resize by 55%
Paste and position on right side
Select Element 19 - resize by 18%
Paste and position on top right
Image duplicate, mirror and reposition on bottom left - resize by 80%
Select Element 6 - resize by 25%
Paste and position on bottom right
Select Text tool and type whatever wording you would like (I used Impact font)
Select new raster layer and flood fill with color or gradient of choice
Move layer to the bottom of the template
Apply Mask 260 or mask of choice
Merge group and move to the bottom layer
Add any additional elements you like.
Add any dropshadows you like
Crop and resize as desired
Add copyright info, license number and name
You're done! Thanks for trying my tutorial!
Labels:Wick3d Creationz | 0
comments
SEXY MERMAID
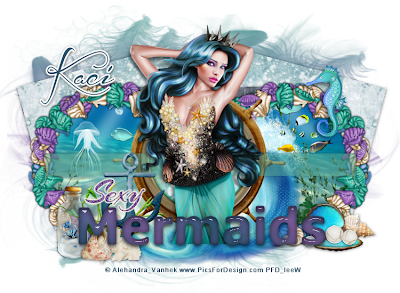
Supplies needed:
I am using the amazing artwork from Alehandra_Vanhek for this tutorial which you can find here
Scrapkit: I am using a beautiful kit from Scrappin Krazy Designs called "Oceana" which you can get by going here
Template from Stylicious Twinky which you can find here
Mask 131 from Gina Gems which you can find here
Plugins used: Eyecandy 4000 - Glass, Xero - Radiance, Lokas 3D Shadow
----------------------------
This tutorial is written for those who have working knowledge of PSPX2 (any version will do).
This tutorial was written by me on June 17, 2014. Please do not copy or paste on any other forum, website or blog provide link back to tut only. Please do not claim as your own. This tutorial is copyrighted to me. Any resemblance to any other tutorial is purely coincidental.
Ok - let's start and remember to save often.
Open the template and using your shortcut keys on your keyboard (SHIFT+D) duplicate the template as a new image. Close the original and delete the copywrite layer.
Adjust canvas by 750 x 550
Select Wordart Raster 9 layer
Select all, float, defloat
Add new raster layer and flood-fill with color or gradient of choice
Select none
Select the "Mermaid" wording and apply Eyecandy Glass on default settings
Select none
Apply Eyecandy Gradient Glow on fat default settings (Glow Width 3)
Delete/Hide original wordart layer
Select Strip Raster 7 layer
Select all, float, defloat
Add new raster layer and flood-fill with color of choice
Select none
Effect, Texture Effects, Blinds (Width 2, Opactity 15, Horizontal and Light from left/top checked)
Drop opacity down to 55%
Delete/Hide original strip layer
Select Circle Raster 6 layer
Select all, float, defloat
Paste Background paper
Select invert, delete, select none
Delete/Hide original circle layer
Select Circle Raster 5 layer and repeat above steps
Select Element 55 - resize by 50%
Paste and position on top of left circle layer
Image duplicate and mirror
Select Rectangle Raster 4 layer
Select all, float, defloat
Paste paper 7
Select invert, delete, select none
Delete/Hide original rectangle layer
Select Square Raster 2 layer
Select all, float, defloat
Paste paper 10
Select invert, delete, select none
Delete/Hide original square layer
Select Square Raster 1 layer and repeat above steps
Select Element 22 - resize by 65%
Paste and position in the center where desired
Select Element 40 - resize by 65%
Image mirror and paste on botton below wordart layer
Copy and paste tube of choice and position where desired
Apply Xero Radiance at setting of choice
Apply Lokas 3D Shadow at default settings
Select Element 24 - resize by 40%
Paste and position on bottom left below wordart layer
Select Element 47 - resize by 30%
Paste and position on left side
Select Element 46 - resize by 30%
Paste and position on bottom left
Select Element 34 - resize by 20%
Paste and position on bottom left
Select Element 49 - resize by 20%
Paste and position on bottom left
Select Element 48 - resize by 20%
Paste and position on bottom right
Select Element 10 - resize by 25%
Paste and position on bottom right
Select Element 19 - resize by 30%
Paste and position on bottom right
Select Element 53 - resize by 30%
Paste and position on top right
Select new raster layer and flood fill with color or gradient of choice
Move layer to the bottom of the template
Apply Mask 131 or mask of choice
Merge group and move to the bottom layer
Add any additional elements you like.
Add any dropshadows you like
Crop and resize as desired
Add copyright info, license number and name
You're done! Thanks for trying my tutorial!
Labels:Scrappin Krazy Designs | 0
comments
Monday, June 16, 2014
BLISS
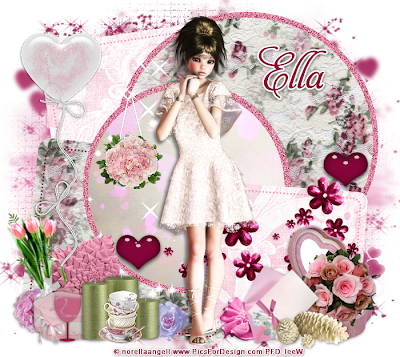
Supplies needed:
I am using the amazing artwork from Designs by Norella for this tutorial which you can find here
Scrapkit: I am using a beautiful kit from Whisper in the Wind called "Bliss" which you can get by going here
Template 72 from Drama Bomb Designs which you can find here
Mask M4 from Kylie which you can find on the Misfits Blog here
Plugins used: Eyecandy 4000 - Glass, Xero - Radiance, Lokas 3D Shadow
----------------------------
This tutorial is written for those who have working knowledge of PSPX2 (any version will do).
This tutorial was written by me on June 16, 2014. Please do not copy or paste on any other forum, website or blog provide link back to tut only. Please do not claim as your own. This tutorial is copyrighted to me. Any resemblance to any other tutorial is purely coincidental.
Ok - let's start and remember to save often.
Open the template and using your shortcut keys on your keyboard (SHIFT+D) duplicate the template as a new image. Close the original and delete the copywrite layer.
Adjust canvas by 750 x 550
Select Heart 12 layer
Select all, float, defloat
Add new raster layer and flood-fill with color of choice
Select none
Apply Eyecandy Glass on default settings
Delete/Hide original heart layer
Select Heart 11 layer and repeat above steps
Select Square 9 layer
Select all, float, defloat
Paste paper 2
Select invert, delete, select none
Delete/Hide original square layer
Select Square 1 layer and repeat above steps
Select Circle 8 layer
Select all, float, defloat
Paste paper 1
Select invert, delete, select none
Delete/Hide original circle layer
Select Circle 7 layer
Select all, float, defloat
Add new raster layer and flood-fill with color of choice
Adjust, Add/Remove Noise, Add Noise (Uniform checked, Noise 65%, Monochrome checked)
Delete/Hide original circle layer
Select Circle 5 layer and repeat above steps
Select Dotted Square 4 layer
Add new raster layer and flood-fill with color of choice
Reselect Dotted Square
Select all, float, defloat
Go back to layer you just filled
Select invert, delete, select none
Delete/Hide original dotted square layer
Select Circle 6 layer
Select all, float, defloat
Paste paper 5
Select invert, delete, select none
Delete/Hide original circle layer
Select Square 3 layer and repeat above steps
Copy and paste tube of choice and position where desired
Apply Xero Radiance at setting of choice
Apply Lokas 3D Shadow at default settings
Select Element 1 - resize by 55%
Paste and position on top left
Select Element 2 - resize by 20%
Paste and position on top left
Select Element 35 - resize by 50%
Paste and position on bottom right
Select Element 15 - resize by 30%
Paste and position on bottom right
Select Element 11 - resize by 30%
Image Free Rotate Left by 15% and paste on bottom right
Select Element 94 - resize by 25%
Paste and position on bottom right
Select Element 36 - resize by 15%
Paste and position on bottom right
Select Element 106 - resize by 40%
Image Free Rotate Left by 15% and paste on bottom left
Select Element 21 - resize by 22%
Image Free Rotate Left by 15% and paste on bottom left
Select Element 56 - resize by 15%
Paste and position on bottom left
Select Element 6 - resize by 20%
Paste and position on bottom left
Select Element 63 - resize by 25%
Paste and position on bottom left
Select Element 10 - resize by 24%
Paste and position on bottom left
Select Element 83 - resize by 20%
Paste and position on bottom left
Select new raster layer and flood fill with color or gradient of choice
Move layer to the bottom of the template
Apply Mask M4 or mask of choice
Merge group and move to the bottom layer
Add any additional elements you like.
Add any dropshadows you like
Crop and resize as desired
Add copyright info, license number and name
You're done! Thanks for trying my tutorial!
Sunday, June 15, 2014
SCARLET
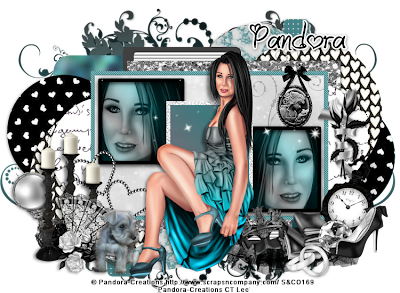
Supplies needed:
I am using the amazing artwork from Pandora Creations for this tutorial which you can find here
Scrapkit: I am using a stunning matching kit from Bibi's Collections called "Scarlet" which you can get by going here
Template 510 from Missy which you can find here
Mask 21 from Urban Fairytales which you can find here
Plugins used: VM - Transmission, Penta - Jeans, Eyecandy 4000 - HSB Noise, Eyecandy 4000 - Glass, Eyecandy 4000 - Marble, Xero - Radiance, Xero - Bad Dream, Lokas 3D Shadow
----------------------------
This tutorial is written for those who have working knowledge of PSPX2 (any version will do).
This tutorial was written by me on June 15, 2014. Please do not copy or paste on any other forum, website or blog provide link back to tut only. Please do not claim as your own. This tutorial is copyrighted to me. Any resemblance to any other tutorial is purely coincidental.
Ok - let's start and remember to save often.
Open the template and using your shortcut keys on your keyboard (SHIFT+D) duplicate the template as a new image. Close the original and delete the copywrite layer.
Adjust canvas by 750 x 550
Select Frame Copy(2) of Raster 4
Adjust, Add/Remove Noise, Add Noise (Uniform checked, Noise 100%, Monochrome checked)
Select Square (Copy(2) of Raster 16
Select all, float, defloat
Add new raster layer and flood-fill with color or gradient of choice
Select none
Effect, Texture Effects, Blinds (Width 2, Opactity 15, Horizontal and Light from left/top checked)
Delete/Hide original square layer
Select Frame Raster 4 layer
Select all, float, defloat
Add new raster layer and flood-fill with color of choice
Select none
Apply Eyecandy Glass on default settings
Delete/Hide original frame layer
Select Frame Copy of Raster 4 and repeat above steps
Select Square Raster 16 layer
Select all, float, defloat
Add new raster layer and flood-fill with gradient of choice (style, Angle 45, Repeat 2)
Paste close-up tube of choice on top of gradient and delete
Change tube to Luminance (Legacy)
Apply Xero Bad Dream at default settings or random setting of choice
Drop opacity down on tube to 75%
Apply dropshadow and merge close-up down on top of gradient layer
Effect, Texture Effects, Blinds (Width 2, Opactity 15, Horizontal and Light from left/top checked)
Delete/Hide original square layer
Select Square Copy of Raster 16 and repeat above steps
Select Rectangle Raster 6 layer
Select all, float, defloat
Paste paper 5
Select invert, delete, select none
Delete/Hide original rectangle layer
Select Rectangle Raster 2 layer
Select all, float, defloat
Add new raster layer and flood-fill with color of choice
Select none
Apply Penta - Jeans with the following settings:
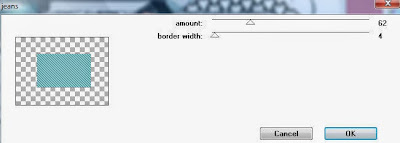
Delete/Hide original rectangle layer
Select Cirlce Raster 7 layer
Select all, float, defloat
Paste paper 3
Select invert, delete, select none
Delete/Hide original circle layer
Select Circle Copy of Raster 7 layer and repeat above steps
Select Rectangle Raster 9 layer
Select all, float, defloat
Paste paper 9
Select invert, delete, select none
Delete/Hide original rectangle layer
Select Rectangle Copy of Raster 9 layer and repeat above steps
Select Circle Raster 10 layer
Select all, float, defloat
Paste paper 7
Select invert, delete, select none
Delete/Hide original circle layer
Select Circle Copy of Raster 10 and repeat above steps
Select Strip Raster 20 layer
Apply VM Transmission with the following settings:
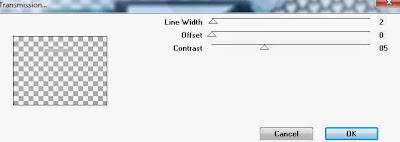
Select Strip Copy of Raster 20 and repeat above steps
Select Circle Copy (2) of Raster 19 layer
Select all, float, defloat
Paste paper 2
Select invert, delete, select none
Delete/Hide original circle layer
Select Circle Copy of Raster 19 and repeat above steps
Select Circle Raster 19 layer
Apply Eyecandy Marble with the following settings:
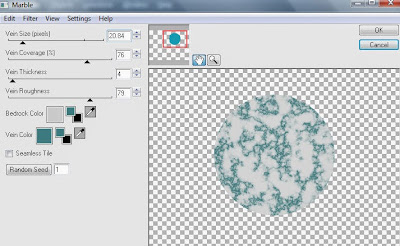
Select Circle Copy of Raster 19 and repeat above
Select Strip Raster 23 layer
Select all, float, defloat
Add new raster layer and flood-fill with color of choice
Select none
Apply Effects, Texture Effects, Weave (Gap size 2, Width 5, Opacity 10, Fill gaps checked, change Gap and Weave color to one of choice)
Delete/Hide original strip layer
Select Strip Copy of Raster 23 and repeat above steps
Select Square Raster 3 layer
Select all, float, defloat
Add new raster layer and flood-fill with color of choice
Select none
Apply HSB Noise with the following settings:
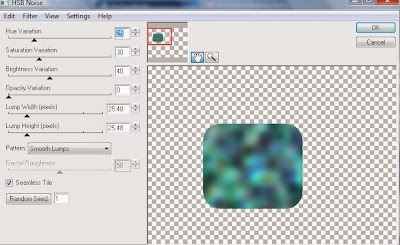
Delete/Hide original square layer
Select Square Copy of Raster 3 and repeat above steps
Copy and paste tube of choice and position where desired
Apply Xero Radiance at setting of choice
Apply Lokas 3D Shadow at default settings
Select Element 2 - resize by 60%
Paste and position on top right
Select Element 56 - resize by 25%
Paste and position on right side
Select Element 9 - resize by 35%
Image Free Rotate Right by 15% and paste on bottom right
Select Element 19 - resize by 22%
Paste and position on bottom right
Select Element 15 - resize by 20%
Paste and position on bottom right
Select Element 4 - resize by 50%
Paste and position on bottom right
Select Element 32 - resize by 28%
Paste and position on bottom right
Select Element 54 - resize by 22%
Image Free Roate Left by 15% and paste on bottom right
Select Element 26 - resize by 40%
Image Free Roate Left by 15% and paste on bottom left
Select Element 7 - resize by 45%
Paste and position on bottom left
Select Element 75 - resize by 30%
Paste and position on bottom left
Select Element 67 - resize by 30%
Paste and position on bottom left
Select Element 1 - resize by 30%
Paste and position on bottom left
Select new raster layer and flood fill with color or gradient of choice
Move layer to the bottom of the template
Apply Mask 21 or mask of choice
Merge group and move to the bottom layer
Add any additional elements you like.
Add any dropshadows you like
Crop and resize as desired
Add copyright info, license number and name
You're done! Thanks for trying my tutorial!
Labels:Bibi's Collections,Pandora | 0
comments
Thursday, June 12, 2014
LADY OF DARKNESS
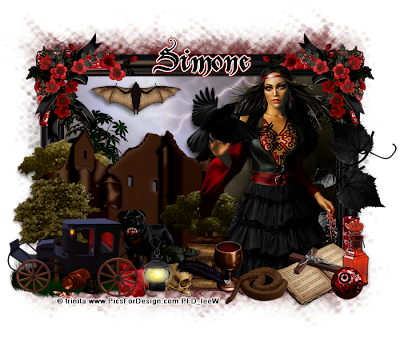
Supplies needed:
I am using the amazing art from Trinita for for this tutorial which you can find here
Scrapkit: I am using a stunning kit from Sophisticat Simone called "Dark Night" which you can get by going here
Mask 250 from Weescotslass which you can find here
Plugins: Xero - Radiance, Lokas 3D Shadow
----------------------------
This tutorial is written for those who have working knowledge of PSPX2 (any version will do).
This tutorial was written by me on June 12, 2014. Please do not copy or paste on any other forum, website or blog provide link back to tut only. Please do not claim as your own. This tutorial is copyrighted to me. Any resemblance to any other tutorial is purely coincidental.
Ok - let's start and remember to save often.
Open up a 750 x 600 blank canvas (we can resize it later)
Select Frame Element 2 and paste in the center of the canvas
Resize by 105%
Select your magic wand tool and click in the center of the Frame (Add (Shift), RGB Value, Tolerance 25, Contiguous checked, Feather 0)
Selections, Modify, Expand by 5
Paste paper 3
Select invert, delete, select none
Move paper layer below frame
Select Element 77 - resize by 50%
Paste and position on top left side of frame
Image duplicate and mirror
Select Element 53 - resize by 55%
Paste and position on bottom left
Select Element 64 - resize by 50%
Paste and position on right side of frame
Select Element 26 - resize by 40%
Paste and position on left side of paper layer where desired
Paste tube of choice where desired
Apply Xero Radiance with the default settings of choice
Apply Lokas 3D Shadow at default settings
Select Element 32 - resize by 45%
Paste and position on bottom left
Select Element 58 - resize by 30%
Paste and position on bottom left
Select Element 59 - resize by 20%
Paste and position on bottom left
Select Element 70 - resize by 25%
Paste and position on bottom left
Select Element 76 - resize by 32%
Paste and position on bottom
Select Element 46 - resize by 45%
Paste and position on bottom
Select Element 27 - resize by 22%
Paste and position on bottom
Select Element 21 - resize by 35%
Paste and position on bottom
Select Element 24 - resize by 40%
Paste and position on bottom right
Select Element 19 - resize by 30%
Paste and position on bottom right
Select Element 51 - resize by 15%
Paste and position on bottom right
Select Element 67 - resize by 22%
Paste and position on bottom right
Add new raster layer and flood-fill with color or gradient of choice
Apply Mask 250 and merge group and move to bottom layer
Add any additional elements you like.
Add any dropshadows you like
Sharpen any elements as needed
Crop and resize as desired
Add copyright info, license number and name
You're done! Thanks for trying my tutorial!
Labels:Sophisticat Simone | 0
comments
GOTHIC PUNK
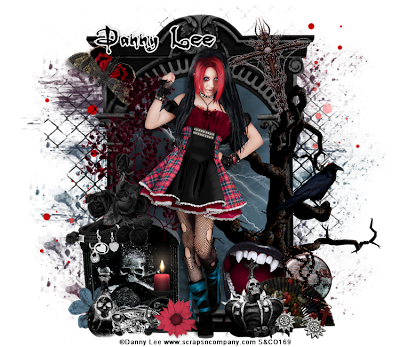
Supplies needed:
I am using the amazing art from Danny Lee for for this tutorial which you can find here
Scrapkit: I am using a stunning matching kit from Devilish Dezines called "Punk" which you can get by going here
Mask 192 from Weescotslass which you can find here
Plugins: Xero - Radiance, Lokas 3D Shadow
----------------------------
This tutorial is written for those who have working knowledge of PSPX2 (any version will do).
This tutorial was written by me on June 12, 2014. Please do not copy or paste on any other forum, website or blog provide link back to tut only. Please do not claim as your own. This tutorial is copyrighted to me. Any resemblance to any other tutorial is purely coincidental.
Ok - let's start and remember to save often.
Open up a 750 x 650 blank canvas (we can resize it later)
Select Frame Element 1 and paste in the center of the canvas
Resize by 75%
Select your magic wand tool and click in the center of the Frame (Add (Shift), RGB Value, Tolerance 25, Contiguous checked, Feather 0)
Selections, Modify, Expand by 8
Paste paper
Select invert, delete, select none
Move paper layer below frame
Select Element 44 - resize by 50%
Paste and position top of paper layer
Select Element 25 - resize by 60%
Paste and position on bottom right
Select Element 35 - resize by 50%
Paste and position on left side
Paste tube of choice where desired
Apply Xero Radiance with the default settings of choice
Apply Lokas 3D Shadow at default settings
Select Element 31 - resize by 30%
Image Free Rotate Left by 15% and paste on top right
Select Element 36 - resize by 25%
Paste and position on right side
Select Element 2 - resize by 20%
Paste and position on bottom right
Select Element 1 - resize by 30%
Image Free Rotate Right by 15% and paste on bottom right
Select Element 34 - resize by 25%
Paste and position on bottom right
Select Element 10 - resize by 30%
Paste and position on bottom right
Select Element 30 - resize by 20%
Image Free Rotate Right by 15% and paste on bottom right
Select Element 12 - resize by 30%
Paste and position on bottom left
Select Element 6 - resize by 20%
Image Free Rotate Left by 15% and paste on left side
Select Element 14 - resize by 25%
Image Free Rotate Right by 15% and paste on bottom left
Select Element 42 - resize by 30%
Paste and position on bottom left
Select Element 8 - resize by 20%
Paste and position on bottom left
Select Element 27 - resize by 22%
Paste and position on bottom left
Select Element 47 - resize by 15%
Paste and position on bottom left
Select Element 39 - resize by 15%
Paste and position on bottom left
Select Element 13 - resize by 25%
Paste and postion on top left
Select Element 4 - resize by 80%
Paste and position in the center of the canvas and move to bottom layer
Add new raster layer and flood-fill with color or gradient of choice
Apply Mask 192 and merge group and move to bottom layer
Add any additional elements you like.
Add any dropshadows you like
Sharpen any elements as needed
Crop and resize as desired
Add copyright info, license number and name
You're done! Thanks for trying my tutorial!
Labels:Scraps N Company | 0
comments
Wednesday, June 11, 2014
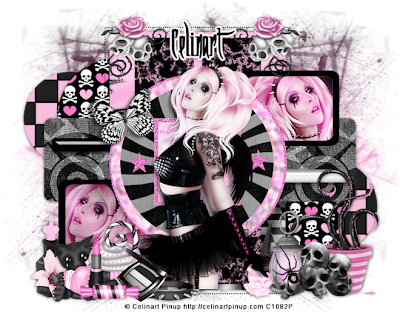
BUBBLEGUM GOTH
Supplies needed:
I am using the amazing artwork from Celinart Pinup for this tutorial which you can find here
Scrapkit: I am using a stunning matching kit from Pink Paradox Productions called "Gothic Bubblegum" which you can get by going here
Template 488 from Missy which you can find here
Mask 112 from Trese which you can find here
Plugins used: Eyecandy 4000 - HSB Noise, Eyecandy 4000 - Glass, Eyecandy 4000 - Marble, Xero - Radiance, Xero - Bad Dream, Lokas 3D Shadow
----------------------------
This tutorial is written for those who have working knowledge of PSPX2 (any version will do).
This tutorial was written by me on June 11, 2014. Please do not copy or paste on any other forum, website or blog provide link back to tut only. Please do not claim as your own. This tutorial is copyrighted to me. Any resemblance to any other tutorial is purely coincidental.
Ok - let's start and remember to save often.
Open the template and using your shortcut keys on your keyboard (SHIFT+D) duplicate the template as a new image. Close the original and delete the copywrite layer.
Adjust canvas by 750 x 600
Select Square Frame Raster 9 layer
Select all, float, defloat
Add new raster layer and flood-fill with color of choice
Select none
Adjust, Add/Remove Noise, Add Noise (Uniform checked, Noise 55%, Monochrome checked)
Delete/Hide original frame layer
Select Star Raster 11 layer
Select all, float, defloat
Add new raster layer and flood-fill with color of choice
Select none
Adjust, Add/Remove Noise, Add Noise (Uniform checked, Noise 55%, Monochrome checked)
Delete/Hide original star layer
Select Star Copy of Raster 11 and repeat above steps
Select Square Raster 10 layer
Select all, float, defloat
Paste paper 30
Select invert, delete, select none
Delete/Hide original square layer
Select Circle Raster 7 layer
Select all, float, defloat
Paste paper 13
Select invert, delete, select none
Delete/Hide original circle layer
Select Circle Raster 2 layer
Select all, float, defloat
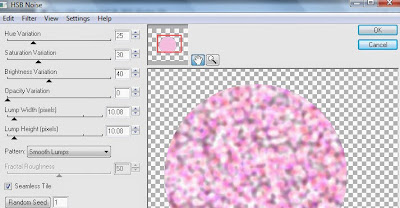
Add new raster and flood-fill with color (#fdc9ea)
Select none
Apply Eyecandy HSB Noise with the following settings:
Delete/Hide original circle layer
Select Circle Raster 3 layer
Select all, float, defloat
Add new raster layer and flood-fill with color of choice
Select none
Adjust, Add/Remove Noise, Add Noise (Uniform checked, Noise 55%, Monochrome checked)
Delete/Hide original circle layer
Select Strip Raster 8 layer
Apply Eyecandy Glass on default settings
Select Strip Copy of Raster 8 layer
Select all, float, defloat
Add new raster layer and flood-fill with color (#000000)
Select none and apply same Eyecandy Glass settings
Select Square Raster 5 layer
Select all, float, defloat
Add new raster layer and flood-fill with gradient of choice (style, Angle 45, Repeat 2)
Paste close-up tube of choice on top of gradient and delete
Change tube to Hard Light
Apply Xero Bad Dream at default settings or random setting of choice
Drop opacity down on tube to 80%
Apply dropshadow and merge close-up down on top of gradient layer
Effect, Texture Effects, Blinds (Width 2, Opactity 15, Horizontal and Light from left/top checked)
Delete/Hide original square layer
Select Square Copy of Raster 5 and repeat above steps
Select Square Raster 1 layer
Select all, float, defloat
Add new raster layer and flood-fill with color of choice
Select none
Delete/Hide original square layer
Select Square Copy of Raster 1 and repeat above steps
Select Square Raster 4 layer
Select all, float, defloat
Paste paper 1
Select invert, delete, select none
Delete/Hide original square layer
Select Square Copy of Raster 4 and repeat above steps
Select Thin Rectangle 1 layer
Apply Eyecandy Marble with the following settings:
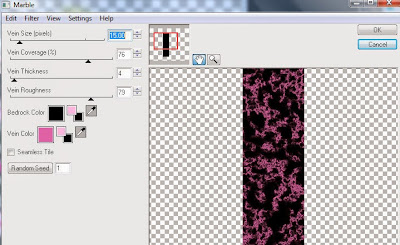
Select Thin Rectangle 2 layer and repeat same marble settings
Select Rectangle layer
Select all, float, defloat
Paste paper 17
Select invert, delete, select none
Delete/Hide original rectangle layer
Select Circle Raster 6 layer
Select all, float, defloat
Paste paper 3
Select invert, delete, select none
Delete/Hide original circle layer
Select Circle Copy of Raster 6 layer and repeat above steps
Select Circle Raster 13 layer
Select all, float, defloat
Paste paper 20
Select invert, delete, select none
Delete/Hide original circle layer
Select Circle Copy of Raster 13 layer and repeat above steps
Copy and paste tube of choice and position where desired
Apply Xero Radiance at setting of choice
Apply Lokas 3D Shadow at default settings
Select Element 4 - resize by 15%
Paste and position on top right rectangle
Image duplicate and mirror
Select Element 107 - resize by 30%
Paste and position on bottom right
Select Element 2 - resize by 22%
Paste and position on bottom right
Select Element 62 - resize by 22%
Paste and position on bottom right
Select Element 11 - resize by 15%
Paste and position on bottom right
Select Element 22 - resize by 20%
Paste and position on bottom right
Select Element 19 - resize by 20%
Paste and position on bottom left
Select Element 110 - resize by 15%
Paste and position on bottom left
Select Element 6 - resize by 15%
Paste and position on bottom left
Select Element 34 - resize by 20%
Paste and position on bottom left
Select Element 41 - resize by 15%
Paste and position on bottom left
Select Element 31 - resize by 35%
Paste and position on bottom left
Select Element 35 - resize by 20%
Paste and position on bottom left
Select Element 24 - resize by 15%
Paste and position on bottom left
Select Element 9 - resize by 20%
Image Free Rotate Left by 15% and paste on top left
Select new raster layer and flood fill with color or gradient of choice
Move layer to the bottom of the template
Apply Mask 112 or mask of choice
Merge group and move to the bottom layer
Add any additional elements you like.
Add any dropshadows you like
Crop and resize as desired
Add copyright info, license number and name
You're done! Thanks for trying my tutorial!
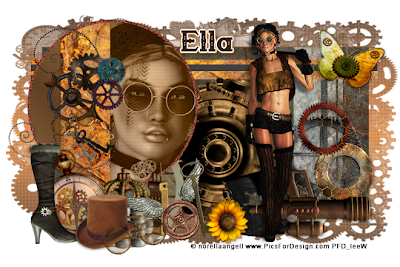
STEAMLOVER
Supplies needed:
I am using the amazing artwork from Designs by Norella for this tutorial which you can find here
Scrapkit: I am using a stunning matching kit from Dance in the Rain called "Steampunk Lover" which you can get by going here
Template 36 from Scrapity Scrap and More which you can find here
Mask 124 from Bitzy Beez Designz which you can find here
Plugins used: Xero - Radiance, Xero - Bad Dream, Lokas 3D Shadow
----------------------------
This tutorial is written for those who have working knowledge of PSPX2 (any version will do).
This tutorial was written by me on June 11, 2014. Please do not copy or paste on any other forum, website or blog provide link back to tut only. Please do not claim as your own. This tutorial is copyrighted to me. Any resemblance to any other tutorial is purely coincidental.
Ok - let's start and remember to save often.
Open the template and using your shortcut keys on your keyboard (SHIFT+D) duplicate the template as a new image. Close the original and delete the copywrite layer.
Adjust canvas by 750 x 500
Select Circle 3 Border layer
Select all, float, defloat
Add new raster layer and flood-fill with color of choice
Select none
Adjust, Add/Remove Noise, Add Noise (Uniform checked, Noise 55%, Monochrome checked)
Delete/Hide original border layer
Select Circle 3 Line layer
Select all, float, defloat
Paste paper 4
Select invert, delete, select none
Delete/Hide original Circle Line layer
Select Circle 3 layer
Select all, float, defloat
Add new raster layer and flood-fill with gradient of choice (style, Angle 45, Repeat 2)
Paste close-up tube of choice on top of gradient and delete
Change tube to Luminance (Legacy)
Apply Xero Bad Dream at default settings or random setting of choice
Drop opacity down on tube to 70%
Apply dropshadow and merge close-up down on top of gradient layer
Effect, Texture Effects, Blinds (Width 2, Opactity 15, Horizontal and Light from left/top checked)
Delete/Hide original circle layer
Select Circle 2 Border layer
Select all, float, defloat
Paste paper 5
Select invert, delete, select none
Delete/Hide original border layer
Select Circle 2 layer
Select all, float, defloat
Paste paper 7
Select invert, delete, select none
Delete/Hide original circle layer
Select Circle 1 Border layer
Select Element 71 - resize by 45%
Paste and position over the border layer
Select Line layer
Select all, float, defloat
Paste paper 4
Select invert, delete, select none
Delete/Hide original line layer
Select Stripes Rectangle layer
Select all, float, defloat
Paste paper 3
Select invert, delete, select none
Delete/Hide original stripes layer
Select Rectangle layer
Select all, float, defloat
Paste paper 2
Select invert, delete, select none
Delete/Hide original rectangle layer
Select Element 37 - resize by 55%
Image mirror and paste on right side where desired
Select Element 20 - resize by 50%
Paste and position on top left circle strip
Copy and paste tube of choice and position where desired
Apply Xero Radiance at setting of choice
Apply Lokas 3D Shadow at default settings
Select Element 30 - resize by 30%
Image Free Rotate Left by 15% and paste on bottom left
Select Element 72 - resize by 35%
Paste and position on bottom left
Select Element 75 - resize by 30%
Paste and position on bottom left
Select Element 38 - resize by 20%
Paste and position on bottom left
Select Element 31 - resize by 20%
Image Free Rotate Left by 15% and paste on bottom left
Select Element 77 - resize by 25%
Paste and position on bottom left
Select Element 39 - resize by 30%
Paste and position on bottom left
Select Element 57 - resize by 25%
Paste and position on bottom
Select Element 42 - resize by 15%
Paste and position on bottom
Select Element 73 - resize by 30%
Image Free Rotate Left by 15% and paste on bottom right
Select Element 74 - resize by 40%
Paste and position on bottom right
Select Element 18 - resize by 22%
Image Free Rotate Right by 15% and paste on top right
Select new raster layer and flood fill with color or gradient of choice
Move layer to the bottom of the template
Apply Mask 124 or mask of choice
Merge group and move to the bottom layer
Add any additional elements you like.
Add any dropshadows you like
Crop and resize as desired
Add copyright info, license number and name
You're done! Thanks for trying my tutorial!
Labels:Designs By Norella | 0
comments
Tuesday, June 10, 2014
EMO SUMMER
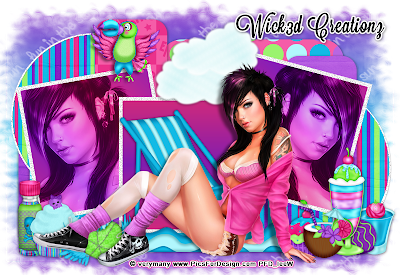
Supplies needed:
I am using the amazing artwork from Very Many for this tutorial which you can find here
Scrapkit: I am using a stunning kit from Wick3d Creationz called "Emo Summer" which you can get by going here
Template 430 from Missy which you can find here
Summer Mask 1 from Rabid Bunny which you can find on the Misfits Blog here
Plugins used: Xero - Radiance, Xero - Bad Dream, Lokas 3D Shadow
----------------------------
This tutorial is written for those who have working knowledge of PSPX2 (any version will do).
This tutorial was written by me on June 10, 2014. Please do not copy or paste on any other forum, website or blog provide link back to tut only. Please do not claim as your own. This tutorial is copyrighted to me. Any resemblance to any other tutorial is purely coincidental.
Ok - let's start and remember to save often.
Open the template and using your shortcut keys on your keyboard (SHIFT+D) duplicate the template as a new image. Close the original and delete the copywrite layer.
Adjust canvas by 800 x 550
Select Frame Back 3 layer
Select all, float, defloat
Add new raster layer and flood-fill with gradient of choice (style, Angle 45, Repeat 2)
Select None
Effect, Texture Effects, Blinds (Width 2, Opactity 15, Horizontal and Light from left/top checked)
Delete/Hide original back layer
Select Frame 2 Back layer
Select all, float, defloat
Add new raster layer and flood-fill with gradient of choice (style, Angle 45, Repeat 2)
Paste close-up tube of choice on top of gradient and delete
Change tube to Luminance (Legacy)
Apply Xero Bad Dream at default settings or random setting of choice
Drop opacity down on tube to 80%
Apply dropshadow and merge close-up down on top of gradient layer
Effect, Texture Effects, Blinds (Width 2, Opactity 15, Horizontal and Light from left/top checked)
Delete/Hide original back layer
Select Frame Back 1 layer and repeat above steps
Select Frame 1 layer
Adjust, Add/Remove Noise, Add Noise (Uniform checked, Noise 55%, Monochrome checked)
Select Frame 2 and Frame 3 - repeat above steps
Select Rounded Edge Rect 4 layer
Select all, float, defloat
Paste paper 4
Select invert, delete, select none
Delete/Hide original rect layer
Select Rounded Edge Rect 3 layer
Select all, float, defloat
Paste paper 7
Select invert, delete, select none
Delete/Hide original rectangle layer
Select Circle 1 layer
Select all, float, defloat
Paste paper 10
Select invert, delete, select none
Delete/Hide original circle layer
Select Circle 2 layer and repeat above steps
Select Square 2 layer
Select all, float, defloat
Paste paper 1
Select invert, delete, select none
Delete/Hide original square layer
Select Square 2 layer and repeat above steps
Select Rounded Edge Rect 2 layer
Select all, float, defloat
Paste paper 7
Select invert, delete, select none
Delete/Hide original rectangle layer
Select Rounded Edge Rect 1 layer
Select all, float, defloat
Paste paper 3
Select invert, delete, select none
Delete/Hide original rectangle layer
Copy and paste tube of choice and position where desired
Apply Xero Radiance at setting of choice
Apply Lokas 3D Shadow at default settings
Select Element 13 - resize by 50%
Paste and position on the bottom below tube layer
Select Element 15 - resize by 75%
Paste and position in the center below tube layer
Select Element 23 - resize by 40%
Paste and position on top left
Select Element 22 - resize by 55%
Paste and position on top below tube layer
Select Element 5 - resize by 45%
Paste and position on bottom left
Select Element 2 - resize by 40%
Paste and position on bottom left
Select Element 1 - resize by 55%
Image Free Rotate Left by 15% and paste on bottom left
Select Element 10 - resize by 35%
Paste and position on bottom right
Select Element 4 - resize by 30%
Paste and position on bottom right
Select Element 9 - resize by 40%
Paste and position on bottom right
Select Element 12 - resize by 30%
Paste and position on bottom right
Select Element 8 - resize by 30%
Paste and position on bottom right
Select new raster layer and flood fill with color or gradient of choice
Move layer to the bottom of the template
Apply Mask 1 or mask of choice
Merge group and move to the bottom layer
Add any additional elements you like.
Add any dropshadows you like
Crop and resize as desired
Add copyright info, license number and name
You're done! Thanks for trying my tutorial!
Labels:Wick3d Creationz | 0
comments
Monday, June 9, 2014
RED PEACE
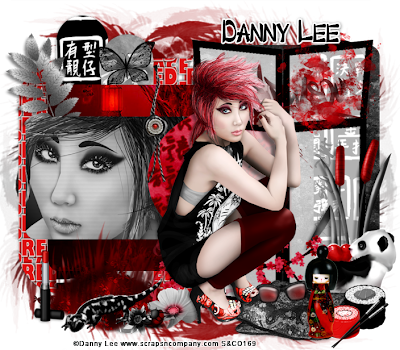
Supplies needed:
I am using the amazing artwork from Danny Lee for this tutorial which you can find here
Scrapkit: I am using a stunning matching kit from Bibi's Collections using her part of the "My Way" Collab which you can get by going here
Template 78 from Drama Bomb Designs which you can find here
I couldn't remember where I got the mask I used so I uploaded it until the maker is discovered. You can find it here.
Plugins used: Xero - Radiance, Xero - Bad Dream, Lokas 3D Shadow
----------------------------
This tutorial is written for those who have working knowledge of PSPX2 (any version will do).
This tutorial was written by me on June 9, 2014. Please do not copy or paste on any other forum, website or blog provide link back to tut only. Please do not claim as your own. This tutorial is copyrighted to me. Any resemblance to any other tutorial is purely coincidental.
Ok - let's start and remember to save often.
Open the template and using your shortcut keys on your keyboard (SHIFT+D) duplicate the template as a new image. Close the original and delete the copywrite layer.
Adjust canvas by 700 x 500
Select Shape 9 layer
Select all, float, defloat
Paste paper 6
Select invert, delete, select none
Delete/Hide original shape layer
Select Shape 8 and 2 layer and repeat above steps
Select Shape 7 layer
Select all, float, defloat
Paste paper 5
Select invert, delete, select none
Delete/Hide original shape layer
Select Rectangle 6 layer
Select all, float, defloat
Add new raster layer and flood-fill with gradient of choice (style, Angle 45, Repeat 2)
Paste close-up tube of choice on top of gradient and delete
Change tube to Luminance (Legacy)
Apply Xero Bad Dream at default settings or random setting of choice
Drop opacity down on tube to 80%
Apply dropshadow and merge close-up down on top of gradient layer
Effect, Texture Effects, Blinds (Width 2, Opactity 15, Horizontal and Light from left/top checked)
Delete/Hide original rectangle layer
Select Square 5 layer
Select all, float, defloat
Paste paper 7
Select invert, delete, select nonea
Delete/Hide original square layer
Select Rectangle 4 layer
Select all, float, defloat
Paste paper 3
Select invert, delete, select none
Delete/Hide original rectangle layer
Select Shape 3 layer
Select all, float, defloat
Paste paper 8
Select invert, delete, select none
Delete/Hide original shape layer
Select Square 1 layer
Select all, float, defloat
Paste paper 9
Select invert, delete, select none
Delete/Hide original square layer
Copy and paste tube of choice and position where desired
Apply Xero Radiance at setting of choice
Apply Lokas 3D Shadow at default settings
Select Element 22 - resize by 70%
Paste and position on right side below tube layer
Select Element 21 - resize by 40%
Paste and position on top right
Select Element 71 - resize by 55%
Paste and position on bottom right
Select Element 16 - resize by 65%
Paste and position on bottom right
Select Element 23 - resize by 48%
Paste and position on bottom right
Select Element 76 - resize by 50%
Paste and position on bottom right
Select Element 77 - resize by 30%
Paste and position on bottom right
Select Element 59 - resize by 30%
Paste and position on bottom right
Select Element 24 - resize by 50%
Paste and position on bottom left
Select Element 26 - resize by 65%
Paste and position on bottom left
Select Element 61 - resize by 40%
Paste and position on botton left
Select Element 5 - resize by 50%
Paste and position on bottom
Select Element 8 - resize by 50%
Image Free Rotate Left by 15% and paste on top left
Select new raster layer and flood fill with color or gradient of choice
Move layer to the bottom of the template
Apply Mask provided or mask of choice
Merge group and move to the bottom layer
Add any additional elements you like.
Add any dropshadows you like
Crop and resize as desired
Add copyright info, license number and name
You're done! Thanks for trying my tutorial!
Labels:Bibi's Collections,Scraps N Company | 0
comments
Subscribe to:
Comments
(Atom)

